
Relax, this is a tutorial and if you're a seasoned torrentor than this should be fairly quick to learn even without the explanation but for anybody else this should be the simplest guide for you regardless as everything has been compressed here itself rather than sending you to multiple sources.
Sideloading Guide
- DNS - Link / Altlink / Permalink
- Esign - Website (need adblocker)
- Certs - Zip File / AppleP12
- Repo - https://repository.apptesters.org (copy-paste)
Before we begin:
It’s essential that one thoroughly reads the tutorial first so they understand the concept and technical aspects itself to troubleshoot or avoid problems themselves instead of blindly following it like Linus Sebastian and face issues later.
Start DNS
About: This is simply a DNS Profile with custom block filters meant to prevent Apple Servers from verifying the status of an enterprise cert with your device UDID to approve the bundle ID of an app downloaded outside of the AppStore before installation, as apps aren't signed locally unlike a PC or Mac since iOS 13. We are reusing revoked certificates to maintain this free until their expiry period and this entire mechanism is called Bypass Revoke as we can't prevent a certificate's status itself from getting revoked that the anti-revoke DNS used to claim but if you're blacklisted (integrity cannot be verified or install failure) from DNS leaks aka the status of the revoked cert already confirmed by your device UDID then head to Final Notes on how to get whitelisted first.
Step 1:
- Make sure Safari is your default browser or being used → Link / Altlink / Permalink
- Go to Settings → General → VPN, DNS, Device Management
- Install the profile and let it work.
For those coming from Android or Windows, having to manually install 'any' profile is the default behaviour of iOS or iPadOS unlike macOS (at least the older versions before the enshittification) for custom DNS rules to work on both Cellular and WiFi networks even if one were to just install a DNS Profile ranging from AdGuard to AhaDNS Blitz. If it were anything else, Apple would just state them at the bottom while still asking for your permission first. Running a DNS is completely fine as you need TLS Certificates to decrypt a HTTPS connection, hence it'll only be filtering certain hosts or domains like an adblocker (included as well) for our sideloading purposes for free without needing to jailbreak.
iOS 18+
Due to a bug, the profile is downloaded as a file first in the downloads folder of your ‘Files’ app. See that the name ends with .mobileconfig by renaming it to "filename.mobileconfig" after which simply open that renamed file manually and revisit your Settings app after.
iOS 18 and onwards also introduces a new change going forward where the device is rebooted (restarts) every time any kind of profile (including a simple DNS) is loaded, use AirPlane mode in advance of reboot to prevent DNS leak and therefore blacklisting… more on that later.
Alternatively, you may also manually add these as blocklist: [Outdated List]
certs.apple.com
crl.apple.com
ocsp.apple.com
ocsp2.apple.com
ocsp.digicert.com
valid.apple.com
appattest.apple.com
app-site-association.cdn-apple.com
You can create a free CloudFlare Zero Trust account for domain blocklist filter rules with your own .mobileconfig file. Otherwise, Egern is a native iOS app that will allow to filter custom rules locally but this is compatible for AdGuard Home users as well.
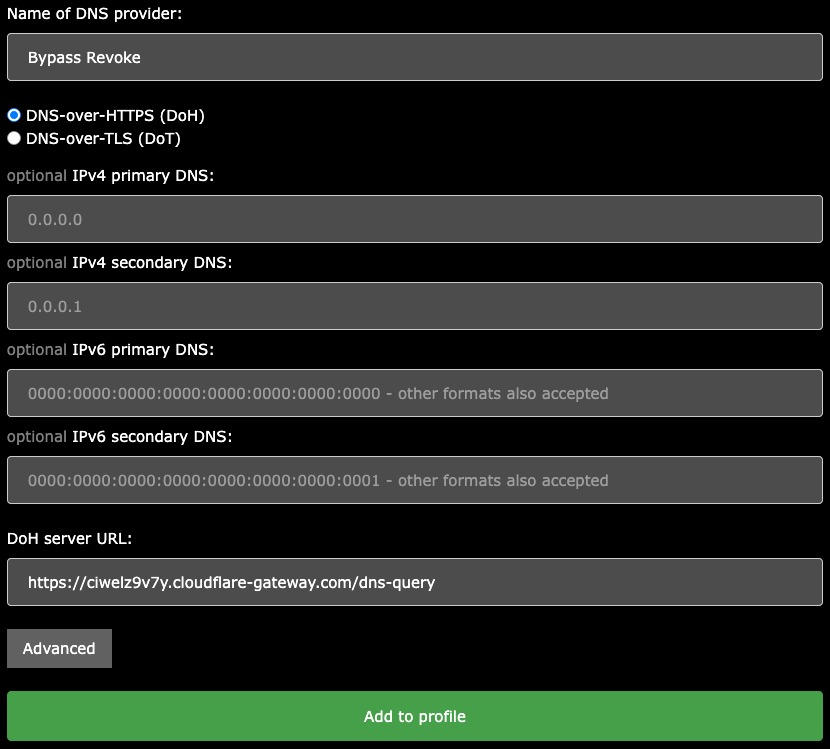
Fields other than DoH are simply left empty.
Please do not disable the DNS after successfully installing an app to renable later when needing to install again only, this is the original DNS with complete blocklist that doesn't want any shenanigans to attract DNS leaks.

ppq.apple.com
Install Esign
About: Esign is a signing app that can download, unzip, package, import, sign and install iPA files to become apps in addition to accessing public repos directly.
Step 2:
- Visit the site (need adblocker) to install Esign from bottom of the page.
- If one certificate doesn't work for you, then simply try another.
- Go to Settings → General → VPN, DNS, Device Management → Enterprise App
- Tap on the Certificate Name and there should be a Trust button.
- Now open the Esign app and under the 'Download' Tab in the bottom navigation bar, find the ellipses ••• on the top then 'Settings' to enable both 'Auto Import' & 'Auto Delete'
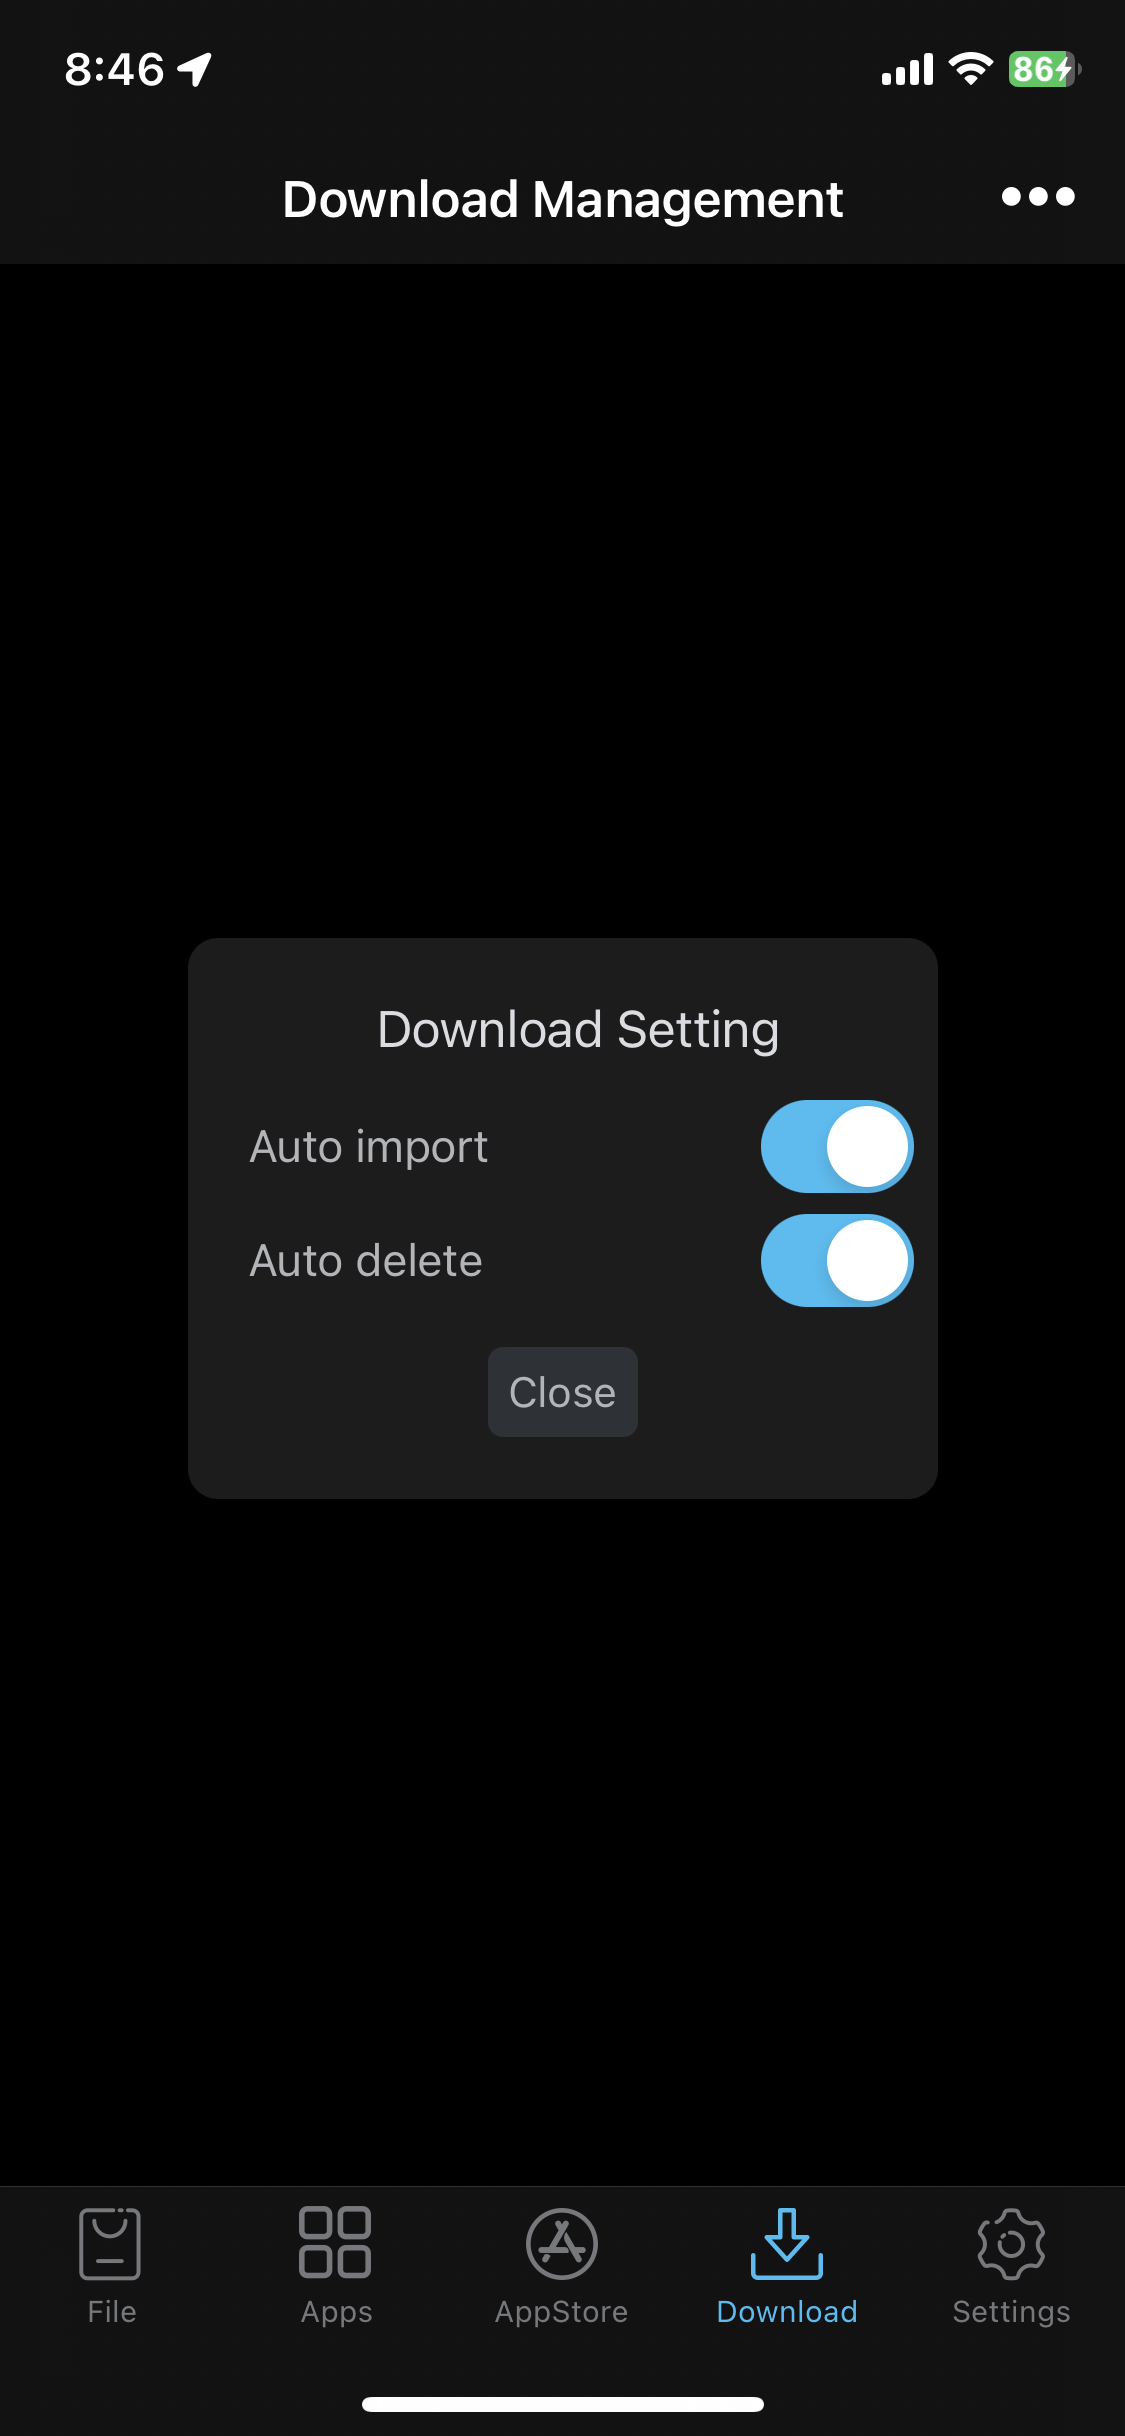
Download Settings for Esign
Esign No Logs
About: I have come across quite a chatter about Esign No Logs which is a dissected version of the original iPA file that sans all telemetry in the app itself by excluding these:
qmuiteam.com
h.trace.qq.com
ios.bugly.qq.com
ios.bugly.qcloud.com
ucc.umeng.com
ulogs.umeng.com
alogus.umeng.com
utoken.umeng.com
aspect-upush.umeng.com
ulogs.umengcloud.com
aladdinsys.com
baidu.com
api.nuosike.com
If you're installing this one through another signer then make sure 'jailbreak dependencies' are disabled before signing.
Its biggest benefit is the serverless option by heading to Esign Settings → Sign Default Config → Install Address and change to 'Local' but servers itself are no longer maintained making it further a very insulated app. So, if there's anything like a newer version or a successor than its straight fake. This is the original signer that prioritises function over form enriched with lot of quirks and utility features like an app packager itself skipping the need to rely on a mac entirely for packaging .app files to .ipa especially if you're from Windows, dylibs injection so you can mod your own decrypted iPA files along with dylibs extraction to also extract the mods from encrypted iPA files all locally, certs inspector to expand the validity if not expiry details of multiple certs at a go and certs exporter that's not behind passwords or separate mobile provision files by using Base64 code… all for free at one place as opposed to loosely made vibecoded SwiftUI alternatives which might not even dial the UX side of things to feel pretty before exploring other features like custom image or a compressor. This what made it possible in not having to rely on a computer or cloud without ever having to exit the app just for .zip files.
Import Certs
About: Cert is simply short for certificate where we'll use the expired ones instead of the active ones with ✅
Step 3:
- Open the link or copy the URL posted above to go here:
- Esign → Download → ••• → URL › Paste
- Alternate Source » AppleP12
- Esign → Download → ••• → URL › Paste
- A zip file should be in your 'File' section, there's an inbuilt decompressor so you just need to tap and the extracted folder will appear by the same name.
- There should be a list of certificates, use the one that installed Esign for you although there's no harm to pick a different one provided this isn't your first time.
- Now, go to the main 'Settings' in the app (bottom bar) for "Sign Default Config" where you'll enable "Install after signed" followed by "Remove mobileprovision after signing" and change "Install Address" to 'Local' while changing "Compress Level" to 'Size' before getting out.
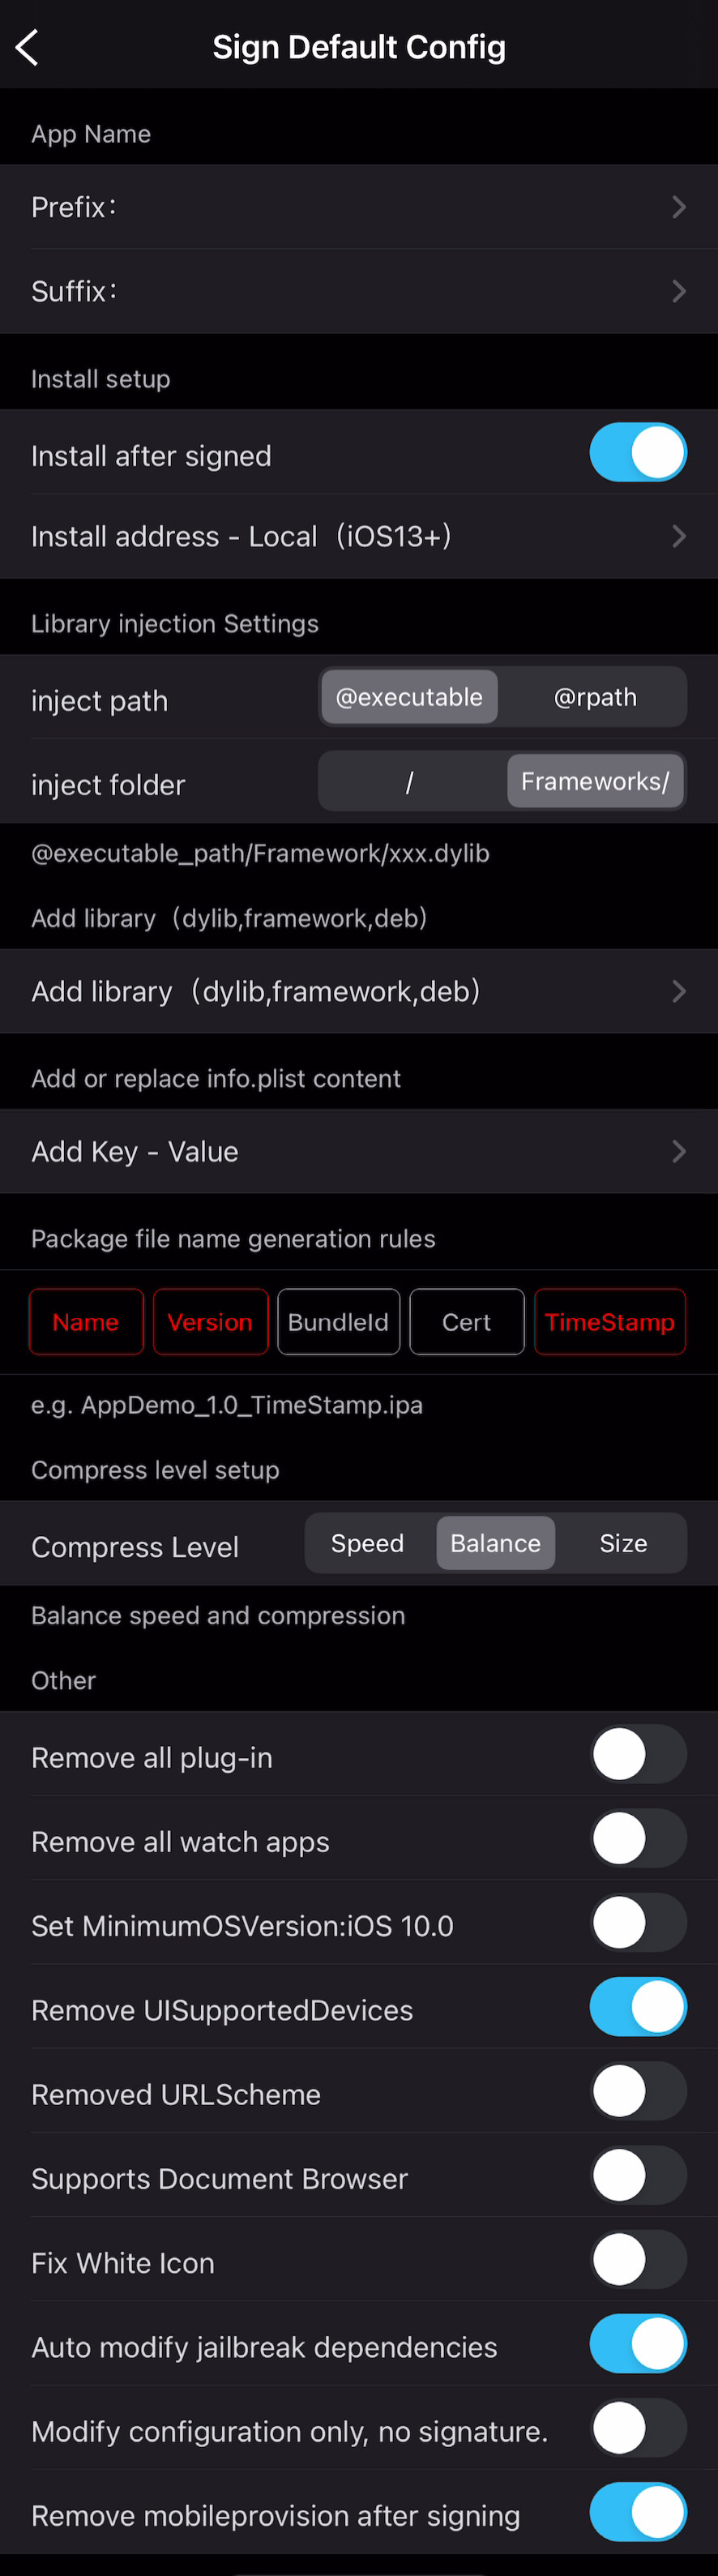
Signing Settings for Esign
Enabling Document Browser allows folder access for installed apps if one seeks to transfer backups later.
Load Repo
About: Repo stands for repository which should allow to act like an App Library of sort, they might look like links but the URLs do not open to a website as they're meant to be copy-pasted originally.
Step 4:
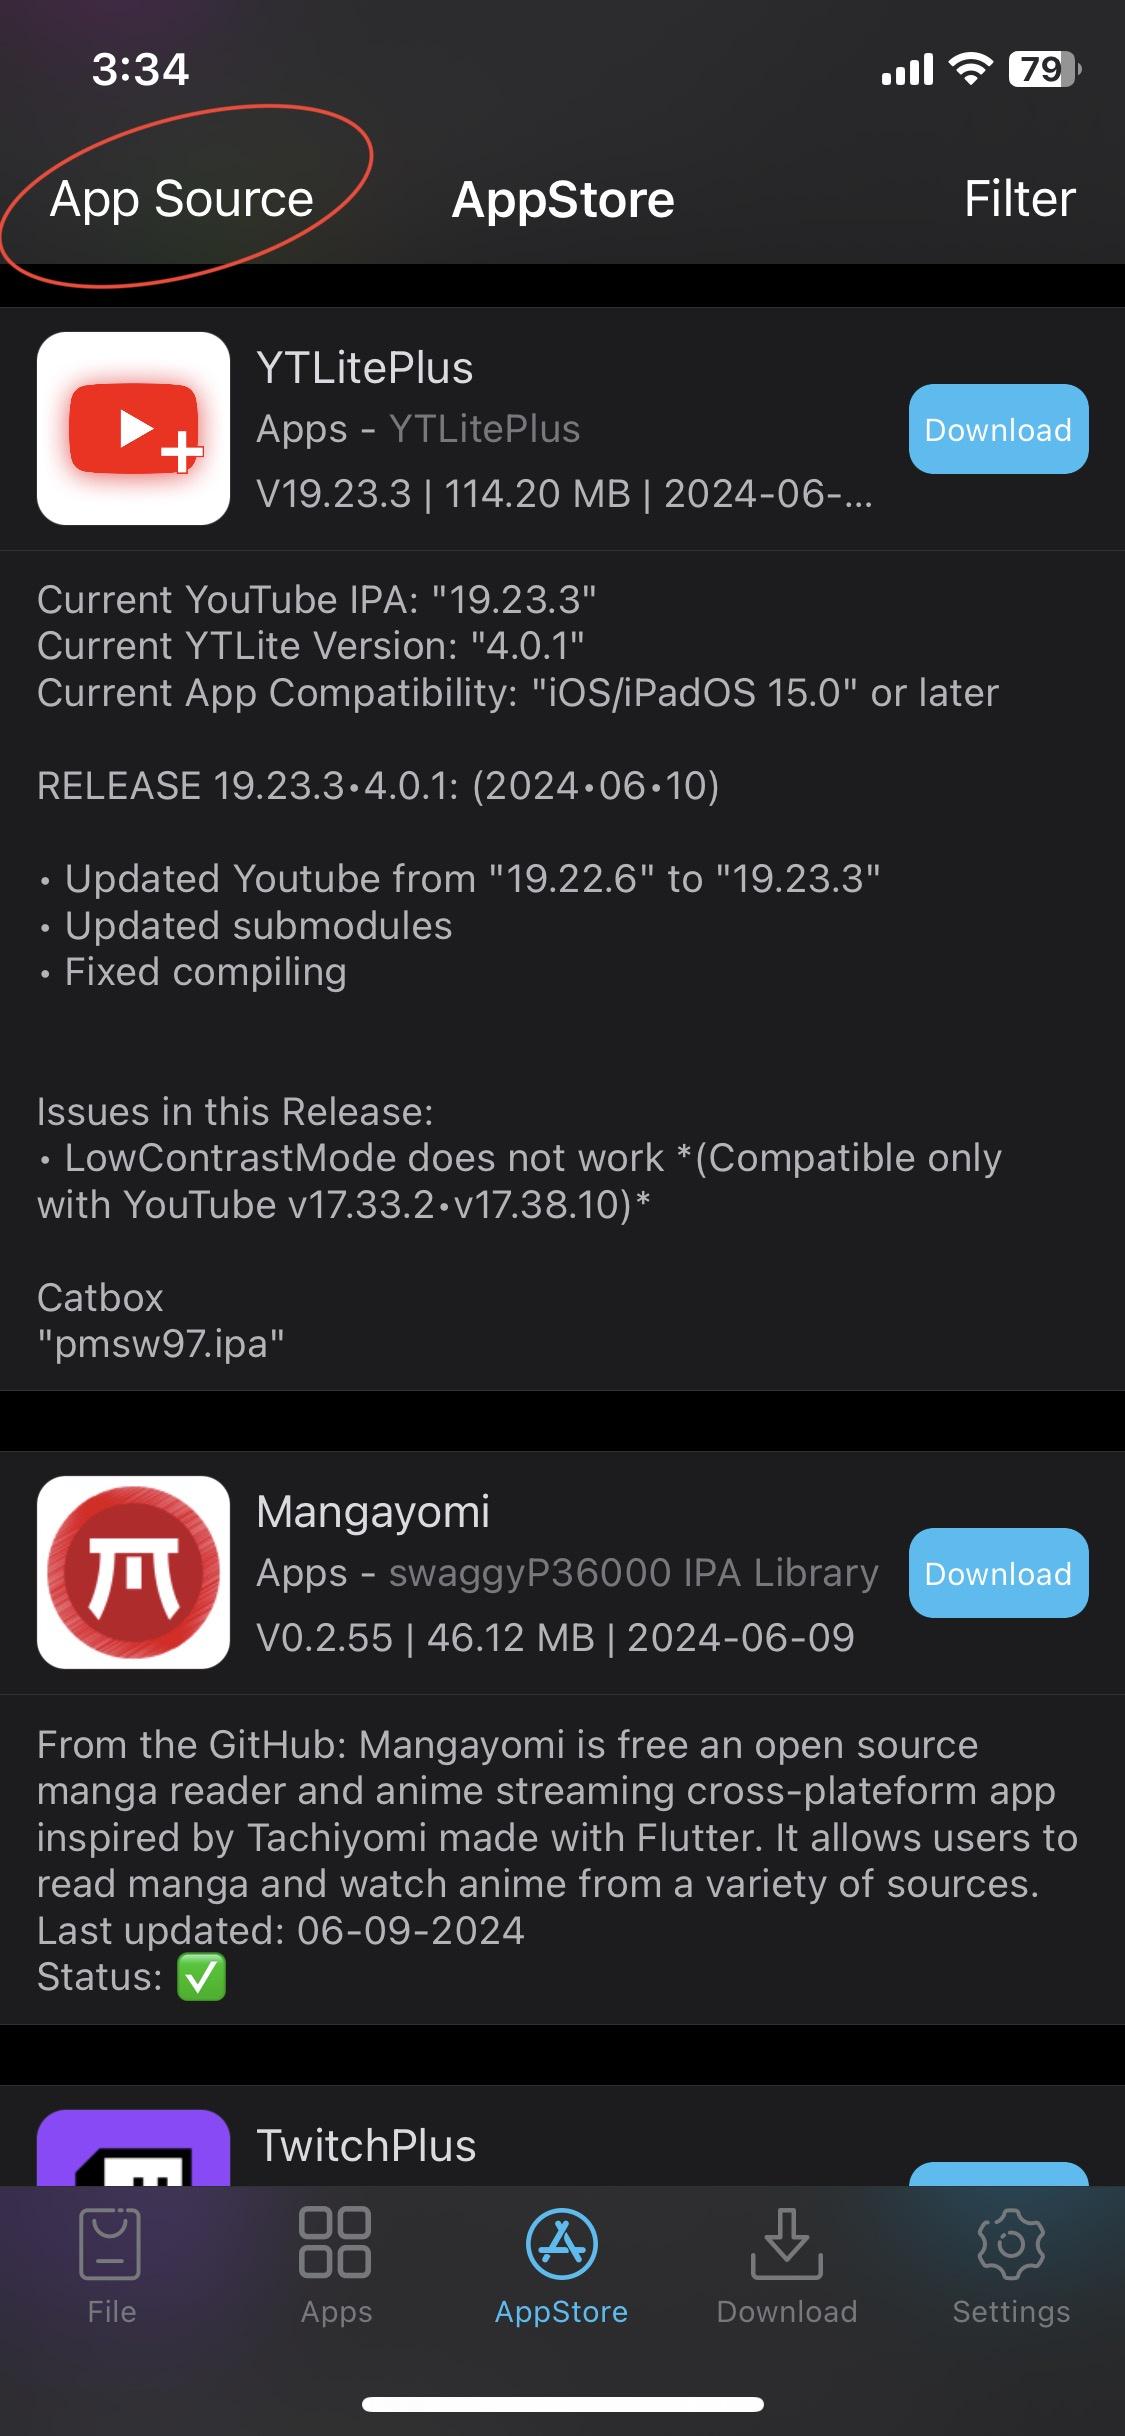
- Open this link or manually copy https://repository.apptesters.org to Esign → App Source (Top Left) → +
- Now see yourself being able to search and download natively.
Shortcut tool to find the RAW URL of any GitHub File Link for repo source.
Additional Repo Source
You don't need to add every repo on Earth unless they serve a particular niche.
iTorrent Repo (Direct)
https://xitrix.github.io/iTorrent/AltStore.json
YTLite Repo (Direct)
https://raw.githubusercontent.com/mrdrvt99/Altstore-Repository/main/ytlite.json
Installation
About: If you've been following attentively up to here then you'd notice you're yet to install an app and that's because unlike the AppStore itself the search function only downloads the app as you'd need to sign it first.
Step 5:
- You'd notice on the initiation of this final process is the 'Signature' button above the 'Install' one. This is what's more important and would be used more unless you're duplicating (more on that later) an already signed app like WhatsApp.
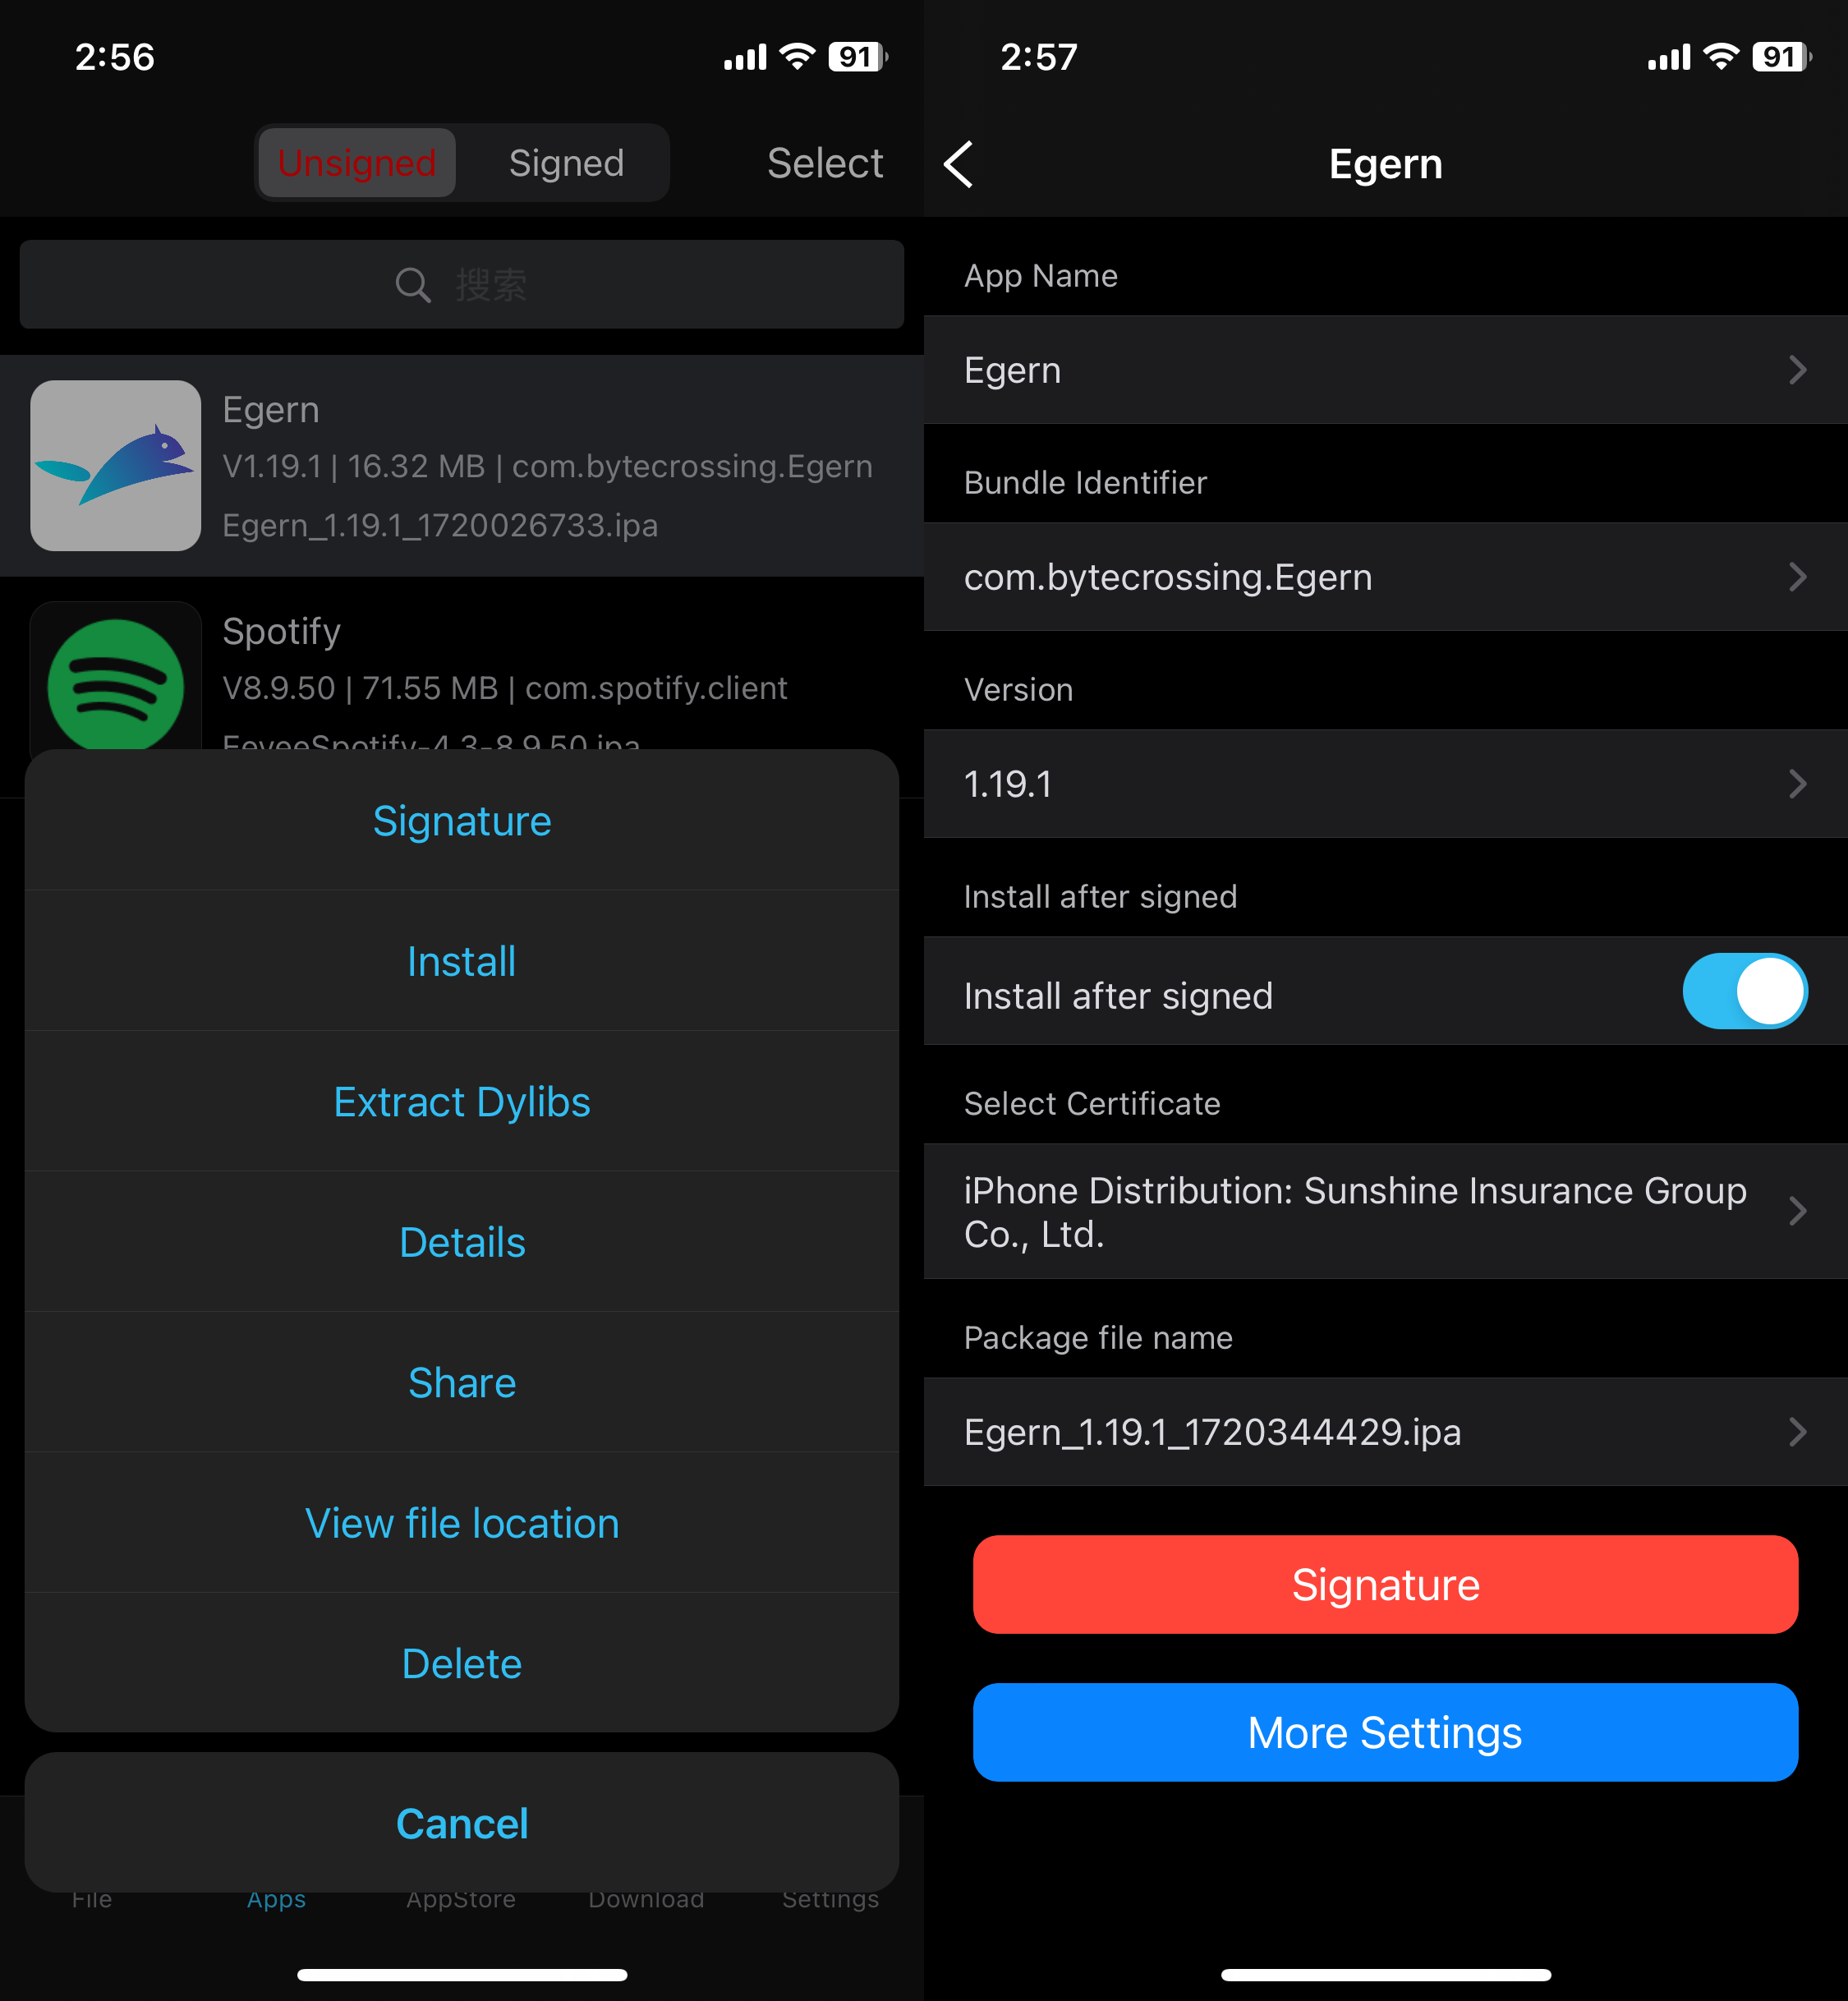
Esign also allows to change your app icon, using this Shortcut makes it easy to grab any direct from the AppStore.
How to Duplicate Apps with Esign?
About: There are instances when you'd like to have duplicate apps because you want to keep the original, have the flexibility of multiple messaging accounts or want to maintain two separate use cases. Usually, I use this Shortcut called Signed Installer but Esign can allow duplicating apps too.
Steps:
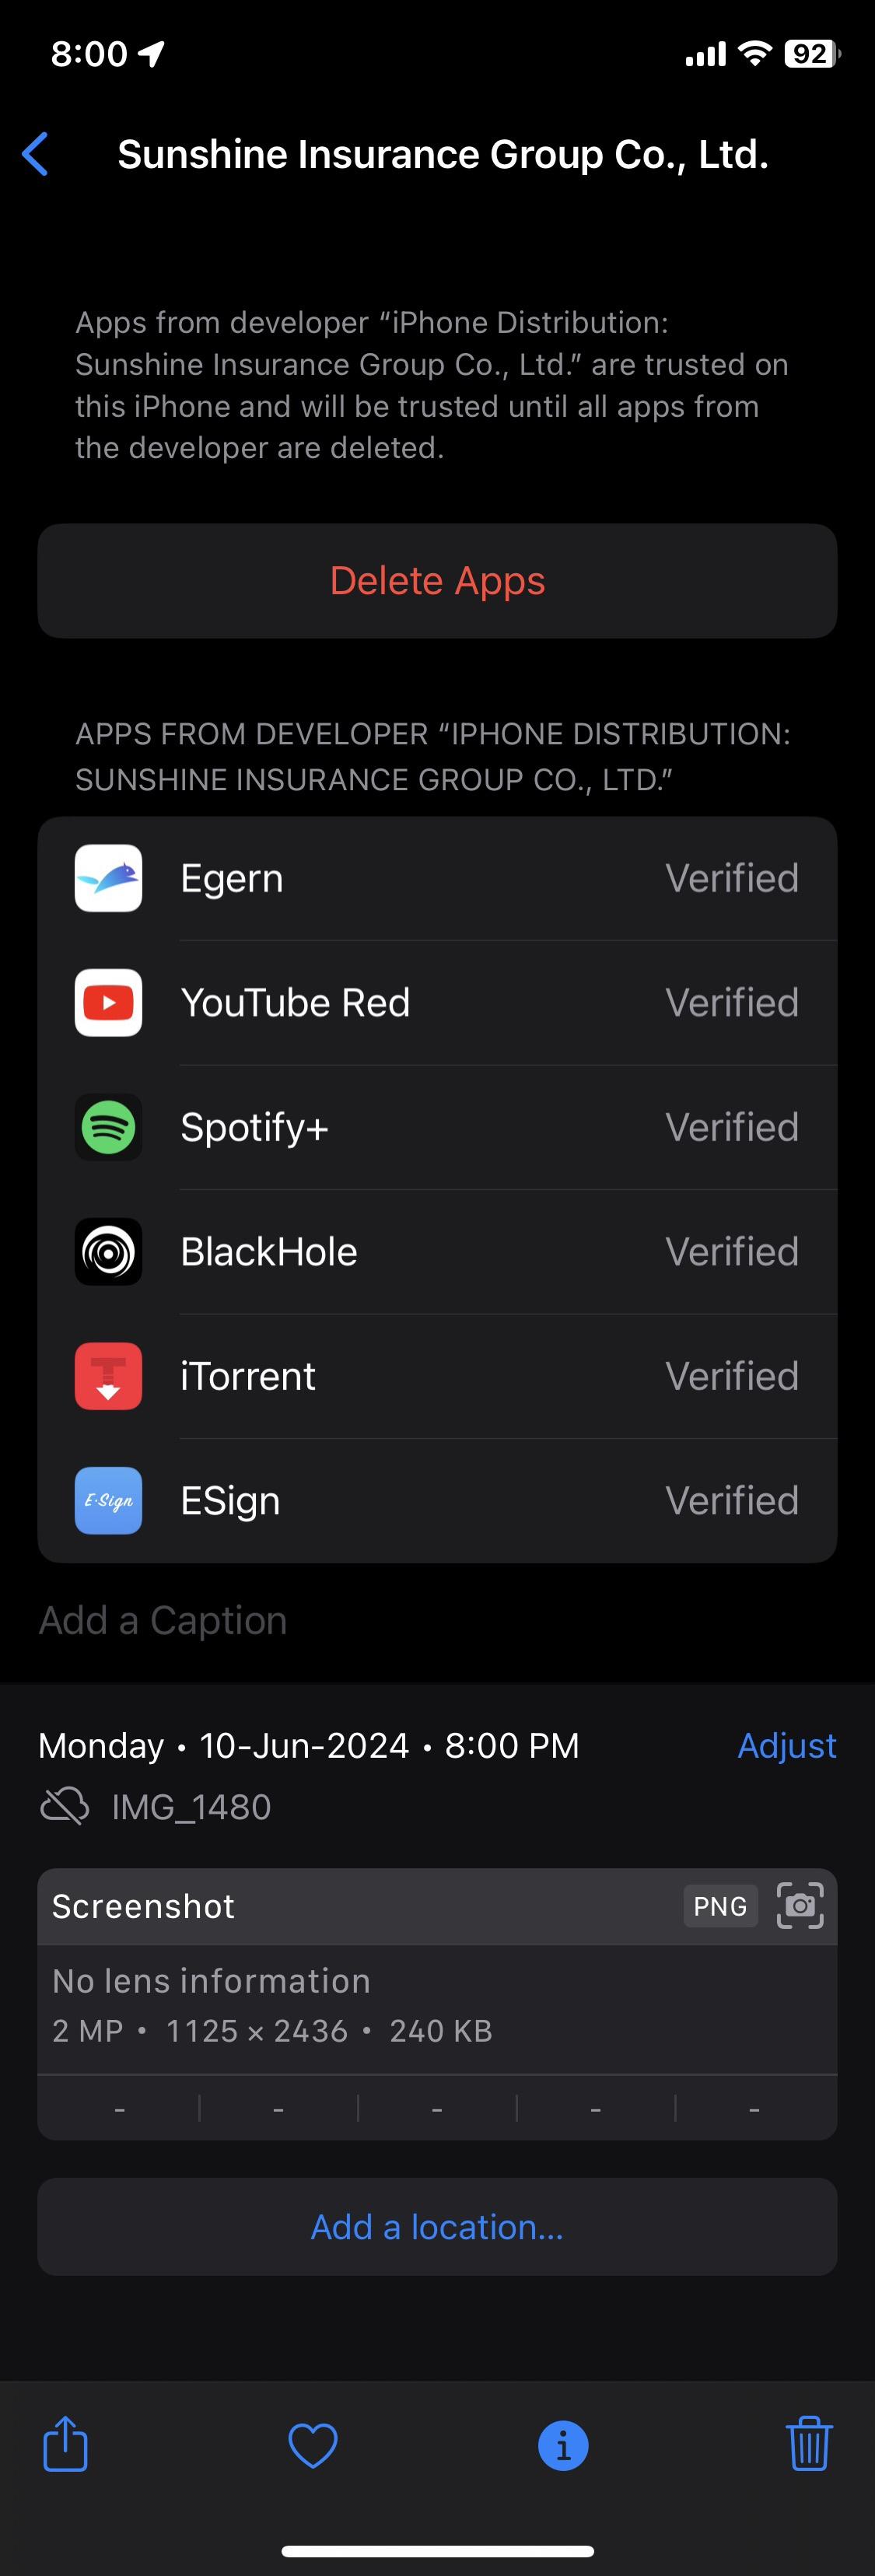
- Modify the App name to your custom name (for example: YouTube Red) or add + symbol after the original app name, just make sure to change the original name used.
- Add “ .1 “ to the bundle identifier, if example bundle identifier is “com.google.ios.youtube” then change it to “com.google.ios.youtube.1”
Final Notes
There are a couple of things that you might want to remember which is just basic common sense:
- Don't try to install any of the Esign versions without DNS (Bypass Revoke) otherwise they would be instantly blacklisted as the certs are already revoked and using the DNS later wouldn’t whitelist them.
- There can be instances when you're still failing to initiate; simply uninstall the app, cert or even DNS involved in this process and start fresh with a different certificate.
- If you’re still failing to install Esign or being greeted with integrity could not be verified popup message for all of the certs then you’re likely blacklisted in which case you would need to backup your data first and either factory reset or local restore your device. Restoring a device from a local backup would only require encrypted messenger, password manager or banking apps to relogin for security otherwise with all the data still preserved.
- Those on older iOS versions can also try BlacklistBeGone which skips restore.
- Before updating your iOS version, first undo the steps above in reverse (uninstall the apps… delete the certs) to not blacklist the particular cert working for you and it is recommended to disable Automatic System Software Updates.
- Apple’s OS has a strange caveat (which is actually a security flaw) where they don’t fully cut off internet to existing routes when new rules are set whether via DoH or VPN, which is why they temporarily resort to unencrypted connections even if you’ve two DNS profiles with symmetrical filters - this causes DNS Leaks that leads to blacklisting as the communication between Apple's server and device is reinstated again. So, use 'AirPlane Mode' like a manual kill-switch to switch between DNS or VPN (only with the same filters mentioned above) every time.
- Avoid setting the DNS to 'Automatic' which just randomly switches between the default leading to instant blacklisting.
- If you're only stuck somewhere in the middle, remind yourself with the following basic questions:
- Did you finish reading?
- Did you try with another attempt?
- Did you explore everything laid out to you?
Remember: The more you read, the less you troubleshoot.
-Avieshek
Extras
If you're still reading then you're actually done with sideloading and good to go.
How to use VPN with Bypass Revoke?
About: VPN stands for Virtual Private Network and for this we'll use CloudFlare Warp.
Setup:
Make sure you have visited the settings for CloudFlare Warp first to add a Gateway DoH Subdomain.
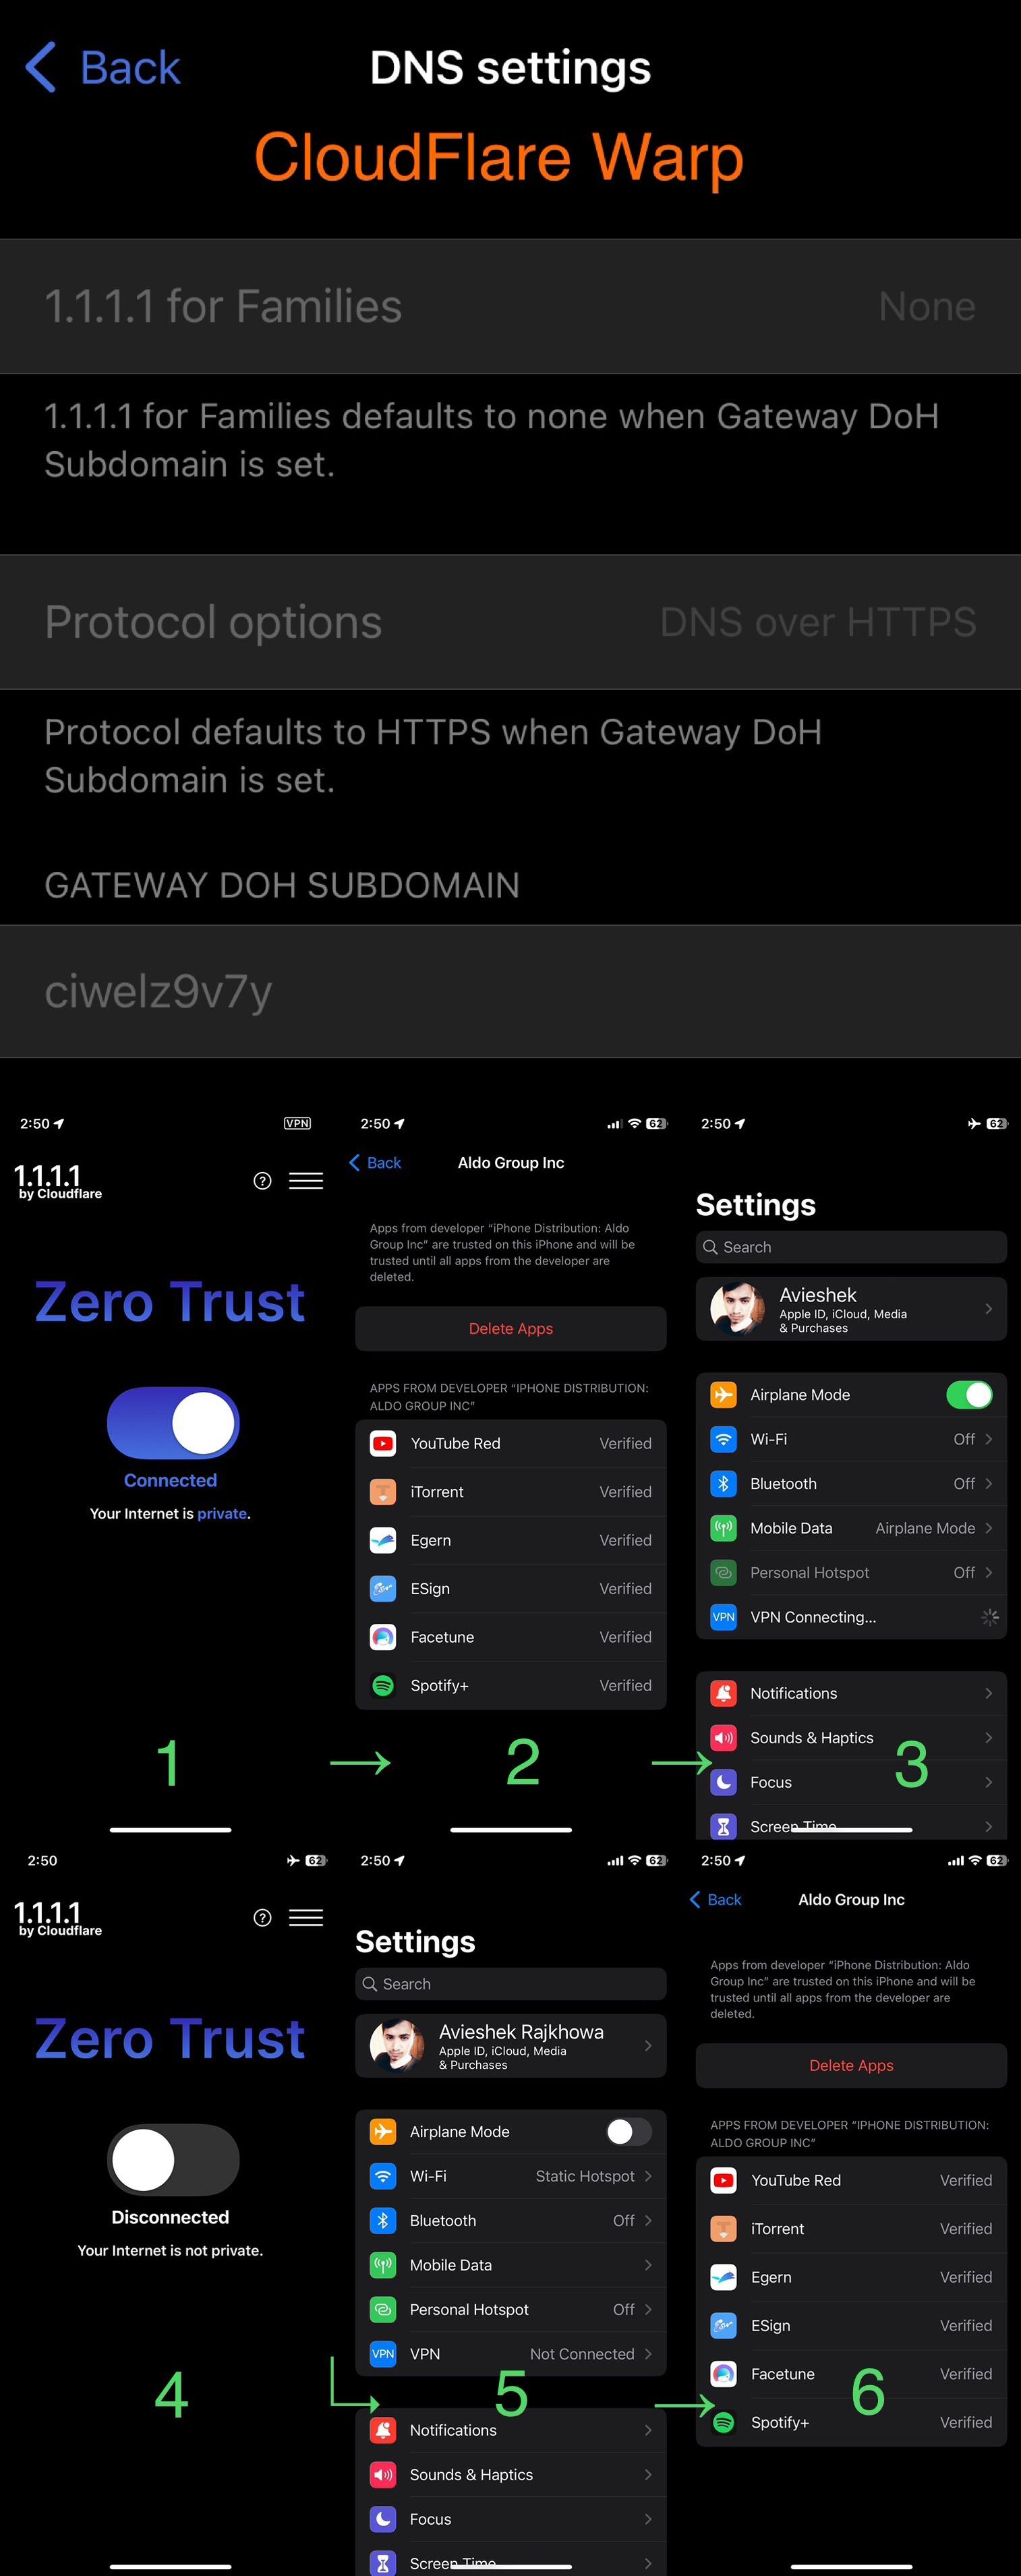
Go to Advanced → Connection Options → DNS Settings: ciwelz9v7y
- The interface should change to Zero Trust after successfully adding a subdomain.
- Continue using VPN normally without revoke.
- Before 'deactivating' VPN every time, enable Airplane Mode first.
(Enable Airplane Mode → Disable VPN → Undo Airplane Mode)- Continue using internet normally without revoke.
For other VPN services, make sure they're based on WireGuard where you can either define the Gateway Endpoint (DoH) or custom blocklist rules as Bypass Revoke under settings.
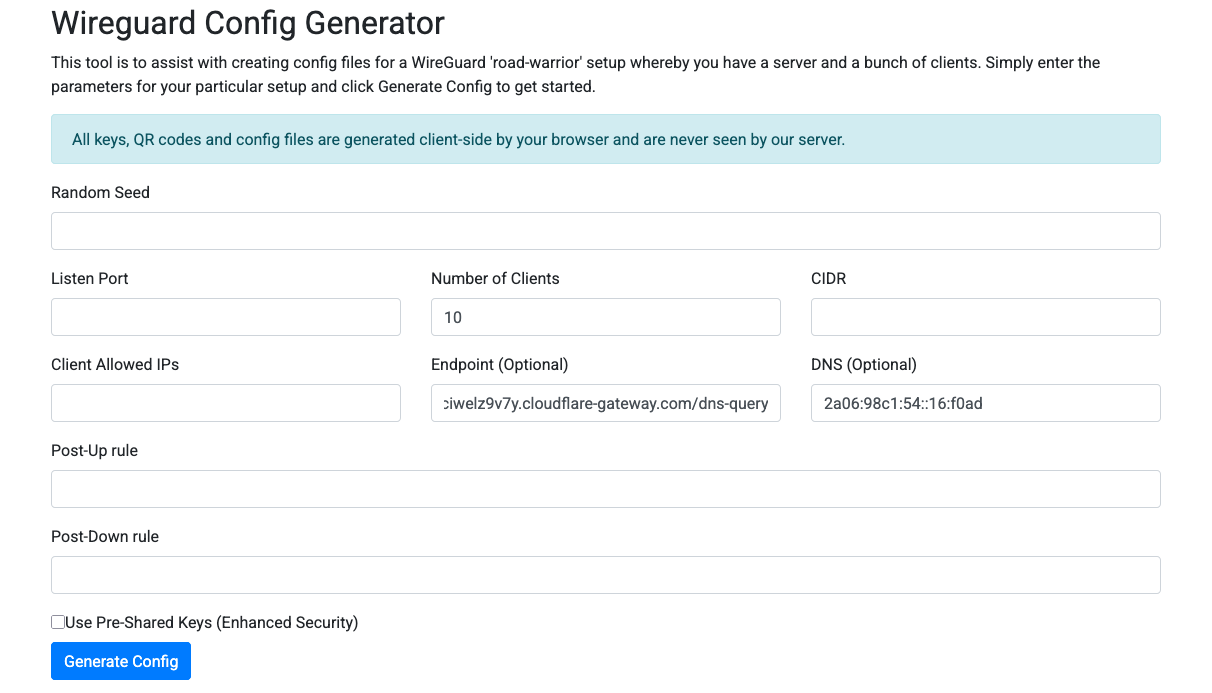
Gateway DoH Endpoint:
https://ciwelz9v7y.cloudflare-gateway.com/dns-query
There can be countries like India in addition to Russia and China with the government increasingly limiting public access to VPN applications by removing its availability from the App Store. In that case, you don't really need an app and can simply build a WireGuard Profile yourself online where you'd at least need to fill in the optional fields with your own. As shown above, you can directly enter the DoH (Gateway Endpoint) field that carries the same blocklist rules as Bypass Revoke (DNS Section) while the remaining blank fields are actually prefilled by your browser itself.
Injecting dylibs with Esign
About: Dylibs stand short for Dynamic Libraries and this is what allows to run tweaks or fixes.
Setup:
- Before injecting with anything, the first thing you'd want to do is visit:
Esign Settings → Sign Default Config → Library Injection Settings - Change 'inject folder' from / to Frameworks/
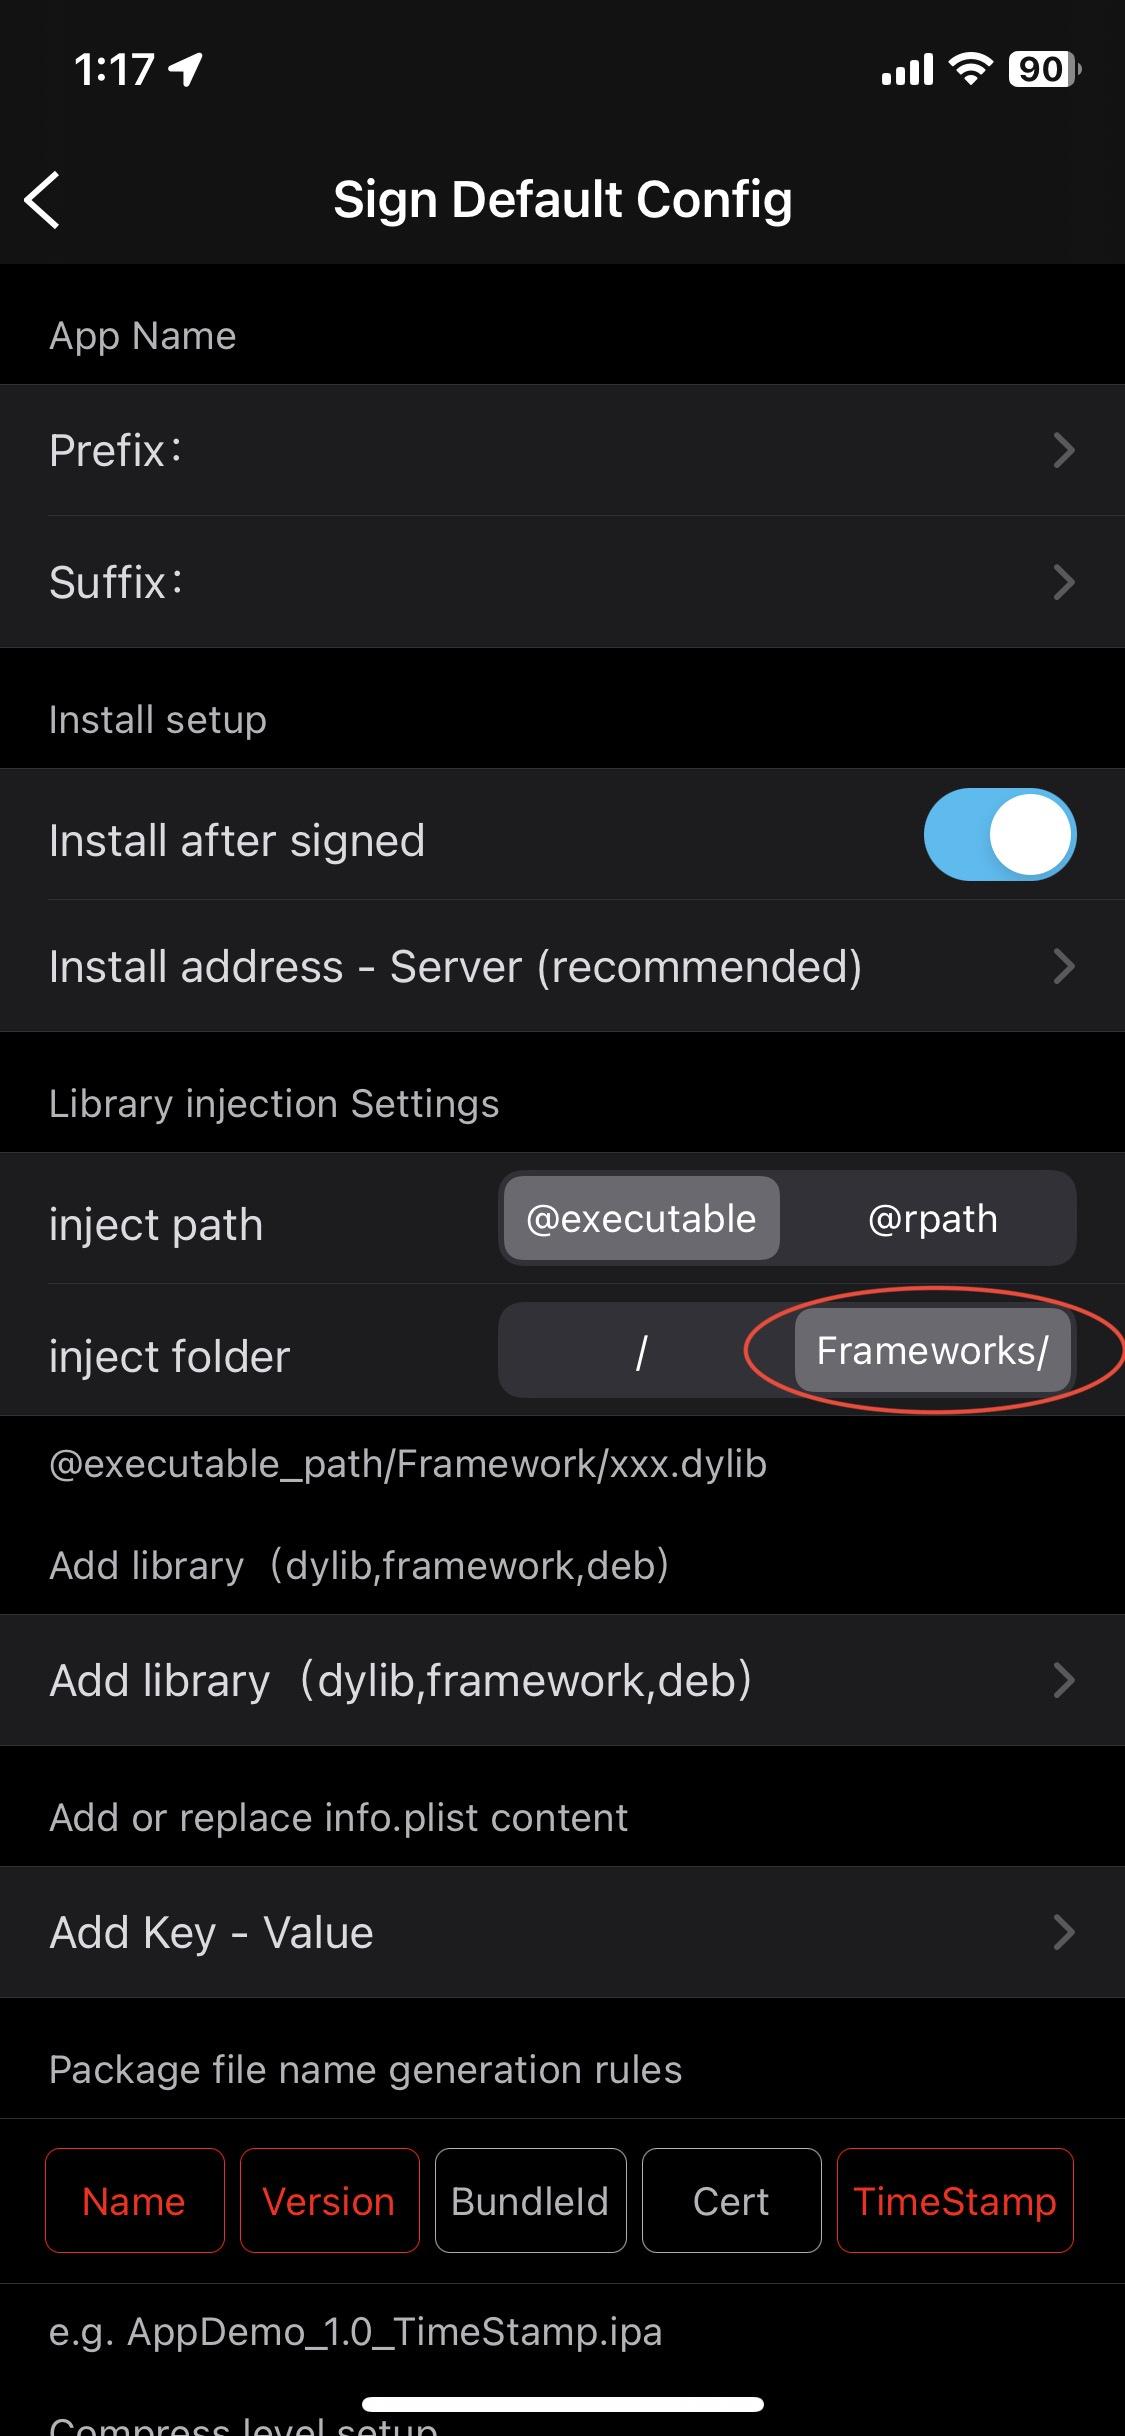
Injection Settings for Esign
Now, if you have the AppTester Repo loaded for example then you can directly search for a dylib or just filter them by category.
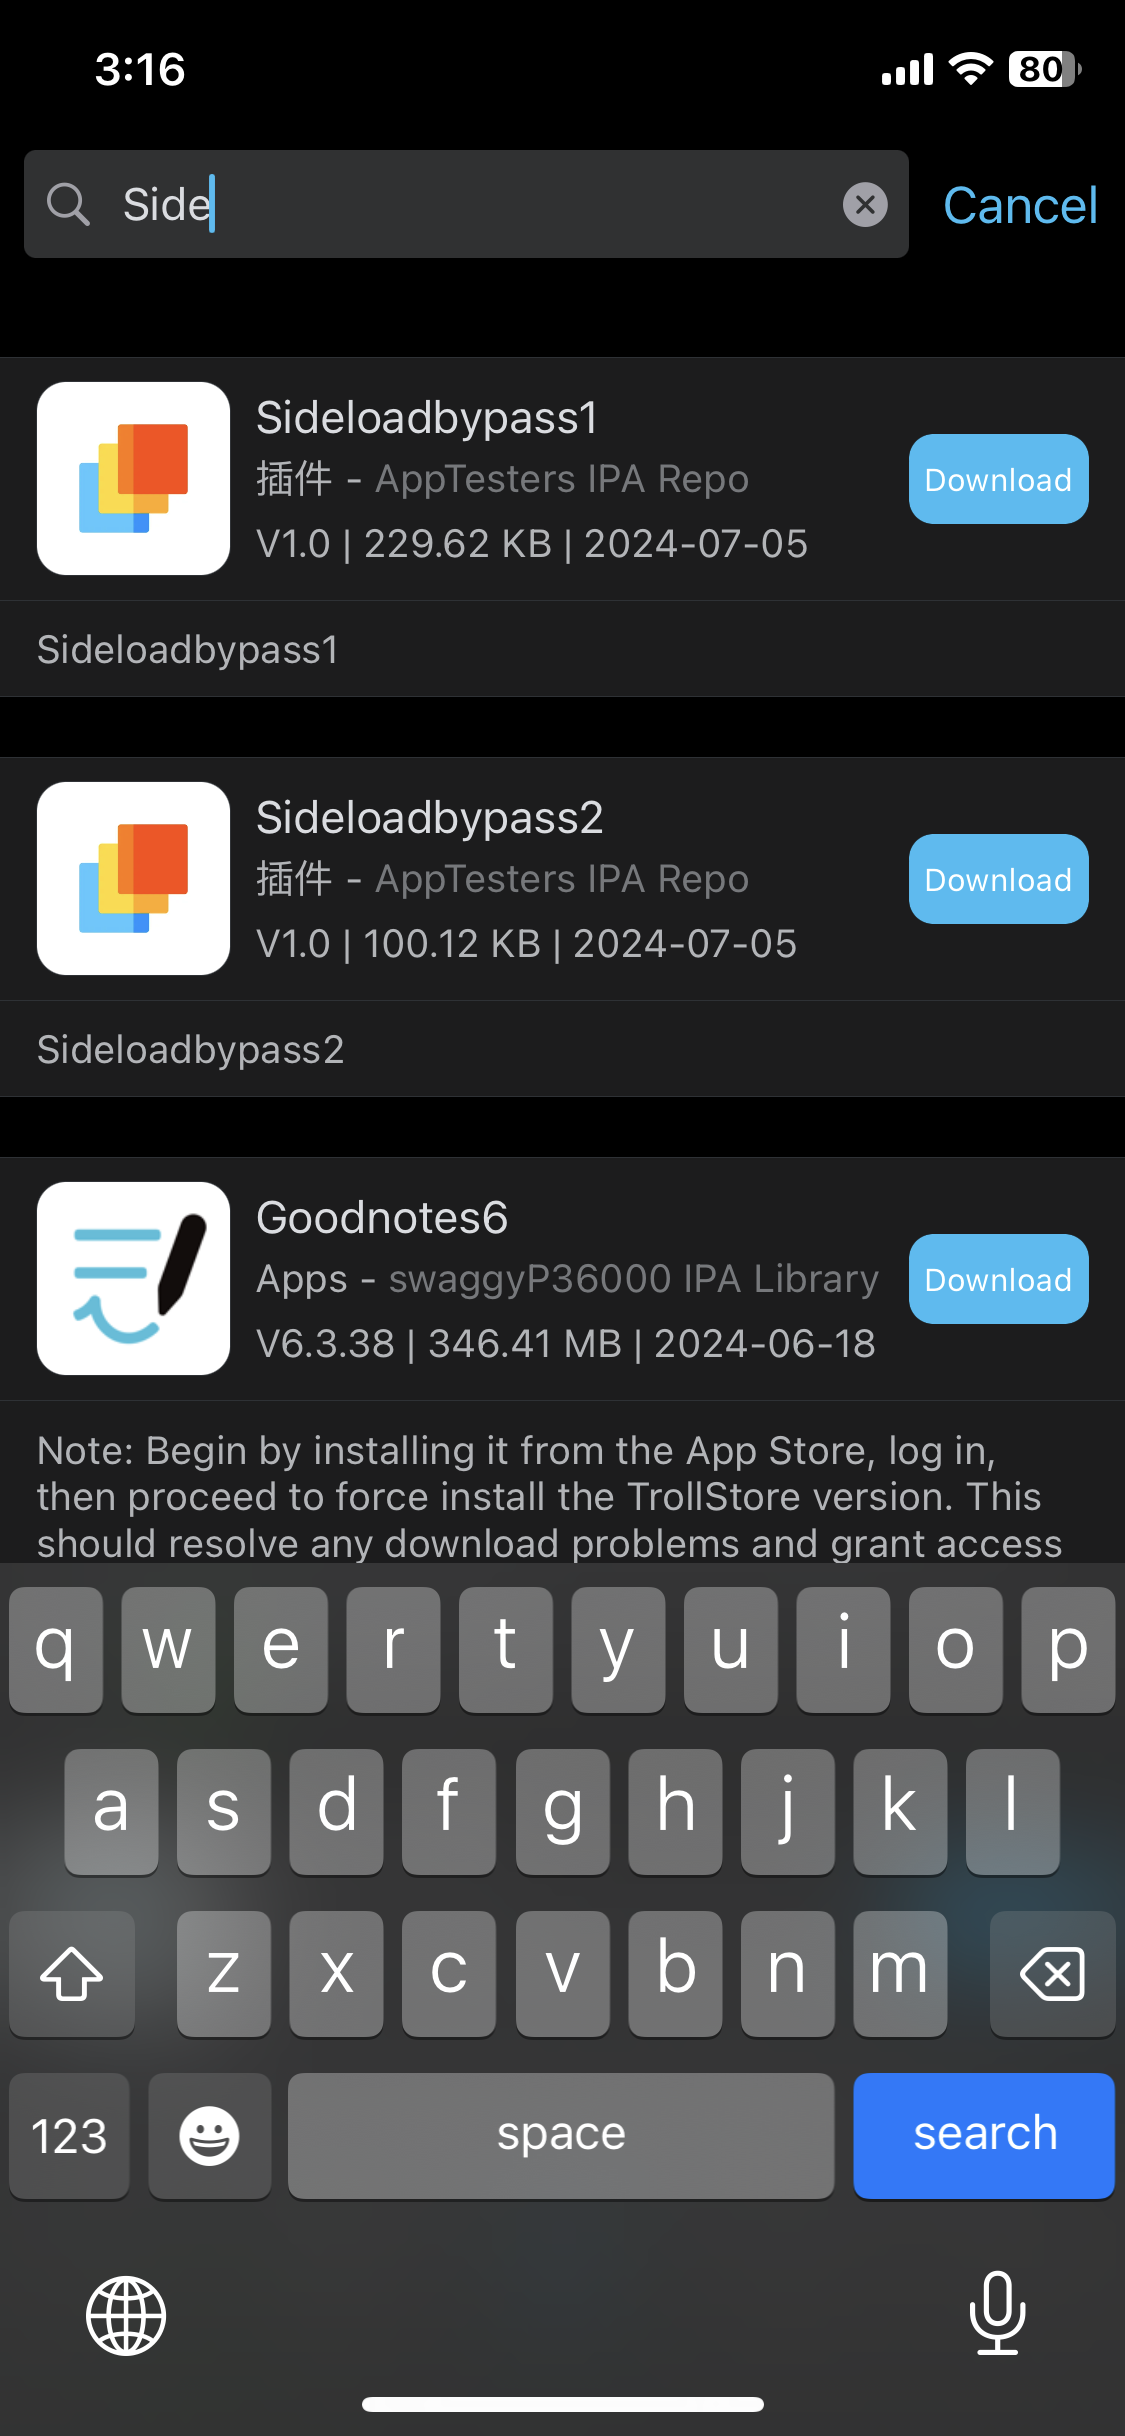
Sideloadbypass dylib
Se2cridFilePickerFix dylib for example would finally fix folder access for sideloaded apps with the files app after injection like for Emulators or Lightroom. To inject, simply head back to Step 5 or hit 'More Settings' before tapping 'Signature' above when installing a new app.
BlacklistBeGone
Another method to lift blacklisting (and graylisting) but without going through the hassle of a data restore process via python script: https://github.com/jailbreakdotparty/BlacklistBeGone
Requires a PC/Mac and if this is your first time, it’s recommend to backup just in case. Otherwise, the instructions are simple but you need to follow a couple more steps beforehand in order for them to work which is why am running a quick summary where you'll still be reading through their instructions.
Steps:
My personal rundown is based on macOS but it can be similarly followed through Windows to Linux systems as well.
- Install a python environment on your computer: https://www.python.org/downloads/
(Make sure to not skip reading after the end of installation for additional instructions.) - Follow the installation instructions for pymobiledevice3: https://github.com/doronz88/pymobiledevice3
(Simply copy the install command to Terminal) - Connect your iDevice to your Mac with the USB cable and disable WiFi Sync and Auto Sync but feel free to make a backup which can always be deleted later to free up space.
- Download and extract the ZIP file for BlacklistBeGone and ensure that the screen stays unlocked while the device is connected, then run “unblacklist.py” file in the folder manually with ‘Python Launcher.app’ instead of the default IDLE.app to go through the steps as instructed in their GitHub page.
- Restart the iDevice when done by pressing and releasing the volume up button then quickly doing the same with volume down button and then holding the side or power button until the logo appears.
- Now, on your iDevice simply skip through everything without selecting any of the options of restoring your backup by selecting "Don’t Transfer Apps and Data" (can’t take screenshot in this mode but likely the last option) then move on to login and directly land on the homescreen.
You’re done ✓
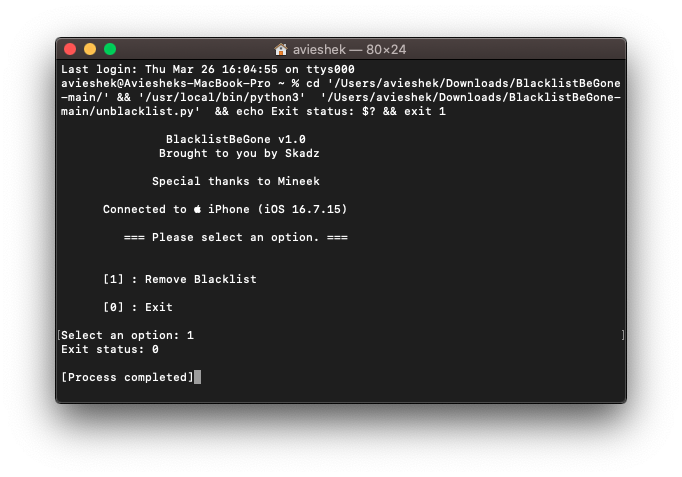
However, it mentions to not necessarily support on iOS 18+ but it does work wonderfully on iOS 16 for example even if not exclusively mentioned. So, try it out regardless because it doesn't require to remove existing apps while you're still logged in 👍🏻