Installation:
1. Mount the ParallelsDesktop-19.4.1-54985.dmg image, run the installer, enter the administrator password and wait for the installation to complete, close the application.
2. Activate a 14-day trial account
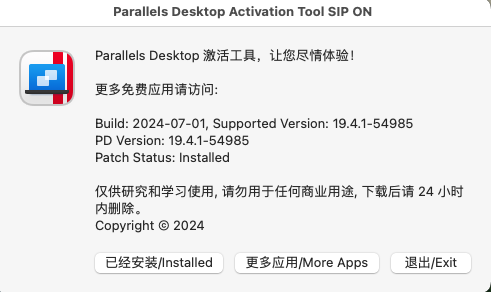
3. Double-click to launch Parallels Desktop Activation Tool SIP ON, enter the password and install.
4. Block the following addresses either in Firewall or in hosts (done immediately for insertion into hosts):
127.0.0.1 update.parallels.com
127.0.0.1 desktop.parallels.com
127.0.0.1 update.parallels.com.cdn.cloudflare.net
127.0.0.1 desktop.parallels.com.cdn.cloudflare.net
127.0.0.1 www.parallels .cn
127.0.0.1 www.parallels.com
127.0.0.1 www.parallels.de
127.0.0.1 www.parallels.es
127.0.0.1 www.parallels.fr
127.0.0.1 www.parallels.nl
127.0.0.1 www.parallels.pt
127.0.0.1 www.parallels.ru
127.0.0.1 www.parallelskorea.com
127.0.0.1 reportus.parallels.com
127.0.0.1 parallels.cn
127.0.0.1 parallels.com
127.0.0.1 parallels.de
127.0.0.1 parallels.es
127.0.0.1 parallels.fr
127.0.0.1 parallels.nl
127.0 .0.1 parallels.pt
127.0.0.1 parallels.ru
127.0.0.1 parallelskorea.com
127.0.0.1 pax-manager.myparallels.com
127.0.0.1 myparallels.com
127.0.0.1 my.parallels.com
127.0.0.1 download.parallels.com
In some cases, parallels will put comments, the # sign , on some lines in hosts, that is, it will roll back the changes made above. To prevent changes from being made to hosts after editing, run the command in the terminal:
This will block the ability to edit hosts
If you need to unblock hosts, run the command in the terminal:
You can check hosts with the command:
If the message Parallels is damaged, you should move to trash appears , you need to do the following:
1. From the terminal, execute the command:
enter the administrator password, then:
2. Go to applications folder and find Parallels Desktop app, right-click on it and open, the application will start normally and there will be no error when you open it again.
Do not update the application!
Additional Information:
Complete clearing of parallels:
Commands in terminal:
rm -rf ${HOME}/Library/Preferences/Parallels
blocking knockers in hosts:
127.0.0.1 Desktop.parallels.com
127.0.0.1 update.parallels.com.cdn.cloudflare.net
127.0.0.1 Desktop.parallels.com.cdn.cloudflare.net
127.0.0.1 www.parallels .cn
127.0.0.1 www.parallels.com
127.0.0.1 www.parallels.de
127.0.0.1 www.parallels.es
127.0.0.1 www.parallels.fr
127.0.0.1 www.parallels.nl
127.0.0.1 www.parallels.pt
127.0.0.1 www.parallels.ru
127.0.0.1 www.parallelskorea.com
127.0.0.1 reportus.parallels.com
127.0.0.1 Parallels.cn
127.0.0.1 Parallels.com
127.0.0.1 Parallels.de
127.0.0.1 Parallels.es
127.0.0.1 Parallels.fr
127.0.0.1 Parallels.nl
127 .0 .0.1 Parallels.pt
127.0.0.1 Parallels.ru
127.0.0.1 Parallelskorea.com
127.0.0.1 pax-manager.myparallels.com
127.0.0.1 myparallels.com
127.0.0.1 my.parallels.com
127.0.0.1 download.parallels.com
If you patch the Parallels tool with SIP enabled. If you had a trial account, in order to exit it, you need to comment out both:
#127.0.0.1 my.parallels.com
then exit and write again
127.0.0.1 my.parallels.com
If you need to boot an OS (for example, the Parallels Windows installer), you will have to unblock it in hosts:
127.0.0.1 desktop.parallels.com
127.0.0.1 download.parallels.com.cdn.cloudflare.net
127.0.0.1 desktop.parallels.com.cdn.cloudflare.net
by putting the # sign
If you are experiencing very slow performance, disable accessibility features (system settings --> privacy & security --> accessibility)
How to add addresses to hosts:
To do this, right-click on the Finder icon on the bottom panel (Dock) of your computer and select "Go to folder..." from the drop-down menu.
In the window that opens, enter the path to the hosts file on computers with the OS X operating system and click the "Go" button. The path looks like this.
/private/etc/hosts
This will open a Finder window in the folder where the file you are looking for is located. It will already be selected. Just right-click on it and open it with your favorite text editor (the standard TextEdit will do).
The file itself is protected from editing. However, when you try to make changes, you will be prompted to create
a copy of it - do so. Make the necessary changes to the copy of the file and save it, for example, on the desktop as a file called hosts. After that, delete the permission.txt from the saved file.
Next, you just need to replace the old hosts file with the newly created one by simply dragging it from the desktop to the folder where the original file is located. In the pop-up window, confirm the action by clicking the "Replace" button.
That's all. But sometimes, in order for the changes to take effect immediately, you may need to refresh the DNS cache. To do this, run the following command in the terminal (you will need to enter the administrator password)
dscacheutil -flushcache; sudo killall -HUP mDNSResponder
After this, the rules specified in the new hosts file will definitely work as they should.
