Prefix:
First of all, I would just like to thank the many people who have contributed their extraction knowledge throughout the internet, whether it be the great folks at r/cannabis extracts, FC, ICMag, or anywhere else. Special thanks to u/schnerp for his awesome guide and GreyWolf for his extraordinary knowledge (you’ve taught us all a lot man!). Before delving in, I just want to express how fun and rewarding making your own cannabis extracts can be! It’s a very exciting process and many would like to just dive right in and start blasting, BUT THIS IS DANGEROUS STUFF!! Please do your research before you hurt yourself or others! This guide DOES NOT have every single bit of info you need to blast safely and effectively! I am not an expert at this stuff nor am I a scientist. This guide is based off the knowledge already posted online and my own experiences. If you start blasting before you have all the knowledge you need to do the job, you will just end up with bad product, or worse, hurt yourself or others! I DO NOT CONSENT TO OPEN BLASTING, AS BUTANE POOLS VERY EASILY AND ONLY NEEDS 1.8 TO 8.4% TO CAUSE AN EXPLOSION! PLEASE BLAST OUTSIDE ONLY! PLEASE BLAST FAR AWAY FROM ANY ELECTRICAL OUTLETS OR ANYTHING THAT COULD POSSIBLY CAUSE A SPARK! It is important to WEAR COTTON ONLY when you are blasting, as acrylics build up static and can cause a spark. Now that we’ve gotten that out of the way, let’s have some fun!! Whooop!
The quality I got on my first BHO attempt. 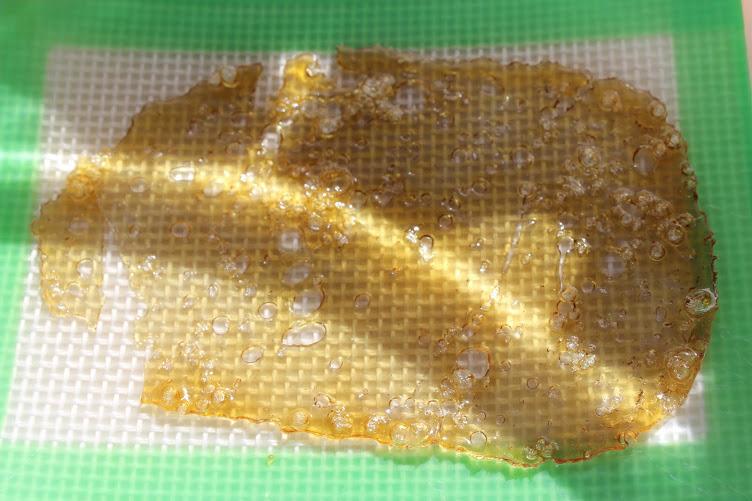
Materials & Tools:
- FIRE EXTINGUISHER
- FIRE BLANKET (wrap yourself in if you start on fire - not a good start)
- Safety glasses
- H/D thick gloves (to hold the freezing tube)
- Light duty latex gloves
- Surgery masks or respirator
- Vacuum pump (1 stage is fine - here’s why)
- Vacuum chamber (size depends on how big your runs are)
- Griddle (presto griddles seem to hold 100F fairly well)
- Infrared temperature gun
- Extraction tube (glass or stainless only please)
- Stainless Steel mesh screens (I use a 50 micron with a 25m on top of that - you can use coffee filters too)
- Hose clamps
- Butane - approx. one 300ml can per oz of bud (you want something with low residual contaminants / mystery oil - check out your options here)
- Pyrex pie plate
- Pot or bucket that fits pie plate perfectly (I’m using a garbage can)
- Putty knife or scraper
- Razor blades
- Cheesecloth
- Slick Pad or Slick Sheet (DO NOT BLAST INTO PARCHMENT, SLICK PADS, OR OTHER SILICONE SHEETING - slick sheets are okay to blast directly onto)
- parchment paper
Method:
- Before doing anything, make sure you clean all of your equipment with ISO or 190 everclear and give it time to dry off. YOU SHOULD BE WEARING LATEX GLOVES DURING ALL OF THIS.
- Take nugs and break up into popcorn size. Trim should be left mostly whole. NEVER GRIND YOUR MATERIAL - this introduces extra chlorophyll, fats, waxes, and other baddies that we don’t want in our oil. I remove big stems and leave the smaller ones intact.
- Take your extraction tube and push a piece of mesh screen or coffee filter to the top of the tube. This will help prevent any blowback and, in theory, more evenly distribute the butane through the tube.
- Fill the tube with popcorn bud or trim a bit at a time and compact it with a wooden dowel about the size of your tube. Shoot for tight even packing throughout the tube. The tighter and more evenly packed, the better the butane can be dispersed throughout the tube meaning more yield. Fill the tube until the bud is flush with the end of the tube. It is okay to leave extra space at the end of your tube if you don’t have enough bud, but this may reduce yields.
- Cover the end of the tube with your stainless mesh screen or coffee filters, pull them taught, and hose clamp it to the tube. DO NOT TIGHTEN TOO TIGHT OR YOU MAY CRACK YOUR TUBE!
- Put your tube in the freezer for about 12 hours or longer. This should help tie up more of the chlorophyll and fats that we don’t want, and let our butane stay liquid a little longer.
- While you wait for that to freeze, setup and test your vacuum pump, chamber, and griddle to make sure that it holds full vac and that the bottom of the chamber is between 90-110F. You will also want to make sure you line the chamber with parchment in case of spill over. I am not going to go through vac pump operation in depth, but I do want to say that you should have a ball valve between your pump and your chamber in order to stop any pump oil from ruining your errl. REMEMBER, START YOUR PUMP WITH THE BALL VALVE (B/V) CLOSED, LET IT RUN FOR 3 SECONDS, THEN OPEN THE B/V TO START VAC. TO STOP VAC, CLOSE THE B/V FIRST THEN TURN OFF THE PUMP.
- Now that your tube is frozen and your vac all setup, get the rest of your stuff set up OUTSIDE AND FAR FROM YOUR HOUSE AND ANY ELECTRICAL OUTLETS / SOURCES and put on all of your safety gear (glasses, gloves, mask, etc). Set up your bucket with 105-110F water and place your pyrex pie plate on it so that the water is touching the bottom of the pyrex. If it’s cold outside, you may want to have some boiling water on hand to add to your bucket halfway through the purge to bring the temp back up to 105-110F range.
- Take your packed, frozen, and screened tube and place the screen end directly over your pyrex. Insert the butane tip (you may want to use one of the included tips to make a better seal) and push it down until the butane flow begins. Run the desired amount (approx. 1 can per oz) until the butane runs clear. Sometimes, the butane will run almost clear from the beginning, so just run one can per ounce if that’s the case. Using more butane probably won’t hurt, but it will increase purge times.
- Once you have stopped the butane flow and you don’t see much more coming from the filter, immediately cover the pyrex with cheesecloth or stainless mesh screen to keep out impurities. BE SURE TO BE CAREFUL NOT TO DIP THE CHEESECLOTH IN THE BUTANE SOLUTION OR YOU WILL LOSE YIELD!
- Monitor the solution outside as the butane evaporates. Check the temperature of your water to make sure you’re in the range. Once most of the bubbling has stopped and the butane is mostly gone, it is ready to be brought inside. MAKE SURE MOST OF THE BUTANE HAS EVAPORATED OFF BEFORE BRINGING INSIDE!
- Take your putty knife and razor blades and scrape the pan. Take the collected wax and place it on a slickpad (or parchment but a slickpad is easier imo). Flatten the wax out to about 1/16” thick on your slickpad or parchment. You can place the pyrex on the griddle to assist the scraping process.
- Once you are done scraping the pyrex, place your wax in the vac and start up the pump. Open the ball valve slowly to increase the vac slowly. WATCH THE MUFFIN AS IT PUFFS UP, AS IT IS POSSIBLE THAT IT WILL GET TOO BIG AND HIT THE TOP OF YOUR CHAMBER! MESSY!! If it is getting dangerously close, close the ball valve to stop vac, release vac, and try it again.
- Once you know it won’t over-muffin, vac it again to full vac and leave it there, with the heat still at a steady 90-110F, until the bubbles settle down and you have a clear and uniform slab. This takes time (up to 24 hours), so just let it go low and slow and keep an eye on it. REMEMBER TO GIVE YOUR VAC PUMP A 10 MIN BREAK EVERY HOUR OR SO. If your chamber holds vac with the pump off, then you only need to turn it on every hour or so to make sure it’s still holding full vac and to pull out any vapors in the chamber.
- Now flip the slab over (you can use 2 pieces of parchment to assist you with this), and put it back in the vac until both sides are now clear and the bubbling has stopped. This could potentially take another 24 hours but likely much less.
- Now that you have a nice uniform clear slab, flip it again, pull full vac for a half hour, and see if there are any changes. Flip it one more time (the 3rd flip) and run it for another half hour. Continue to flip it every 30 mins or so until you no longer see ANY reaction when the shatter is under full vac. When you have flipped it to both sides and see no reaction, it is done and ready to go.
- Fold it in parchment and then into an envelope or put it in a silicone container (slickball) for storage.
- ENJOY THE FRUITS OF YOUR LABOR!!!