
Creating your own glass pipe is not only a fun and rewarding project, but it's also a way to express your personal style and creativity. Whether you’re a seasoned craftsman or just starting out with glassblowing, this step-by-step guide will walk you through the process of making a basic glass smoking pipe. While you’ll need some patience, safety precautions, and practice, it’s all worth it to create a unique, handcrafted piece.
Key Takeaways
- Customization: Craft your pipe to your personal taste by choosing your designs and colors.
- Essential Tools: You’ll need basic glassblowing equipment such as a torch, kiln, and proper safety gear.
- Patience is Key: Glassblowing is an art that requires time and practice, but the result is a one-of-a-kind creation.
- Safety First: Always prioritize safety by working in a well-ventilated space and wearing the necessary protective gear.
Understanding Your Pipe
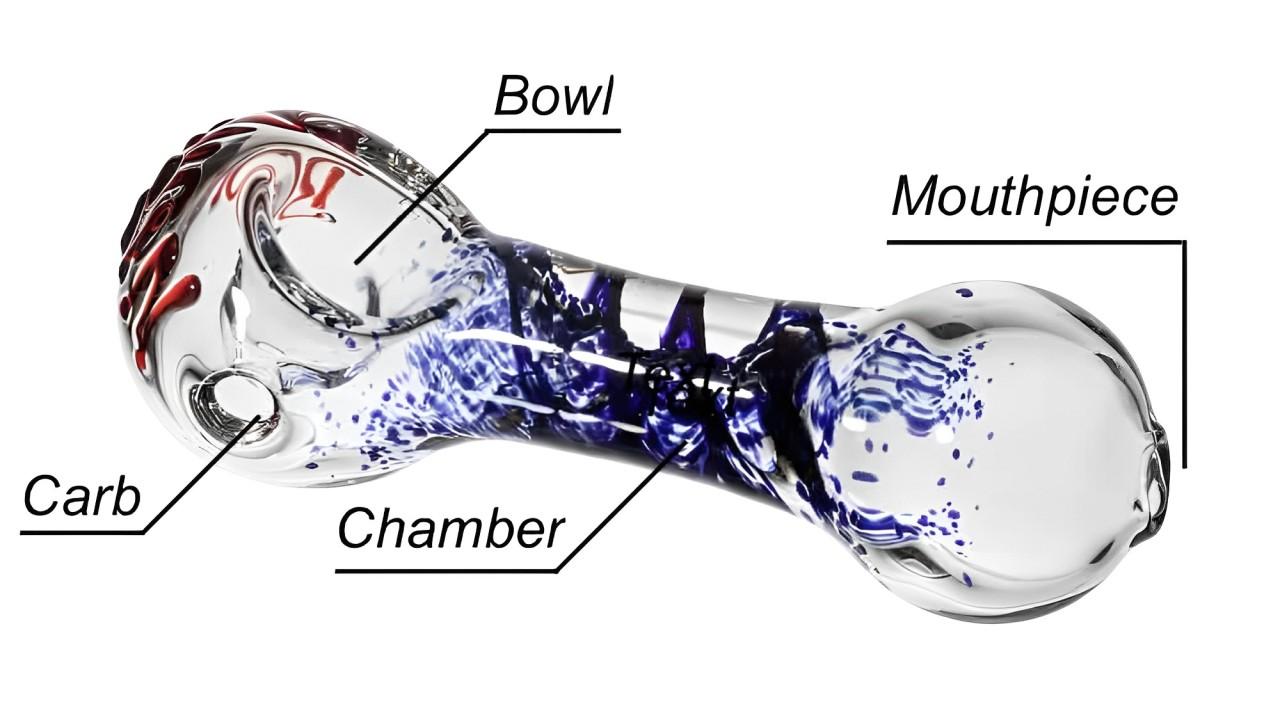
Before you get started, it’s important to understand the basic parts of a smoking pipe:
- Bowl: This is where you place your herb or tobacco.
- Stem: The body that connects the bowl to the mouthpiece.
- Mouthpiece: The part of the pipe that you inhale through.
Gathering Your Materials and Tools
Before you begin, you’ll need to gather all the materials and tools required for glassblowing:
- Borosilicate Glass: This is the primary material used for making your pipe. It’s strong, durable, and can withstand heat.
- Color Rods (Optional): For adding colors to your pipe design.
Tools You’ll Need:
- Glassblowing Torch: For heating the glass to the right temperature.
- Kiln: A must-have for annealing the glass, ensuring it hardens properly and retains its durability.
- Tweezers, Tongs, and Graphite Paddles: These tools help in shaping and molding the glass.
- Didymium Glasses: Protective eyewear designed to protect your eyes from intense light and glare during glassblowing.
- Blow Hose and Mouthpiece Assembly: Used for inflating the glass and creating the pipe’s shape.
Crafting Your Glass Pipe: A Step-by-Step Process
Now, let’s go through the steps for making your own glass pipe. Remember, this is a craft that requires patience, so take your time.

Step 1: Prepare Your Workspace
Safety should always be your first priority. Make sure you have a ventilated workspace free from flammable materials. Gather all your tools and materials so they are easy to reach when you need them.
Step 2: Heat Your Glass
Begin by taking a piece of borosilicate tubing and heating it with your glassblowing torch. Rotate the glass evenly to ensure it heats up gradually, preventing cracks. Once the glass softens, it’s ready for molding.
Step 3: Form the Bowl
When the glass has softened, use tweezers to pinch one end of the tube. This will form the beginning of your bowl. Use a graphite paddle to flatten the bottom so the pipe can stand upright.
Step 4: Shape the Stem
Attach the blow hose to the other end of the tubing. Heat the center of the tube and start to blow into the hose intermittently. As you do this, rotate the tubing to shape the stem of your pipe. You’ll want it to be even and straight, but this is an area where you can get creative with the design.
Step 5: Customize the Mouthpiece
Once the stem is shaped, heat the tip and mold it into the mouthpiece. You can adjust the width and shape of the mouthpiece to fit your preferences.
Step 6: Add Some Flair
This is where the fun comes in! If you want to add color to your pipe, melt color rods onto the surface of the glass. You can add stripes, swirls, or spots to make your glass pipe truly unique.
Step 7: Anneal Your Creation
Once you’re happy with the shape and design, place your pipe into the kiln for the annealing process. This slowly cools the glass and removes internal stresses, making the pipe durable and ready for use. The annealing process can take a few hours, so be patient.
Safety Considerations
- Always wear didymium glasses to protect your eyes from harmful infrared and UV rays while working with the torch.
- Consider wearing heat-resistant gloves to safely handle hot glass and tools.
- Have a fire extinguisher nearby as a precaution when working with an open flame.
Conclusion
Making your own glass pipe is an exciting way to explore the art of glassblowing. While it may take some practice, the end result is a personalized, unique smoking pipe that you created with your own hands. Whether you’re a beginner or experienced, glassblowing offers endless opportunities for creativity and customization. Remember, patience is key, and don’t be discouraged if your first pipe isn’t perfect. With each attempt, you’ll get closer to mastering this craft.
If you're looking to enhance your smoking experience, check out geticglass.com for a wide selection of smoking accessories, from dab rigs to bongs and everything in between!