
Here’s a step-by-step guide on how to implement file uploads using pre-signed URLs to a specific storage class, specifically with AWS S3. I’ll cover how to generate a pre-signed URL in Python and how to use it in Postman.
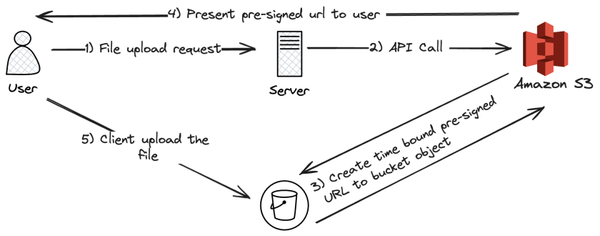
Architecture:
Create an IAM User:
- Sign in to the AWS Management Console.
- Navigate to IAM (Identity and Access Management):
- Open the IAM Console.
- Create a New User:
- Click on Users in the sidebar.
- Click the Add user button.
- Enter a user name (e.g., s3-uploader).
- Select Programmatic access for the access type to generate an access key ID and secret access key.
- Click Next: Permissions.
Create an S3 Bucket:
- Navigate to S3:
- Open the S3 Console.
- Create a New Bucket:
- Click on Create bucket.
- Enter a unique bucket name (e.g., data-from-resign).
- Choose a region.
- Configure options as needed (default settings are usually sufficient for this example).
- Click Create bucket.
Edit Cross-origin resource sharing (CORS):
- Under the Permissions tab, find the CORS configuration section.
- Click on Edit to modify the CORS settings.
- Replace the existing CORS configuration with the following JSON configuration. This example allows PUT requests from a specific domain (e.g., https://example.com) and specifies which headers are allowed:
[

    {

        "AllowedHeaders": [

            "*"

        ],

        "AllowedMethods": [

            "PUT"

        ],

        "AllowedOrigins": [

            "https://example.com"

        ],

        "ExposeHeaders": []

    }

]
Attach a Custom Policy to the User:
- Create a Custom Policy:
- In the IAM Console, go to Policies.
- Click Create policy.
- Select the JSON tab and enter a policy that grants permission to upload files to your specific bucket. For example:
```

{

    "Version": "2012-10-17",

    "Statement": [

        {

            "Sid": "VisualEditor0",

            "Effect": "Allow",

            "Action": "s3:PutObject",

            "Resource": "arn:aws:s3:::data-from-presign/*"

        }

    ]

}
- Click Next: Tags (optional) and then Next: Review.
- Provide a name (e.g., S3UploadPolicy) and description.
- Click Create policy.
Attach the Policy to the User:
- Go to Users and select the user you created (s3-uploader).
- Click the Permissions tab.
- Click Add Permissions.
- Select Attach policies directly.
- Search for and select the policy you created (S3UploadPolicy).
- Click Next: Review and then Add permissions.
Generate Programmatic Access Credentials:
- Get Access Keys
- Go to Users and select the user (s3-uploader).
- Click the Security credentials tab.
- Under Access keys, click Create access key.
- Download the CSV file containing the Access key ID and Secret access key or copy them. These are needed for programmatic access.
[ Good Read: advanced data modeling techniques ]
Generate a Pre-Signed URL:
Using the AWS SDK (Boto3 for Python), generate a pre-signed URL. Here’s a Python script to do this:
import boto3
import botocore

# Assuming your S3 bucket name and image file name
ACCESS_KEY = 'access_key'
SECRET_ACCESS_KEY = 'secret_key'
BUCKET_NAME = 'data-from-presign'
OBJECT_KEY = 'image.png'
STORAGE_CLASS =  'ONEZONE_IA'

# Initialize a session using the AWS SDK for Python (Boto3)
session = boto3.Session(
    aws_access_key_id=ACCESS_KEY,
    aws_secret_access_key=SECRET_ACCESS_KEY,
    region_name='ap-south-1'  # Specify the region where your bucket is located
)

# Generate the presigned URL
s3_client = session.client('s3')
try:
    response = s3_client.generate_presigned_u rl(
        'put_object',
        Params={'Bucket': BUCKET_NAME, 'Key': OBJECT_KEY , 'StorageClass': STORAGE_CLASS},
        ExpiresIn=60
    )
except botocore.exceptions.ClientError as e:
    print(e)
    # Handle the error here

print(f'Presigned URL to upload file to S3: {response}')
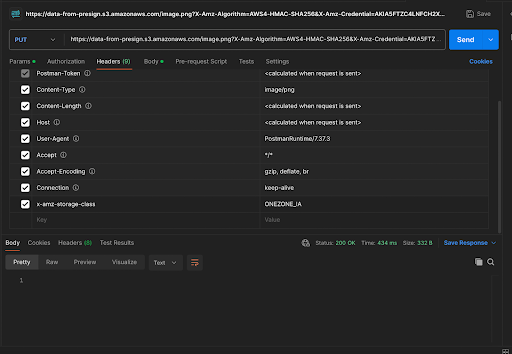
Upload a File Using the Pre-Signed URL:
- Copy the URL generated from the Python script and paste it into Postman. Change the request method to PUT. Additionally, add the following header: {‘x-amz-storage-class’: ‘STANDARD_IA’}.
- Navigate to the Body tab, select binary, and choose the file you want to upload.
You can check more info about: Pre-Signed URLs to a Specific Storage Class.