4 Technical Ways to Structure Your PowerPoint Presentation
How to Structure a PowerPoint Presentation
How do you manage a presentation that’s too big? You break it down into smaller parts. This step-by-step guide demonstrates how to structure your PowerPoint presentation in both editing and viewing mode. See how to combine slides into logical groups, create an interactive table of contents for non-linear navigation, and more.
In this article, you’ll learn how to:
- Combine slides into sections
- Use the outline view
- Create a table of contents
- Take your presentation to another level
1. Combine slides into sections
When working with a large presentation, you can create sections that can be collapsed and expanded. This will help you keep slides organized and facilitate navigation in editing mode. To do that, follow these steps:
In the list of slides, right-click on the one where you want the new section to begin, and select Add Section from the drop-down menu.
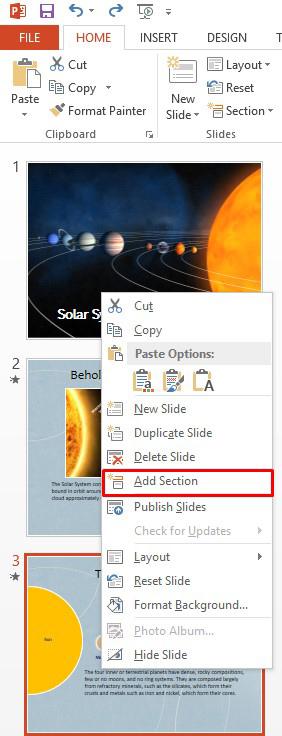
Now right-click on where it says Untitled Section , and select Rename Section . After that, type in the name of the section.
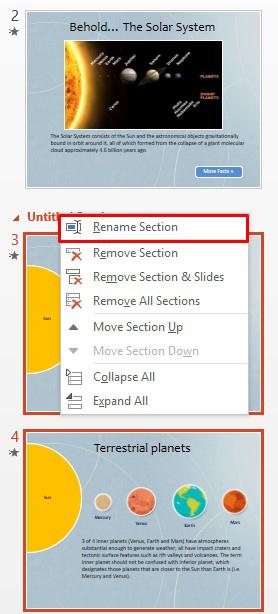
If necessary, repeat the process to create and name other sections.
To collapse or expand a certain section, click on the collapse icon to the left of the section name. You can also minimize and maximize all sections at once by right-clicking on the section name and choosing Collapse All or Expand All .
You can also access these settings by choosing Slide Sorter under the VIEW tab.
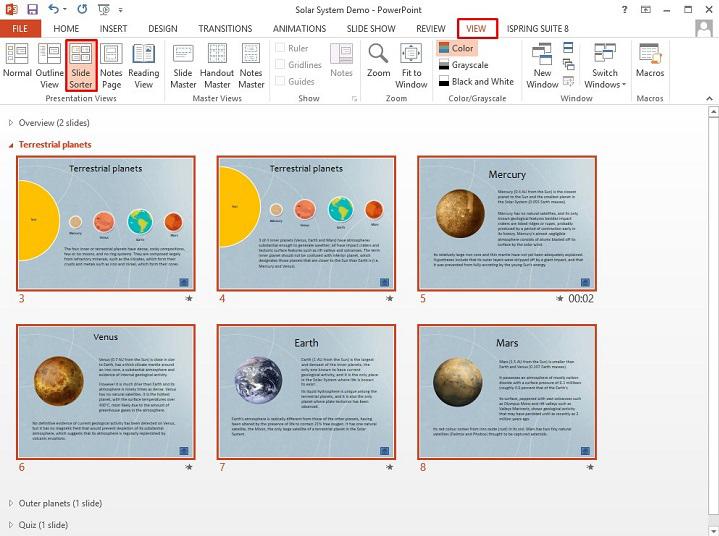
Such segmentation is a great way to overview the logical flow of your slides all at once and see if there are any changes required. For example, you may decide to break one slide into two or three, or the other way around.
2. Use the Outline View
One more way to structure a PowerPoint presentation in the editing mode is to use Outline View . thesis help can choose it from the VIEW tab.
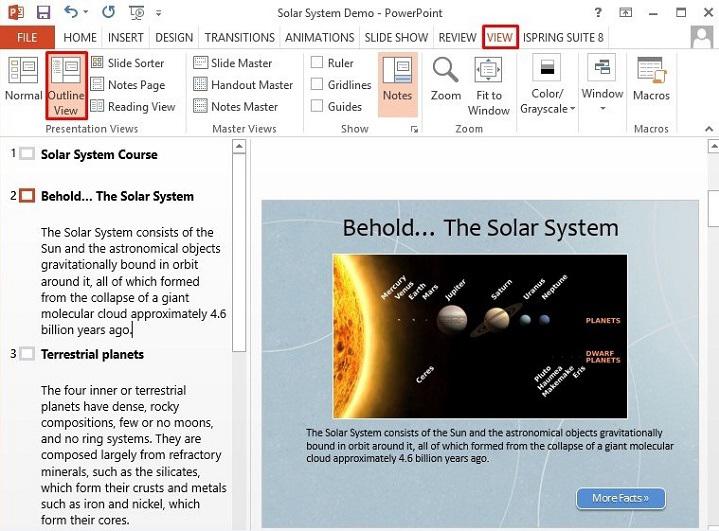
This view doesn’t display sections, but it shows you the title and main text of each slide, which can give you a quick overview of the presentation contents. Here you can go through all the text and instantly edit it. You can also work with text (on the left) and slides (on the right) simultaneously, as the latter is shown on the right side of your screen.
Note that to be displayed in an outline, text needs to be typed in a text placeholder , not a text box . A text placeholder is a box with the words “Click to add text” or “Click to add title”, and it appears when you choose a standard layout.
You can also use Outline View to promote bullet text to titles and the other way around. To do that, right-click on a relevant title or text and select the Promote or Demote options.
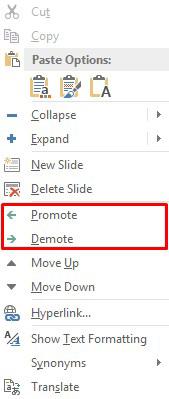
Be attentive about demoting a title, as this will delete the original slide and move its title and text to the adjacent slide.
PowerPoint only allows users to promote and demote text, not entire slides. Therefore, there’s no possibility to change the hierarchical order of slides.
3. Create a table of contents
All the aforementioned tips help you organize a presentation when formatting it. However, it’s crucial that your viewers can easily navigate through the presentation too. One sure way to provide them with this opportunity is to create an interactive and structured table of contents.
Though there’s no native automatic outline in PowerPoint, it can be created manually:
- You can insert a table of contents into the title slide or a blank one. To add a slide, click on New Slide on the ribbon, and choose the Title and Content layout.
- For the chapters, you will need to use the titles of the slides. This is where the now familiar Outline View comes in handy. You can access it from the VIEW tab.
- Right-click anywhere on the outline pane, and choose Collapse , then Collapse All . This way only the titles are displayed.
- Press Ctrl+A to select all the names, and Ctrl+C to copy them.
- Press Ctrl+V to paste the copied titles on the desired slide. In case there are too many titles and they don’t fit onto a single page, you can divide the table of contents into two columns or place it on two slides.
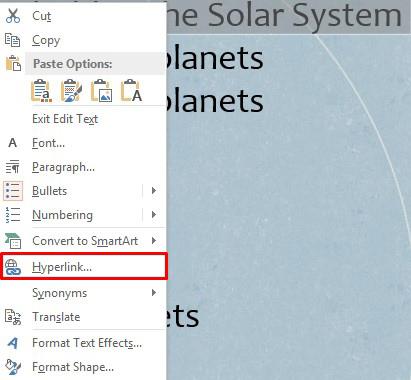
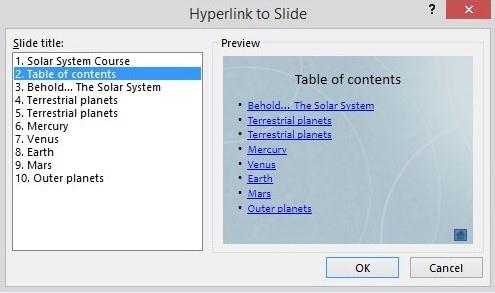
Now select and right-click the title of the first slide and choose Hyperlink .
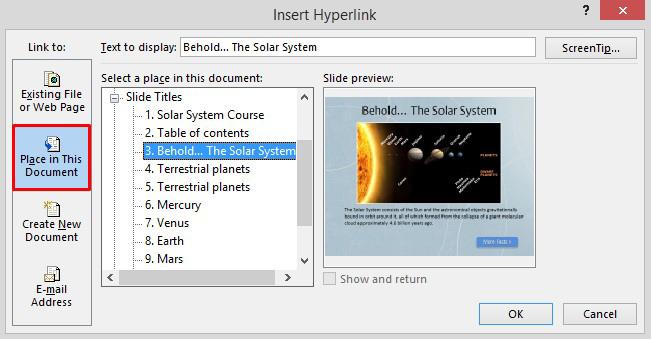
In the open window, click on Place in This Document on the left-hand menu, then choose the corresponding slide and click OK .
You will need to repeat this procedure to link all the chapters to corresponding slides. For more information, read this step-by-step guide on how to add a hyperlink in PowerPoint.
Now all the chapters can be accessed from a single table of contents, which is very convenient. However, you will also need to link them back to that unifying page. You can do that by inserting an Action Button on every slide of your presentation in Slide Master mode:
Go to the VIEW tab and choose Slide Master .
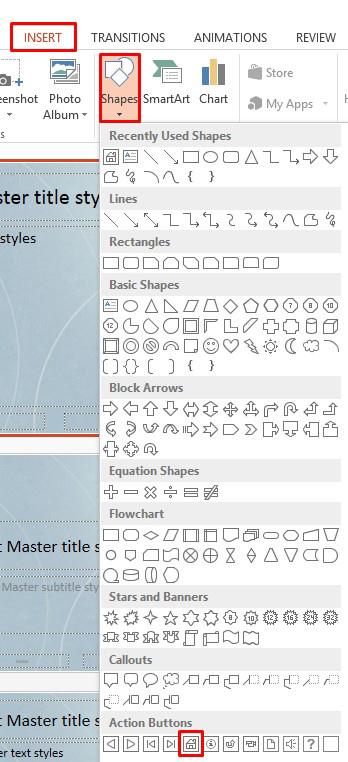
Choose the first slide on the left, then open the INSERT tab on the ribbon, click on Shapes , and under Action Buttons select the Home button.
Place the Home button anywhere on your slide – that’s where it will appear on all of them. Once you’ve placed it, the Action Settings window will appear. Under Hyperlink to: choose Slide… from the drop-down menu.
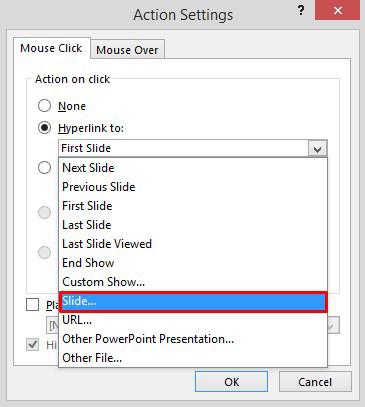
Choose the slide with the table of contents, and click on OK .
Now there’s a single page from which all the other ones can be easily accessed. At the same time, it’s possible to go back to the table of contents at any time with the intuitive Home button.
Depending on the size of your presentation, creating an interactive outline may take a varying amount of time, as you will need to add hyperlinks to every chapter manually. Be aware that if you rename a slide or simply delete it, these changes will not be automatically made in the table of contents. For example, if you delete a slide, its title will still be displayed in the table of contents, but clicking on it won’t lead viewers anywhere.
This is what our sample presentation looks like:
4. Take your presentation to another level
Creating a table of contents manually may be a good idea only for a small presentation. But what if you have 122 slides? It would be then unnecessarily time- and energy-consuming. That’s why instead of manually creating a table of contents, we took advantage of iSpring Suite 8 and simply enabled the automatic outline.
As you can see, the new presentation has a pop-up outline and a navigation panel, which make it possible to move to any slide at any time without leaving the slide show mode. To enhance your presentation, follow these simple steps:
- Download a free trial of iSpring Suite 8.
- Open PowerPoint and switch to the iSpring Suite 8 tab.
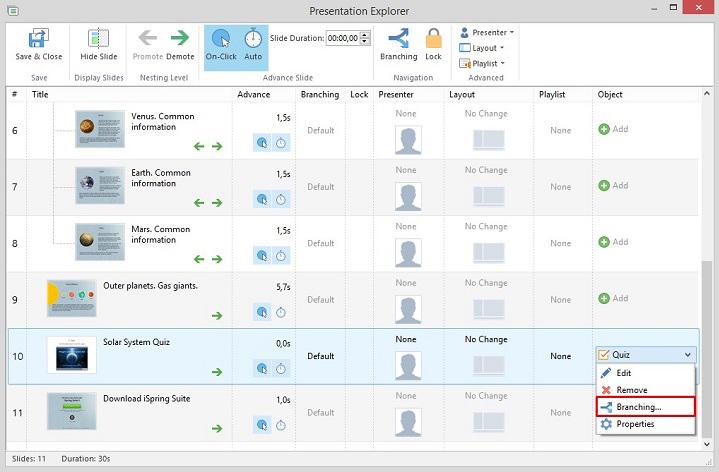
Click on Presentation Explorer on the toolbar.

Here you can see the slide titles. Unlike in PowerPoint, you can give a slide any name regardless of the text in the placeholder. You can also organize slides into a hierarchy by changing their nesting levels. To do that, select any slide(s) and click on the Promote or Demote buttons on the toolbar.
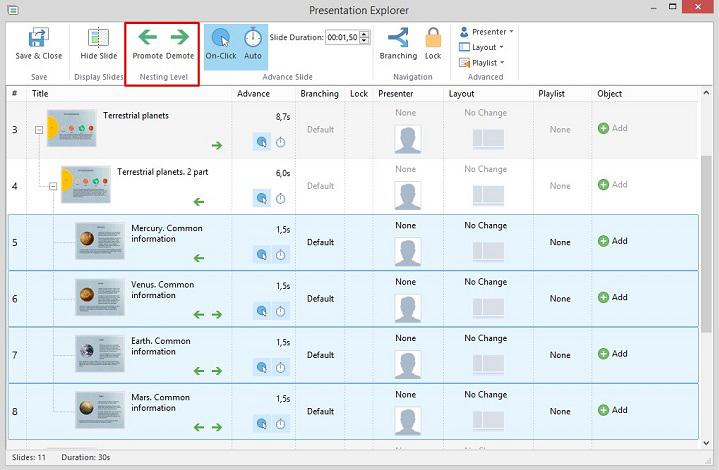
To collapse or expand nested slides, use the “-” and “+” icons to the left of a top level slide. The arranged slides can also be easily minimized and maximized during presentation playback, since they appear as menus and sub-menus in the outline.
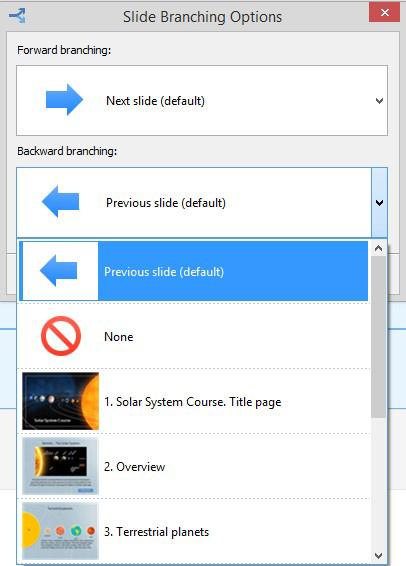
With iSpring Suite, you can turn a linear presentation into an engaging non-linear scenario. For that, select a slide and click on the Branching button on the ribbon. Now choose the corresponding slides for users’ forward and backward actions, or None to lock navigation.
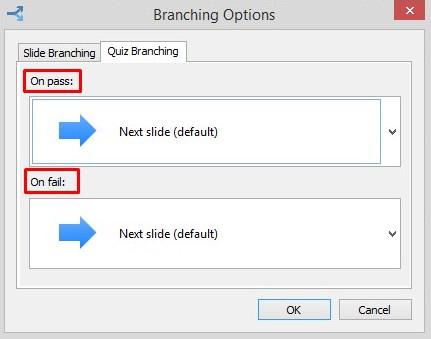
Quizzes created with iSpring Suite can use the branching option too. This way, learners can be taken to different presentation slides based on their quiz results. In the Object column, click on Quiz and then Branching .
Select the corresponding slides that learners will see On pass and On fail . For example, you may prompt them to view the presentation again if the quiz was taken, but not passed.
Perhaps the best part about organizing a presentation with iSpring Suite is configuring an outline. While PowerPoint requires it to be designed manually, iSpring Suite has already prepared it for you. At the same time, you don’t have to stick with the standard outline template, as you can easily customize the final look and feel of the player:
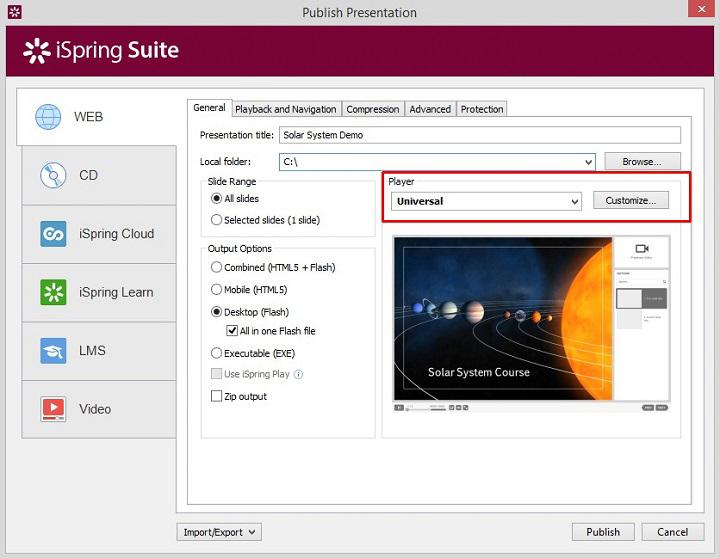
On the iSpring Suite toolbar, click on Publish .

Choose the Universal player and click on Customize…
Here you can choose from a set of ready-made templates. To preview any template, simply click its name in the left pane.

To customize the chosen template, click on Layout on the ribbon. Here you can define what elements to display and where. For example, for our presentation we have hidden the Presenter Video feature and the Top Bar.
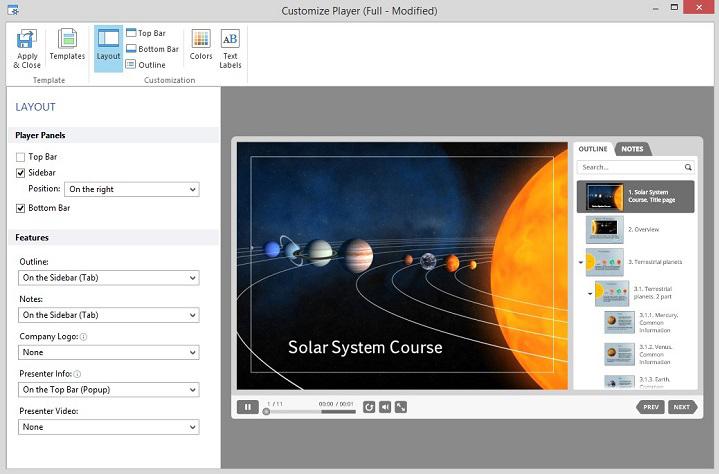
To adjust the outline appearance, click on Outline on the ribbon, and select what options to include.
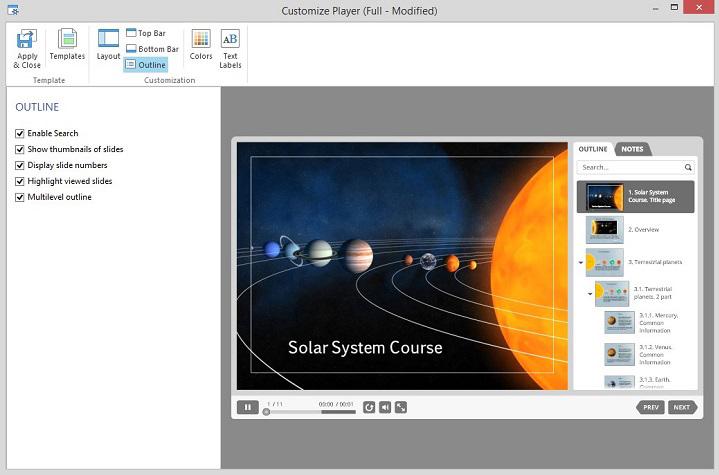
We recommend leaving Enable Search marked, as this will allow viewers to search for any content at any time, including text on the slides. This is especially useful for large presentations with a lot of text.
If you have previously arranged slides into multiple levels in the Presentation Explorer, then leave Multilevel outline marked. This way the outline will display the nesting structure of the presentation, facilitating navigation. You can learn more about the other outline options here.
- Customize the color scheme and edit text using the Colors and Text Labels options on the ribbon, respectively.
- When you have finished configuring the player, click on Save & Close in the upper-left corner.
- Now you can publish your enhanced presentation to Web formats (under Output Formats ) to make it easily accessible via a browser on any device, or for an LMS. To open your presentation online, you can use one of these three online services.
While a standard PowerPoint slideshow is straightforward and limited, iSpring Suite 8 saves viewers from having to follow a strict slide order. An interactive and searchable outline allows non-linear navigation, where any information can be accessed at any time and at a glance.
Conclusion
The Internet is full of tips on how to develop an ideal structure for your PowerPoint presentation: from starting with a strong opening to using a concise language. But how do you actually implement those ideas technically? At the end of the day, no matter how expertly you outlined the content in your mind, it’s the real outline that counts. Use these practical guidelines to organize your presentation in a clear and simple way.
If you liked the article, please let us know by clicking the Share button.
If you have any ideas what kind of e-Learning topics you’d like to see discussed, feel free to leave a comment; we’re always happy to write new content for you.