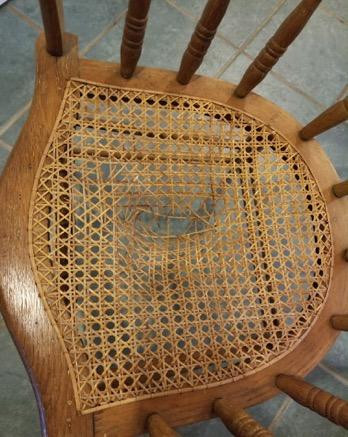
Chair caning repairs require a dedicated craftsman and meticulous attention to detail. Rush repairs, in particular, require expert skills and a keen eye for matching weaving patterns and blending the repaired areas into the original fabric. In this article, we'll cover how to repair a ripped or damaged chair's caning, a common cause of poor chair quality. But before you get started, make sure to read the rest of the article for more information.
 Chair
Chair
Shaker tape
Whether you are repairing the caning on a chair or simply replacing it, there are several ways to use Shaker tape. Shaker tape comes in a variety of traditional patterns, as well as specialty ones. Before you begin, it is important to measure the caning in order to determine how much tape is needed. You should choose enough tape to cover the front and back rungs of your chair. The length of the Shaker tape will depend on the length of the seat and back rungs.
If you need to repair the caning on a chair, you can use woven Shaker tape. This tape is one-inch wide and is sold by the yard. You can also use a rush seat instead of a Shaker seat. Shaker tape is one of the most common and affordable materials used to repair chair caning. It is available in a variety of colors and can be used on a variety of types of materials, including wicker, rush, and seagrass.
Binder cane
The Binder Cane is used in weaving porch chairs, covering wicker legs, and weaving seats in rustic furniture. The cane is similar to natural chair cane, but is thicker and wider. You can buy the cane by the strand or coil to repair a chair. This material can be bought in 4mm, 5mm, or 6mm thicknesses. To make repairs, carefully follow the manufacturer's instructions.
To replace a binder cane chair's cane, you can cut a piece of cane slightly longer than what you need. Then, peg the ends into the holes of the chair's corner rails. Start with the front rail and place a binder cord into the left corner hole. Then, put a cane loop down the backside of the next hole, and repeat this procedure for the other side.
Fiber rush
If your chair caning has seen better days, it might be time to consider replacing it with Fiber Rush. You'll need approximately 2 pounds per seat, which is easier to work with than you might think. Once you have purchased Fiber Rush, you can apply it with a tacking stapler or small hardware tacks. Then, cut the rush to size using scissors. After that, use a screwdriver or mallet to tap it into place.
This material is also easier to work with than natural rush. Made from high-quality paper, fibre rush is available in two different diameters and is perfect for chair seats, bar stools, and footstools. Its brown color blends well with most antique seat styles. It will last about 20 to 30 years. You can even do it yourself if you are confident in your abilities. Just be sure to follow the instructions carefully, and you'll be ready in no time!
Reed
When repairing a reed chair, you need to understand how it works and where to begin the process. The warp, or back of the chair, should be looser near the middle. Then, you'll want to start weaving the weft. Begin by weaving the reed over the bottom rung of the seat. Be sure to weave the reed over two of the adjacent warp pieces. Make sure to do it gently, as pulling too tightly can cause distortion.
The first thing you need to do is estimate the length of the reed. Measure the width of the damaged area and add an inch to the length. Be sure to leave two inches extra at either end, since this will prevent the reed from pulling out. You can also weave a short piece over two or three cross members, if necessary. To ensure a perfect fit, try to take a photo of the damaged area and make sure the replacement will match the original one.