The idea of the project
When developing the game, we set a goal - to create a unique fishing simulator that can convey the grandeur of Russian fishing and its special significance for the heart of a Russian man whose life has always been closely connected with nature, the beauty and diversity of which our vast country is so rich. Open game world, beautiful scenery and the absence of worldly vanity will allow you to immerse yourself in the atmosphere of this Russian fishing.
Introduction to the game
Russian fishing 4 is a fishing simulator with RPG elements. The game lacks a storyline and the whole process is based on the concept of free play.
As you develop, you will gain experience and improve your skills, discovering new opportunities and skills. You can choose the specialization of your character, developing certain skills with the help of special glasses, the stock of which will be limited. From the distribution of these points will depend on the unique nature of your character.
The game world consists of several reservoirs. If there is a certain level, you can freely navigate through these reservoirs, using all sorts of swimming tools for this. Each of the reservoirs is a unique ecosystem, with its fish, vegetation, weather conditions and infrastructure.
To succeed, you will need to study the reservoirs and their inhabitants. Each fish has unique preferences, habits, daily activity and habitats. In addition, the same type of fish on two different water bodies can behave differently. All this makes fishing really exciting, forcing the player to constantly improve their knowledge to achieve the best result.
By selling fish, you will earn game money, which you can spend on the purchase of fishing tackle, equipment, food, tools and many other items.
The game provides social functions that allow the fishermen to communicate with each other, exchange items and participate in all sorts of ratings. The player is available several tables of records and a rating of the best anglers. In the process of project development, the list of ratings and other social functions will be actively replenished.
How to start?
To start fishing, it is enough to have one rod assembled. The starting set of the player already has everything you need: fly rod, fishing line, hook, float and worms. All you need is to select the rod and thread the components of the rig into it. If you happen to break the rod or lose the rigging, without which it is not possible to continue fishing, it is necessary to use old stocks.
Old stocks are in the house on the summer cottage. The composition of these stocks includes a minimum set of items that provide the player with an existence in the event of complete impoverishment. Accumulating experience, the player will begin to acquire capital; this will greatly facilitate the existence and eliminate the need to use old stocks.
When you first start the game, it is recommended that you get training. It does not take much time and will give you a basic understanding of basic gaming functions.
At the initial stage it is necessary to investigate the reservoir and try to find a place where carp or roach well bites. These fish are easily caught and not particularly demanding on rigging. In addition, they colonize the pond with large flocks, which guarantees a constant and active biting.
If you choose to catch roach or crucian carp, then as a promising fishing place try to feel the water thickets near which these fish eat. Try to throw as close to the grass as possible and feed the bait to the bottom. These fish feed in the bottom layer, and the proper feeding of the bait plays a big role. As a bait, you can use a worm or bread crumb. Bread crumb can be made independently from the loaf, which can be bought at the grocery store.
At the initial stage it is worth to be afraid of meeting with a large fish, such as carp or tench, and even more so try to catch them intentionally. For a starting tackle a meeting with a large fish is likely to end with a breakdown. If you accidentally broke the tackle and you do not have the money to buy a new one, then you need to use old stocks. If you have no more bait, you can also refer to old stocks.
By selling fish in the fish market, you will be able to earn your first capital, which you can spend on updating gear and equipment. Try to catch a test fish; when evaluated in the fish market, this fish is marked with a yellow flag. The main profit comes from the sale of credit items, while ordinary trifles go for pennies. Do not forget to sell fish on time, as with long-term storage it can deteriorate. The spoiled fish is sold at a reduced fare.
Having mastered these basic game moments, you will learn how to fish and earn money. This is followed by a detailed user guide, in which you can find answers to more complex questions. If to our great regret you could not find the answer to your question in this guide, then please use the forum or technical support service.
Main game window
The main game window contains the main indicators of the game state.
Indicators of the status of the character

Fig. 1: The status of the character displayed on the four indicators.
Energy indicator
Displays the player's energy reserve. Energy is needed to fight fish, crafting, running and performing some other physical action. The level of energy and speed of its recovery depend on the satiety and comfort of the player. Energy can also be affected by food.
Saturation indicator
To maintain satiety, you need to periodically feed the player. The satiety level affects the rate of energy regeneration. Food can have additional bonuses and not only saturate the player, but also raise other characteristics.
Luck indicator
Luck increases the likelihood of catching valuable catch. The action of luck is well revealed with low activity of fish, when other factors do not favor successful fishing. Bonus luck can be obtained with the use of certain foods or accidentally when catching fish. The bonus time for success is limited.
Comfort indicator
Comfort is made up of the current weather conditions and equipment of the player. Also, comfort depends on certain places on the pond. In a swamp or a dark forest, the player can feel uncomfortable, and in the camp at the bonfire, comfort will be higher. Comfort affects the speed of energy recovery.
Indicator of experience

Fig. 2: Indicator of experience and current level.
Displays the current level of the angler and the progress bar, indicating the required number of experience points to reach the next level.
Compass and navigation
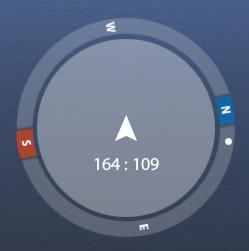
Fig. 3: Compass.
The compass shows the player's position in space, its coordinates and the direction of the wind. The wind direction is displayed as a round point, the position of which indicates the side with which the wind is blowing.
Batch fill indicator

Fig. 4: Filling the tank.
In case of overflow of the tank, the player will not be able to put the caught fish into it.
Time and Weather Indicator

Fig. 5: Weather.
The life cycle of the fish and its activity depend on time and weather. Each fish has the most favorable hours of daily activity. During these hours, the chance to catch a trophy specimen increases noticeably. As a rule, fish are most active in the sunset and dawn hours, but there are exceptions that become clear with experience. Night fish eat mainly at night, and during the daytime they prefer to sit out at depth or in holes. Based on this, for effective and efficient catching the player must learn how to plan the day correctly. The weather also affects fish activity. In hot weather, the biting is affected by cloudiness or rain. In the cool opposite - the bright sun heats the water and accelerates all life processes, increasing the activity of the fish. It is also desirable to monitor the deviation of temperature from the daily rate,
Indicator of the current bait, bait and bait
Fig. 6: The current snap indicator.
In this block of indicators, a bait / bait is placed on the rod, which is currently in the hands of the player. Also shown is the bait loaded into the feeder (if a bottom rod is used) and the PVA stick.
Load indicator

Fig. 7: Tackle indicator.
The load indicator shows the level of the current load that your tackle is experiencing. The indicator displays the relative load, the critical level of which depends on the strength of the weakest component of the rig. In the calculation of the weakest link involved the following components: rod, coil, fishing line, leash and hook. If the critical load level is exceeded, there is a chance to break or break the weakest component or even several components at once, if the load has been exceeded significantly. As the load increases, wear of tackles also increases.
Backpack
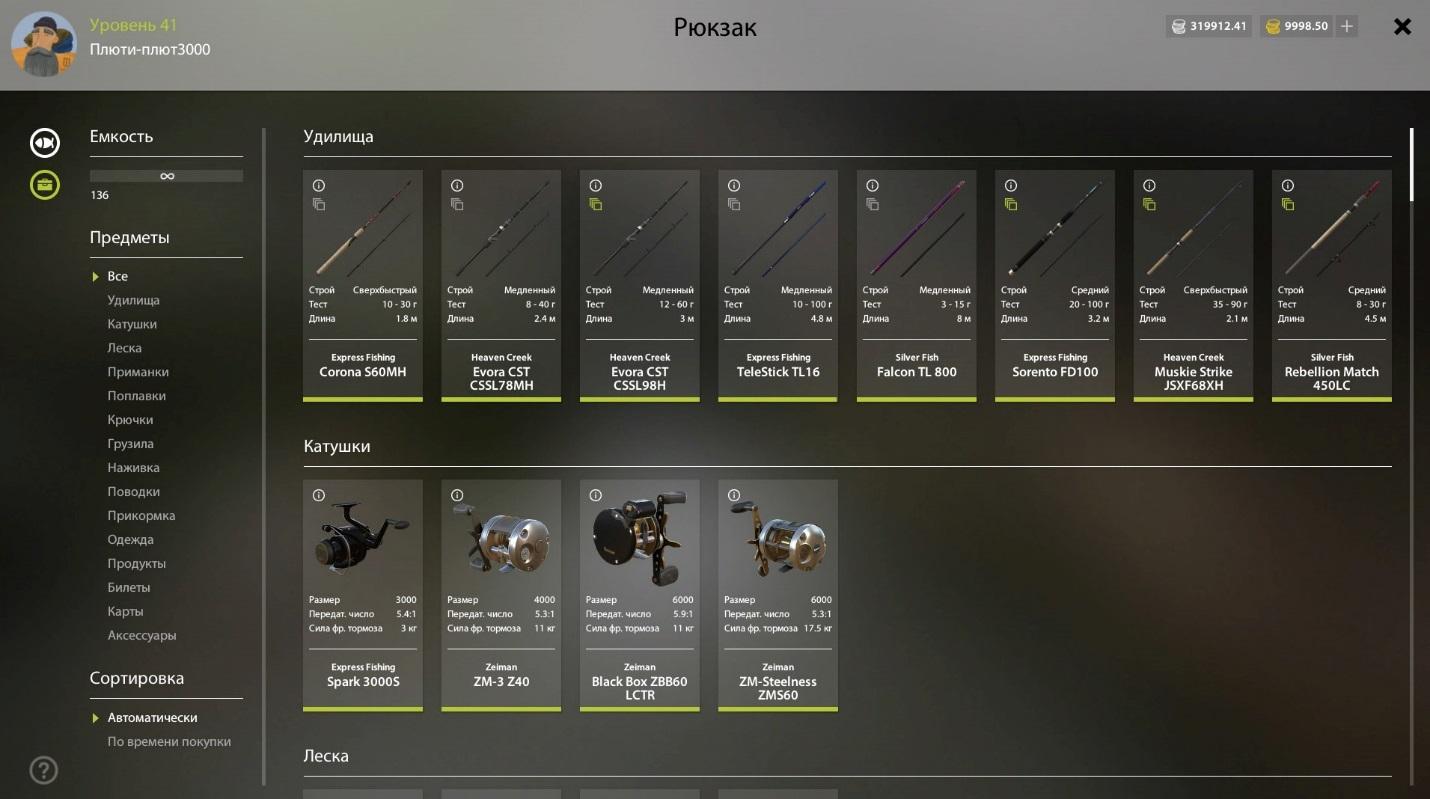
Fig. 8: The backpack window.
The backpack is used to store gear, equipment and household items. To view the content of the backpack, open it with the [I] button or through the control panel [ESC]. To view a large number of items you can use filters. To obtain detailed information about an item, click on it with [LMB]. The detailed information window contains a description, status, technical characteristics, as well as components from which the object can consist. To view the description, you need to expand it (it's initially minimized) by clicking on the [I] button, which is in the right-top corner of the item image. The description of the rod assembly process will follow.
Assembling the rod
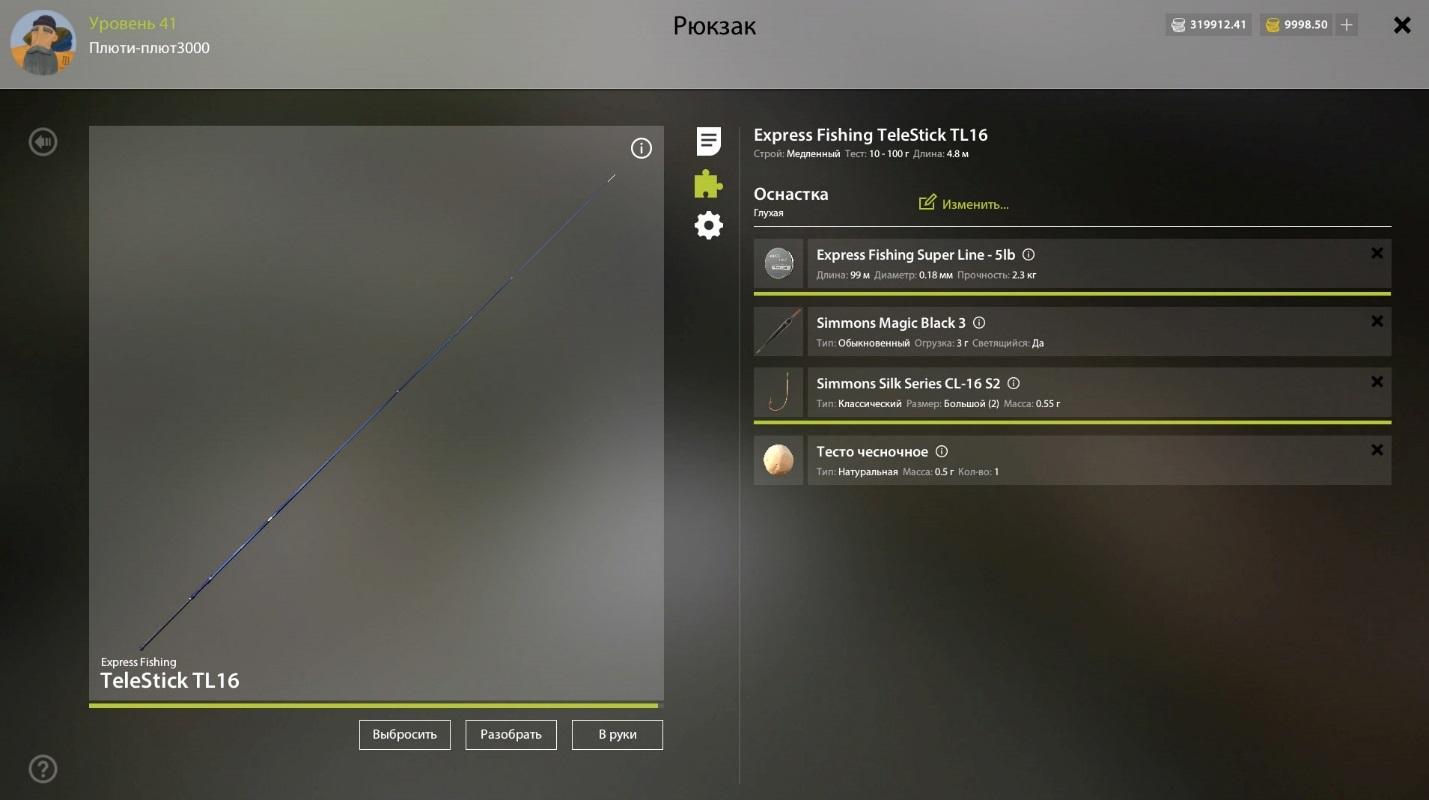
Fig. 9: Detailed information window.
To assemble the rod, you need to open a detailed information window and subsequently install the rod all the necessary components. The set of components depends on the type of rod and accessories. The snap selection button is located in the same window, slightly above the list of components. The player is only available those rigs that are suitable for this type of rod and to which there is access by skill. In the simplest version, the rod, equipped with a deaf float tool (this basic rig), consists of four components: fishing line, float, hook and bait. In more complex snap-ins, the number of components can significantly increase. Some components are marked as optional, their player can set at their discretion. If, after completing the rod assembly, you want to use it for fishing, then you need to take it in hand by clicking on the appropriate button.
Fishing for float tackle
Floating tackle among Russian fishermen is the most famous and popular. In the game float flywheel is assigned the role of starting tackle, with which the player is born and begins his hard way. Next, each type of float rod and the process of catching float equipment will be described in detail.
Types of float rods
Fly Fishing Rod
Telescopic rod without rings and coil. Equipped with fishing line, float and hook with bait. Simple and convenient to use. The fly rod is designed for catching small fish in calm water or on a small current. Catching large fish with a fly fishing rod can be a dangerous activity, since this rod is not equipped with a coil and in case of strong fish resistance the player will have limited opportunities for maneuvering.
The process of catching flywheel consists of adjusting the depth of descent, casting, cutting and dicing.
Bologna fishing rod
This telescopic rod, equipped with rings and reel seat. Bolognese rod allows you to cast a float on the short and medium distances, and also perform wiring on the flow. Bolognese rod can be considered as an alternative to a simple fly-fishing rod. It has a significant plus in front of him - it is the ability to install a coil, which allows you to confidently dare large fish. Of the minuses - it is difficult in comparison with the fly-fishing rod cutting, requiring additional attention to the tension of the line.
Match rod
The match rod is used mainly for catching large fish on a rig with a wagler. Wagler is a special heavy float designed for long distance fishing. The match rod has a very strong and powerful design and is an ideal tool for catching large carp, cupid or carp. Also, the match rod can be used with live gear or for catching on sbirulino.
Catching
The process of catching float gear consists of the following steps, which are applicable for any type of float rod or rig, except for sbirulino, as will be discussed separately.
Step 1: Set the descent of the float.
The descent of the float determines the depth at which the hook with the bait will be fed. The depth of the bait is very important, because each fish has its own preferences for depth and food. Some fish eat from the bottom, some from the surface, and some prefer to procure food in the water column. These features must be taken into account so that the result of fishing is maximum. Most of the fish we habitually like, like crucian carp, roach or bream, most often feed in the bottom layer and the first thing to learn is the proper feeding of the bait to the bottom. Set the depth of the descent in such a way that the bait was as close to the bottom or even lying on it. It is very important that the float remains in a standing position, otherwise the bite of the fish may go unnoticed.
For rigs with a sliding float or with a wagler, the depth of descent will indicate the maximum depth at which the bait can immerse itself due to the free movement of the float along the line. That is, the bait will always be delivered to the bottom, if the depth in the given place of catch does not exceed the depth of descent.
Step 2: Casting
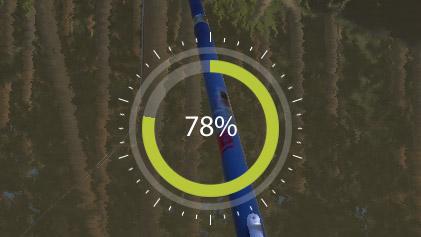
Fig. 10: Indicator of the casting force.
Before casting the tackle, you must stand on a comfortable position and choose the direction for the throw with the mouse. After completing all the preparations, press the reset button (LMB) and hold it to set the throw strength. Release the button to cast with the indicated force. Hold [SHIFT] during casting, if the maximum throw range is required. Consider the direction and strength of the wind. A strong wind can exert a significant influence on the flight of the rigging-to brake, pull down, or even accelerate, if the casts go downwind.
The casting range of the fly rod is limited by the rod itself and the long line, which is approximately equal to the length of the rod. The casting range for the fly rod can be calculated using the formula "rod length x 2".
The casting distance of the Bologna or match rod is limited by the aerodynamic properties of the rigging, the characteristics of the rod and the coil. Consider the rod test and the weight of the rig to achieve the maximum throw range.
Step 3: Waiting for a bite
The most important thing when waiting for a bite is to have patience, to stand still and watch the float carefully. For ease of tracking, use the squint [Z]. To monitor the float at a distance, you need to get a pair of binoculars. It is very important to maintain immobility, since movement and extraneous sounds negatively affect the biting of a neat fish. With a long absence of bite, you can try to reload the tackle, since it is entirely possible that the cunning fish has already managed to steal the bait from the hook. After waiting for the bite, do not hurry to immediately cut the fish, but first analyze the movements of the float. This will be discussed in the next step.
When fishing in the river, the rigging can be exposed to the action of the current. For catching on stream it is most convenient to use the Bolognese rod, which allows you to cut the line from the spool and perform the so-called fishing. To do this, open the coil sprinkler [ENTER] and release the float downstream.
Step 4: Cutting
The most critical part of this step is to select the moment for the strike. Carefully follow the movement of the float. Biting fish consists of two phases: in the first phase, the fish sniffs at the bait, and in the second phase begins to swallow it swiftly.
The first phase is accompanied by chaotic twitching of the float and the duration of these twitchings depends on the caution and accuracy of the fish. For example, a plovitch can sniff at a bait for so long that it can bring out even the most serious angler out of mental equilibrium. The perch is on the contrary - there is enough bait sharply and confidently, which requires a good reaction from the fisherman. Do not cut during the first phase. It is necessary to wait for the second phase of the bite.
At some point, the fish will finish sniffing and try to grab the bait to swim with her in a secluded place and chew it peacefully. From this moment the second phase of the bite starts, which clearly reflects on the float: it can begin to sink, swim to the side or even lie on its side. It is at this point that you need to cut. The duration of this phase is unpredictable and at any time the fish can release the bait from the mouth, sensing the wrong. The faster the player can recognize the phase of swallowing the bait and perform the sweep, the higher the probability of success.
But it is not in every situation to hurry with the cutting. Some fish have a very insecure and nervous bite, which is often accompanied by deceptive movements. The fish can take a bait for a moment in the mouth, then again let it go, misleading the fisher. If a player gets to contact such a cunning fish, then the first thing to do is to study her bite and experiment by calculating the best moment for cutting.
Sweeping on the swing is performed automatically when the rod is lifted upwards [LMB]. Cutting on the Bologna or match rod should be done manually [PCM]. It is very important (especially on the Bologna and match rods) that at the moment of cutting the line is not strongly weakened, otherwise the cutting will not bring the expected result, but will be absorbed by the weave of the weakened fishing line.
Successful sweeps go into the phase of survival, which will be described in a separate paragraph.
Features of catching on sbirulino
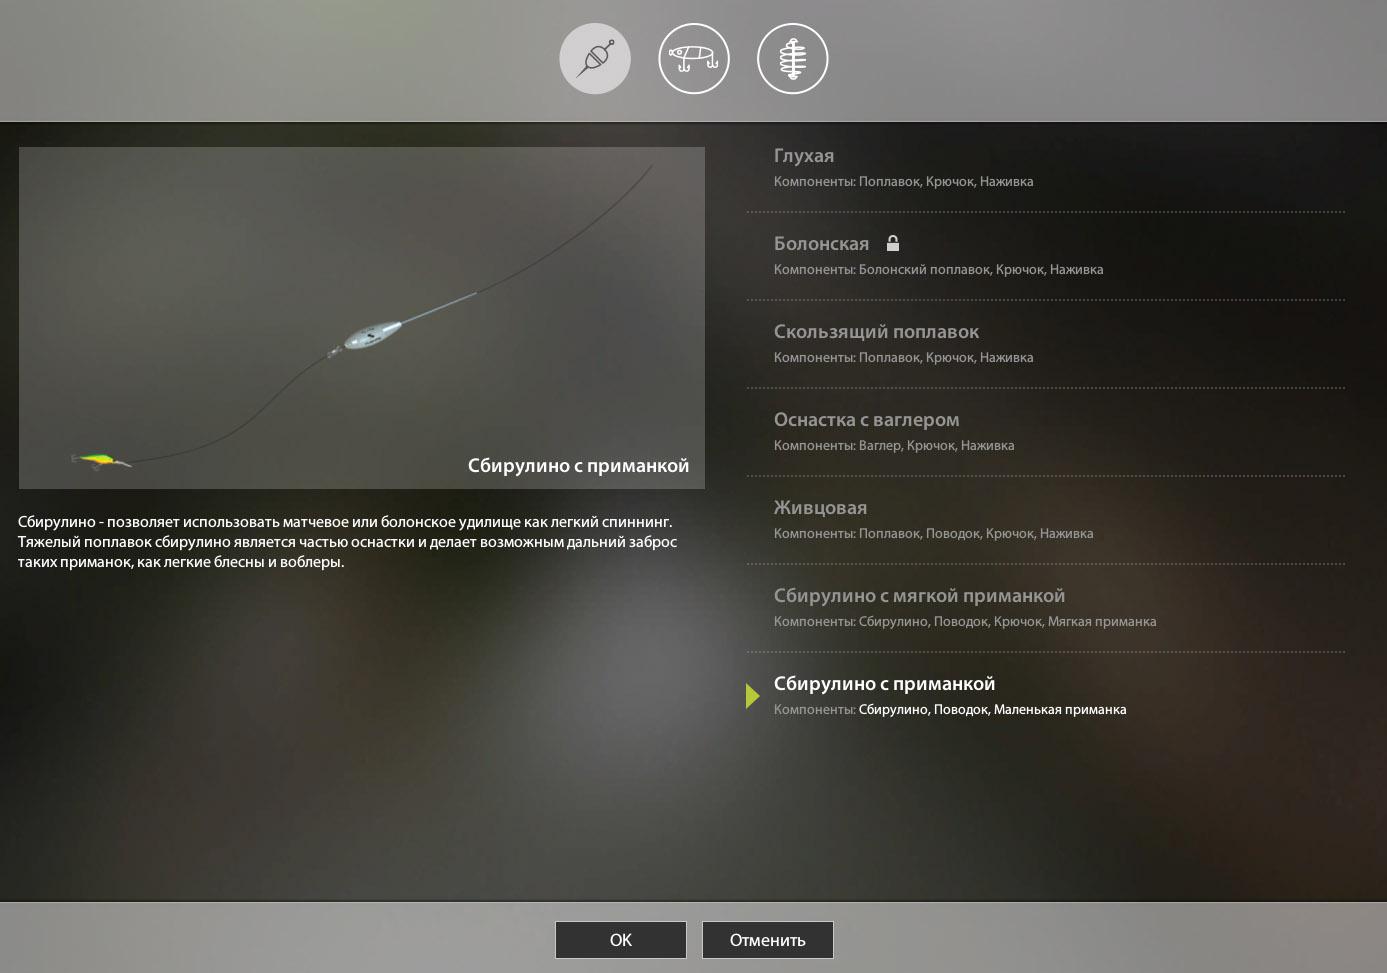
Fig. 11: Application of sbirulino in float fittings.
The Sbirulino snap-ins that are presented in the game only formally refer to float fittings. They include an artificial bait and a special float - sbirulino, playing the role of ballast. This float allows you to cast a light bait at a very long distance, and also helps to bring this bait to a depth. Sbirulino in our case is a hybrid float equipment that allows the floater to catch quite predatory fish without resorting to expensive spinning gear.
The process of fishing on sbirulino differs from the process of catching classical float rigging and requires a purely spinning approach, consisting in wiring the bait and provoking the predator to attack. To familiarize with principles of catching on spinning, it is possible in the following section.
Fishing for spinning
Spinning tackle is used mainly for predator fishing. Spinning fishing is very dynamic, exciting and requires a lot of money, because the average spinning equipment consists of dozens and hundreds of all kinds of baits and accessories. But the costs of spinning with ease pay off inexhaustible flow of joy, which is accompanied by a fight with a large and powerful predator. The following describes all types of spinning rods and the general process of fishing for spinning tackle.
Types of spinning rods
Ordinary spinning
Classical spinning tackle, which will suit most beginner spinners. Ordinary spinning can be used to catch absolutely any predatory fish for any rigging, except for the jerkbait.
Casting Rod
The casting rod, when considered superficially, is practically the same as the classic rod, with the exception of the specific configuration of the access rings, which are oriented to using a byk-tasting coil. On the casting rod, you can install only a buy-in or a multiplier coil. This type of coils is built according to the classical scheme, reminiscent of a winch. These coils are usually stronger and more reliable than ordinary ones - inertia-free, in addition they have excellent throwing qualities. The casting rod is perfect for a professional who needs long-range casting and a powerful tackle to fight a large predator.
A jerk rod
The jerk rod is a weighted modification of the casting rod, created for catching on jerkbaits. Jerkbate is a massive bait designed to catch a large predator, such as a pike or trophy perch. The weight of a jerkbait and the specificity of catching it require a very powerful tackle, which is the jerk rod. Otherwise, it is no different from an ordinary casting rod.
Catching
Fishing for spinning, in contrast to calm float or bottom fishing, requires the player to take active actions associated with the constant movement along the pond and the search for feeding places of the predator. Regardless of the type of spinning rod, the fishing process consists of three steps: finding a promising place for catching, casting the bait into the water and performing wiring. To get the best result, you do not have to stay long in one place. Explore the pond and check out the most promising points for a predator. If a bite has occurred at some place, then it is worth studying this place more carefully. The more places you explore, the more information you will get about the pond and the displacement of the predator.
Step 1: Select a location
Fig. 12: An ideal place for pike fishing.
A universal advice on the choice of a predator is impossible to give. As you gain experience, you will learn how to easily find such places yourself. Everything depends on the type of fish and the specifics of the reservoir, but first of all it is necessary to consider the boundary of aquatic thickets, snags and flooded trees. Such places are immediately evident and for their determination from the player no special training is required. To search for a bottom predator, such as pikeperch, catfish, or perch, you need to know the reservoir well, since in this case it will be necessary to feel the crooks, dips, pits and other anomalies of the bottom relief. When catching in the water thickets and snags try to throw and hold the bait as close as possible to them.
Step 2: Throwing the bait into the water
Before casting, you must select the direction of the bait flight with the mouse pointer. Press LMB and hold it to set the required throw strength. Then release the button and cast. Hold [SHIFT] to perform the casting with maximum force, without waiting for the indicator to fill. Consider the direction and strength of the wind. A strong wind can have a significant effect on flying bait, especially as light as a wobblers or poppers.
Step 3: Wire the bait
Rotate the spool to drive the bait. The bait must move - only in this case it can provoke the predator to bite. Change the rotation speed of the coil [R + mouse wheel]. Changing the speed can help you lower the bait closer to the bottom or raise it to the surface, which is especially important when catching a classic bait. Changing the speed of rotation of the coil when catching a jig, you will be able to choose the optimal speed for performing a jig step.
Dilute the uniform wiring in a variety of movements, this has a positive effect on predator bite. Try to pause or speed up the bait by pressing [SHIFT]. Also, when catching wobblers, top-wagons and jerkbaits, the player is given special moves that can be performed with the right mouse button [PCM].
Attack of the predator is very rapid. As a rule, it is accompanied by a strong bump and a rod bend. To cut the fish is not necessary - it clings itself. The process of combating fish or vyvazhivanie will be described later in the corresponding section.
Fishing on the bottom tackle
Bottom fishing is the use of special bottom and feeder snap-ins. Simple feeder equipment consists of a line, a load-feeder, a hook and bait. The load-feeder, as usual, is clogged with a bait, which entices the fish. Bottom fishing is properly slow and a special role is played by the cooking process, which consists in the correct choice of the place of catching and mixing of bait. At the initial stage of development, the player is provided with simple equipment with an ordinary cargo. In such a tooling, the use of the trough is not provided, but if desired, the player can feed the place of catching separately with the glued balls from the bait. For catching on the bottom rigging, special feeder rods are used, which in turn are divided into several types. Next, all types of bottom rods and the fishing process will be described.
Types of bottom rods
Feeder rod
Universal rod for catching on bottom rigging. This rod is basic and for most cases it will be enough.
Picker
The picker is a light version of the feeder rod, which is used when catching lightweight bottom rigging in a limited space, usually on small ponds with standing water. The peak is convenient for catching at a short distance.
Carp fishing rod
A carp rod is a heavy feeder rod designed to catch a large carp and other strong fish, which requires a strong and strong tackle to fend off. The carp rod has a very high strength and has an extremely long throw.
Catching
Catching on donka begins with preparation. Decide what kind of fish you are going to catch. It is from the fish will depend on the place of fishing, tackle and bait. Further advice will be given on the preparation and catching of starting equipment with an ordinary cargo. If you are using ground tackle for the first time or do not yet have sufficient experience, these tips will help you to get the basic skills of catching on donka.
Step 1: Select the location and bait
It's very difficult to choose a good place for catching Donkey, not having enough experience for this. If, up to this point, you have already tried to catch a float rod, then try to use the already familiar by float fishing place, where the fish takes a good fish. If you do not know such places, then you should choose any. It is very important that in the place of fishing there is enough space for the rods, which are located on a special stand.
Feeding fish is not a mandatory requirement for feeder fishing. But properly prepared bait can greatly improve the biting and lure a large fish to the place of fishing. During the familiarization with the game process, it is recommended not to mess with the bait, as this requires additional expenses and can drain the already scarce money of the player.
If you decide to try the bait, then try to use for its preparation the simplest and cheapest components. For a basis take grated crackers, and as the additive use the boiled millet or bloodworm. You can combine the additives, this increases the efficiency of the feed mixture. As a starter, throw 10 balls of bait into the water. After 7-9 game hours, you can repeat the operation, slightly reducing the number of balls thrown. Try to throw the balls as close as possible to the place of fishing.
Step 2: Casting the Snap
Before casting, you must select the direction of flight of the snap with the mouse pointer. Press LMB and hold it to set the required throw strength. Then release the button and cast. Hold [SHIFT] to perform the casting with maximum force, without waiting for the indicator to fill. Consider the direction and strength of the wind. Strong winds can have a significant impact on flying rigs. If you need a long cast, then pay attention to the shape of the load or the trough. Choose a cargo streamlined shape, such a load will allow the equipment to be cast over a long distance. Also consider the weight of the load. The heavier the load, the better it flies and is less prone to the effects of the current.
Step 3: Control of the rods
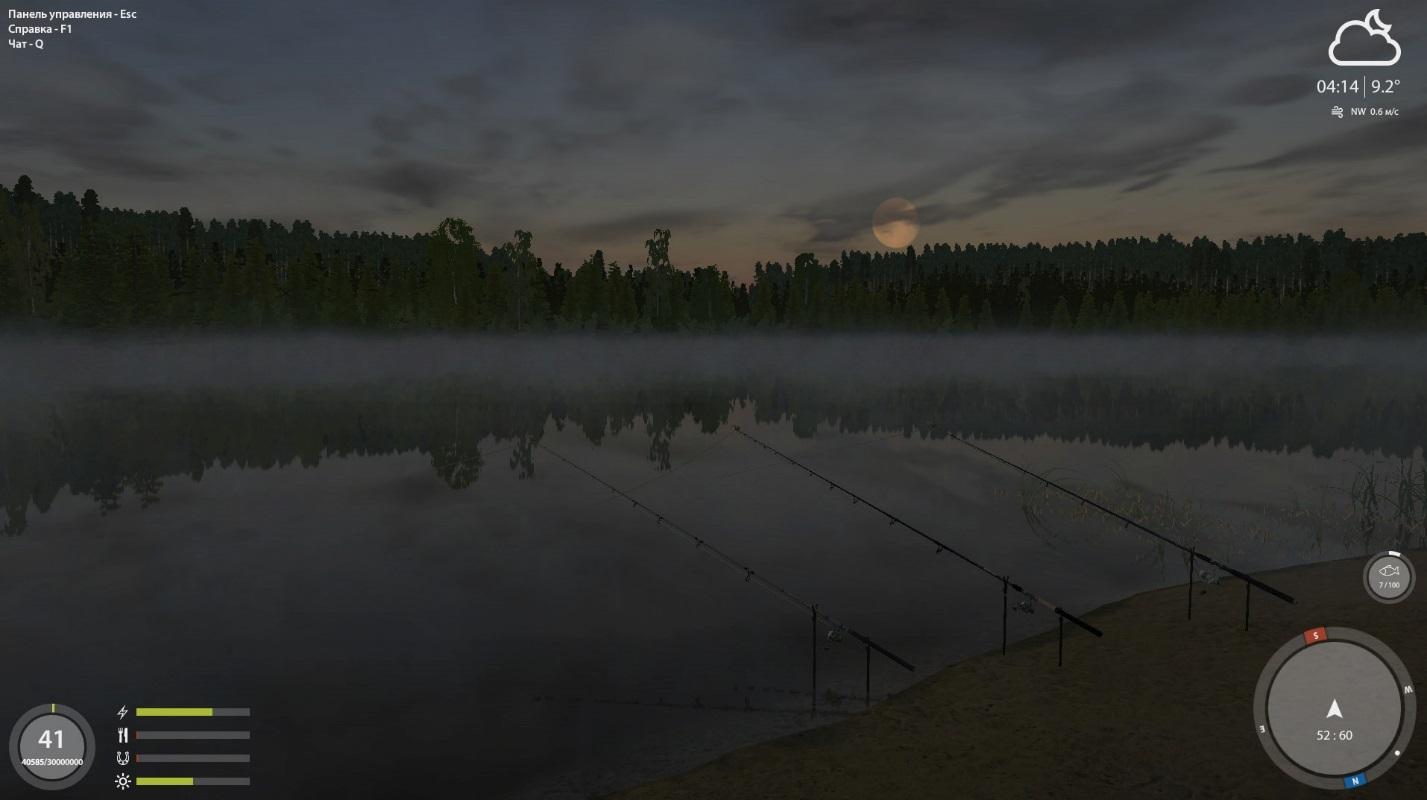
Fig. 13: Morning catch on several feeders at the same time.
After casting, you need to install the rod on a special stand with the [0] button. This may require a place and level ground. After casting, hover the rod and drag the fishing line with the help of the rotation of the coil. The tension of the line is necessary in order to make out the bite. When fishing for feeders, it is advisable to use several rods simultaneously, this increases the fishing efficiency. To manage several rods you will need some skill. For catching two or three rods you must consistently drop them and set side by side on the stand. To control the rod, which is installed on the stand, you need to point the mouse at it and choose the desired action.
Step 4: Waiting for bite and sweeping
Place yourself next to each other and carefully watch the tip of the rod, on which the bell is fixed. It is very important to keep silence and try to move as little as possible. Biting the fish is accompanied by a rocking of the rod tip and a bell tinkling. The bait of neat and not large fish can be very difficult to discern, such bite can be expressed in a light tremor of the line or its sagging. The big fish grabs the bait confidently, making itself felt by the strong curve of the rod and the din of the bell.
Waiting for the bait to take the rod into his hands, pointing at it with the mouse. The fish is detected by yourself and all you need is to grab the rod in time and get the fish. The process of fish fading will be discussed later.
Fishing fish
Fighting fish or vymazhivanie - the most important moment in fishing. At this very moment the angler already feels the pleasant weight of the fish sitting on the hook and begins to anticipate a worthy reward for his patience. But any wrong step can lead to a fish's gathering and instantly deprive the player of the joy of the captured trophy. The lost trophy for the devoted fisherman is a real shock. In order to minimize the loss of fish, it is necessary to follow certain rules and, if possible, maintain maximum composure.
Try as soon as possible to pull the fish to the shore and grab it in your hands. Take care of buying podsaka already in the early stages of the game. The podsak is the best investment for the first earned money, because it greatly facilitates the voyage, and in some cases its absence makes it impossible to survive. The podsak is used in the final stage of survival. Pulling the fish to the shore or to the side of the boat, click on the SPACE bar to get the podsak and try to grab the fish. It should be borne in mind that when catching a reel tackle, the player can not rotate the reel and hold the pod at the same time, as it uses one hand for this. To return the coil control, remove the tackle by pressing the space bar again [SPACE].
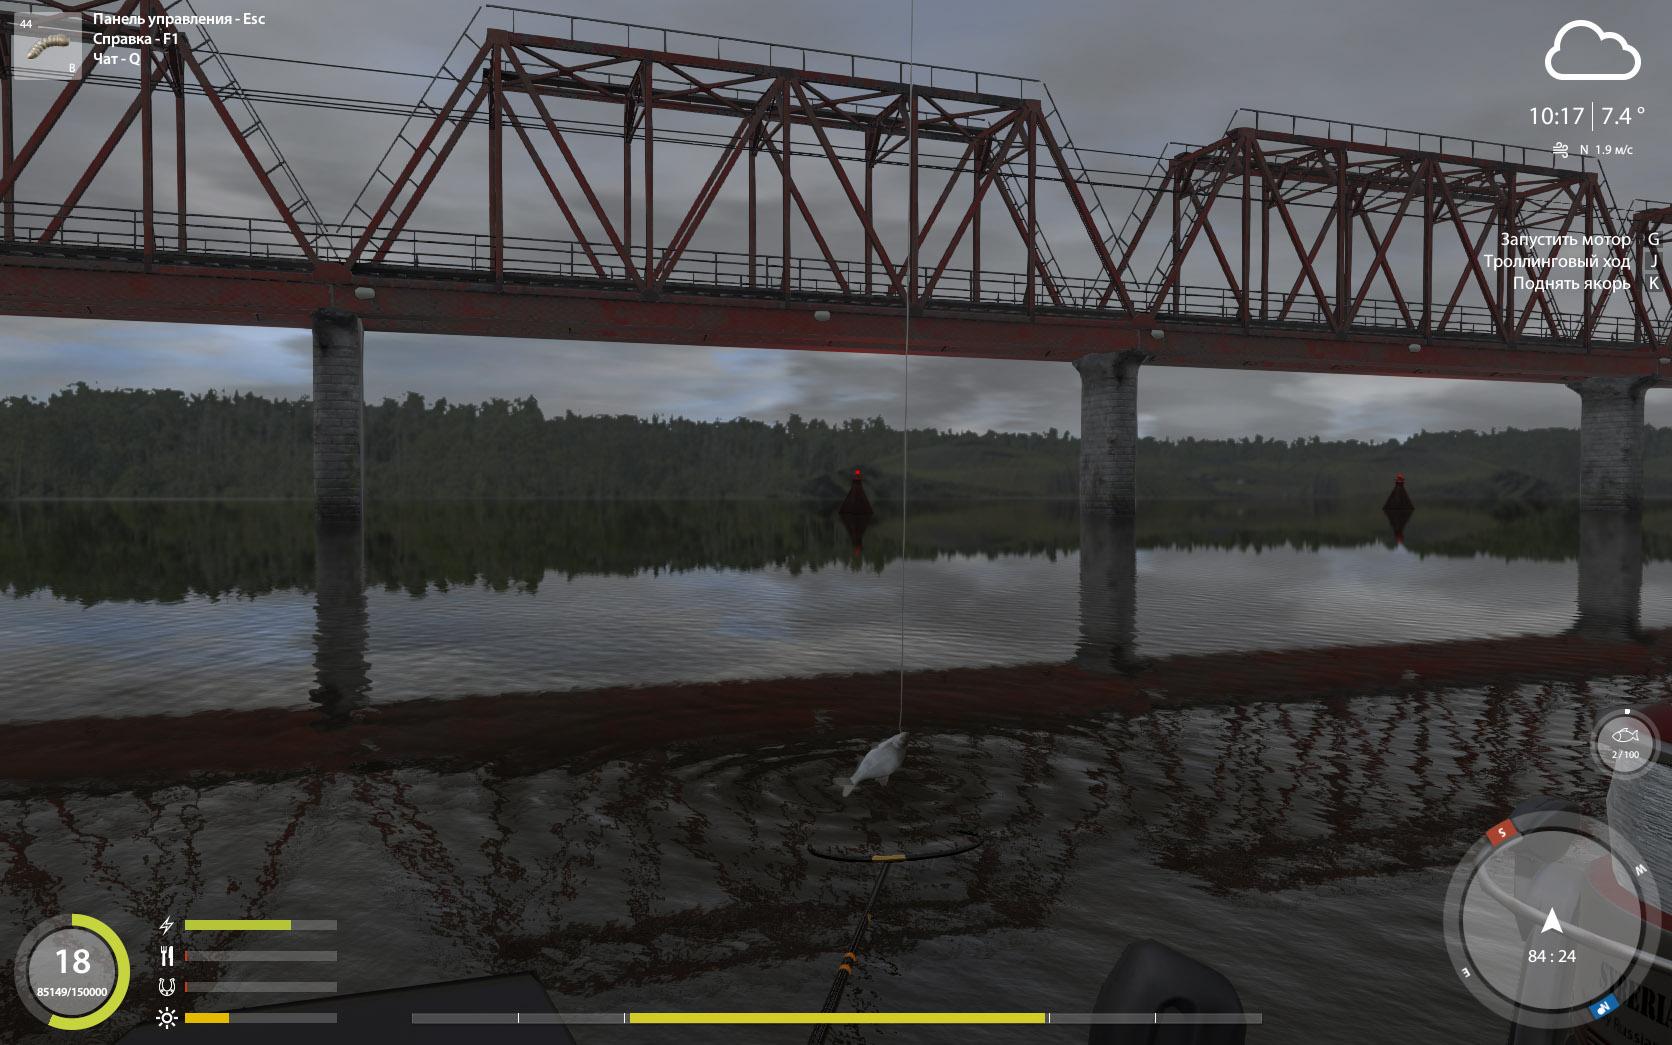
Fig. 14: Using the podsak.
The process of dicing on the fly rod is relatively simple: it is necessary to tighten the fish with a pendulum motion [retention of the LMC].
Fishing on the rod, equipped with a coil, in contrast to the fly fishing rod, often starts from a long distance and before you need to pull the fish to shore using a coil. If the power of the coil is not enough to pull the fish to the shore, work with the coil can be combined with "pumping out" the rod [holding PKM].
It is very important to monitor the load indicator, which displays the load relative to the weakest component of the tackle. Avoid getting the load indicator in the critical zone - this can lead to a breakdown of the gear. If a reel is installed on the rod, then with a high load it is necessary to relax the friction [wheel of the mouse], this will soften the impacts and reduce the load on the tackle. Weakening the load on the flywheel will be more difficult. As a last resort, in order to keep the rod, you can try to move for fish, if such an opportunity exists.
In the case of a large fish, it can take a while to digest, since you will first need to fish, giving it a little exhaustion. At a high load, do not try to force a bravado, this can lead to unreasonable damage to the tackle.
If the podsaka was not at hand, and a large fish that could not be raised by a fishing rod, then try to drag it to the shore.
Tips for catching
Range and accuracy of the throw
The accuracy of casting depends on:
- Player's skill
- Ability to catch on this type of rod
- The ability to use this type of coil
- Rod lengths
- Degrees of intoxication
- Wind Effects
First of all, pay attention to the skill and skill of catching this type of rod and coil. Pumping these skills will qualitatively improve the accuracy of casting. Also consider the direction and strength of the wind. The cast accuracy also decreases with increasing throw range.
Range of cast depends on:
- Corresponding to the weight of the rigging of the rod test
- Coil characteristics
- Characteristics of the rod: length, build and slenderness
- Mass and aerodynamic characteristics of the rigging
- Type of line
- Player's skill
- Ability to catch on this type of rod
- Ability to use this type of coil
- The condition of the rod, the through-rings and the coil assemblies.
- Fisher Energy
- Effect of bonuses to casting
First of all, for the casting distance it is necessary to take care of the fish energy reserve. Exhausted body physically can not far throw a snap.
The initial range of the throw is set by the characteristics of the rod. For maximum range, you should use long, slashing rods with a slow build. The weight of the rigging should lie in the test range, which is indicated in the characteristics of the rod.
It is also necessary to take into account the aerodynamic characteristics of the rigging. Many of them can not be far abandoned due to their physical parameters. To rigs with problematic aerodynamics are light wobblers and poppers, which have a high coefficient of resistance.
For casting light rigs, use small coils. Pay close attention to the choice of the baytalk coil. These coils allow you to perform very long casts, but they are demanding on the bait weight. To catch light baits, you need to choose low-profile bytkastingovye coils, which have a light spool and high-quality bearings. Classic round bytkastingovye coils are more suitable for casting heavy baits and jig rigging.
Skills and skills of the player significantly increase the casting distance and they need to be given the highest priority. Include skill points in pumping the type of coil and rod that you prefer.
The type of line used is also important. The casting range with a different type of line can be different.
Some rods have bonuses to cast range. Information about bonuses can be obtained in the rod description window.
Selection of spinning
When choosing a spinning it is necessary to pay attention to its test. As the first spinning, the universal rod is best suited, the test of which should cover the weight range of the most popular baits. Alternatively, you can consider the rod with a test 7-28, 10-30, or 12-40. This test will be enough for the first rod.
To catch a strong predator, such as a pike or a pike perch, you will need a hard rod with a fast formation. These rods have a good reserve of power to pierce the hard jaw of the fish and cope with swift fish maneuvers. On the other hand, it should be taken into account that a hard rod often does not have outstanding throwing qualities, and by choosing a powerful spinning you sacrifice the casting distance.
For fishing on jig rigging you will need a sensitive rod. Sensitive spinning will make it easy to "read" the features of the bottom relief, so it will be easy to find a dump, an underwater hillock and other points of attraction of bottom predators.
To catch a gentle predator, such as perch or grayling, it is better to use a soft and light rod. A too hard spinning can damage your mouth and lead to loss of fish.
Using light rods with prefixes (UL, L, ML) you can get additional experience points. Catching a light tackle can be risky, but if you use it to hunt for a medium predator, you can get a significant increase in the points of experience. Information about bonuses is available in the rod description window.
Fig. 15: An example of a light series of spinning rods that have a bonus to experience.
Selection of float rod
When choosing a flywheel in the first place, pay attention to its length, weight and maximum load. A long fly rod is good for fishing from the shore. For fishing from a boat it is better to choose a rod shorter. The responsiveness of the actions of the angler to the controls and the rate of energy consumption depend on the mass of the fly rod. In short, the easier the rod, the better. The Maximum withstand loads is especially important for the flywheel rod which has no coil and clutch, which allows to soften the fish jerks.
When choosing a Bologna and a match rod, it is necessary to take into account their test, the range of which must cover the weight of the used rigs. Also pay attention to rigidity, length and build. From the match rod you need a good cast and enough power to cope with a large barbel or carp. For long casting, a long, biting rod with a slow or medium string will fit. A powerful, hard rod with a quick build better holds the beats of the fish, making the process of stealing more manageable.
Choosing the bottom rod
When choosing a bottom or feeder rod, you should proceed from the conditions of use and the type of fish for which this rod will be used. As a universal rod, it is better to choose an ordinary feeder with a medium build and moderate stiffness. Such a rod will be good to throw a snap and give the necessary control over the fish.
For catching on small reservoirs it is expedient to use a picker. In addition to convenience of use in limited conditions, the piker has a bonus to the experience gained. Also, the picker allows far to throw light and sensitive rigs, which has a positive effect on catching cautious and medium-sized fish.
Carp fishing rod is a choice for large lakes and rivers. Carp rod is ideal for catching large carp, barbel or cupid. In addition to catching a large peaceful fish, such a rod can be used to catch a predator on a heavy live bait.
General tips for choosing a fishing rod
When choosing a rod, pay attention to its mass. The heavy rod exhausts the player and makes the control less responsive.
Pay attention to the transmission rings with which the rod is equipped. Qualitative access rings less wear out the line and make casting more qualitative.
The high stiffness of the rod almost always has a positive effect on the quality of the cutting and control of the fish. But excessive stiffness can affect negatively when catching fish that have weak lips.
It is necessary to take into account that the actual characteristics of tackles and rigging elements may differ from those stated (indicated in the store).
Coil selection
When choosing an entry-level coil, you should choose the ordinary non-inertial option. With the accumulation of experience and money, the selection of the coil needs to be approached more consciously, since the coil is the main component of the rod, to which the main load comes.
Carefully study the characteristics of the coil. Pay special attention to the power of the friction brake (Max Drag). The power of the friction brake indirectly indicates the power of the coil itself. This value indicates the load limit to which the brake will perform its function, bleeding the line during the jerking of the fish before finally tightening.
When choosing the size of the coil, consider the weight of the tool. For catching heavy lures or massive bottom rigging, you should choose a large coil, the size of 6000 and above. For the casting rod, the best choice in this case will be a round byte-tracking coil.
If you plan to work with light snap-ins, then you need to choose a small (3000 - 4000) inertial coil or low-profile byte-casting.
Coils of the smallest sizes (1000 - 2000) should be chosen exclusively for fishing rods from the light series (UL, L). For a small coil, the producer and its value play a big role, indicating the reliability of the mechanism. Small coils for easy spinning are often subjected to serious stresses and it is very important that the coil mechanism does not fail you.
Fig. 16: An example of a small coil for light fishing.
Do not use small coils for casting heavy rigging, weighing more than 30 grams, as this can damage the coil mechanism.
For powerful feeders or carp fishing rods, choose the maximumless inertia coils. Such coils not only do well with the casting of heavy loads, but they will also be able to restrain the pressure of a large fish confidently.
If it is a large fish , then make a choice always in favor of large and powerful coils. Insufficient power of the coil will complicate the vyzazhivanie and ultimately lead to the loss of a serious trophy.
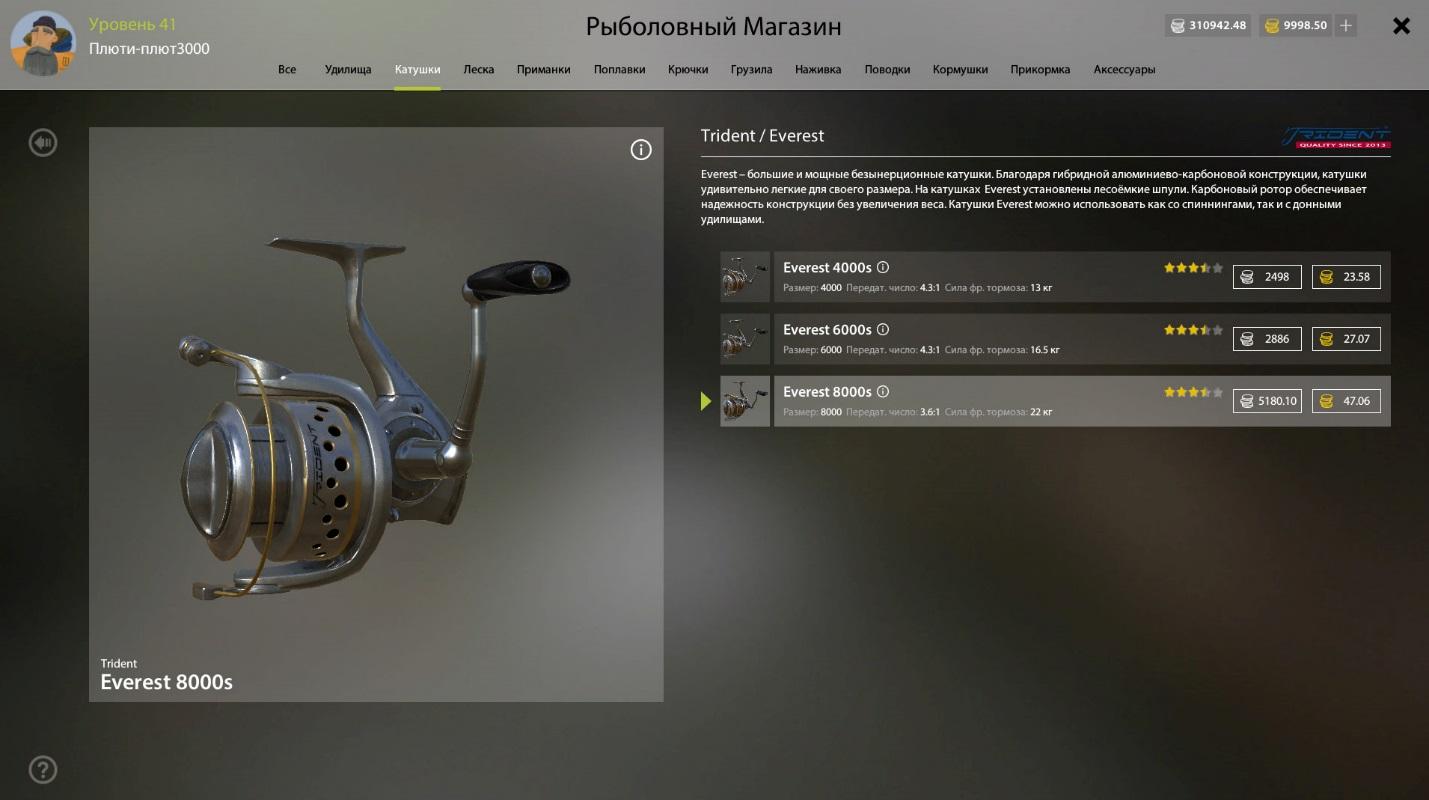
Fig. 17: An example of a powerful feeder coil.
For a strong predator, the best option is a byte-tracking reel, which can be equipped with a casting or jerk rod. If these rods are not yet available for you, then opt for a large inertia-free coil.
Baytkastingovaya round coil is good for power spinning fishing for heavy and medium baits weighing 15 grams.
Baytkastingovaya low-profile coil its best use can be found when working with light and medium-weight baits weighing up to 25-30 grams. At its small size, this coil has enough power to cope with an average and even a large predator.
If the goal is long-range casting, then you should choose the baytesting coils. Round - for heavy baits, low profile - for lungs.
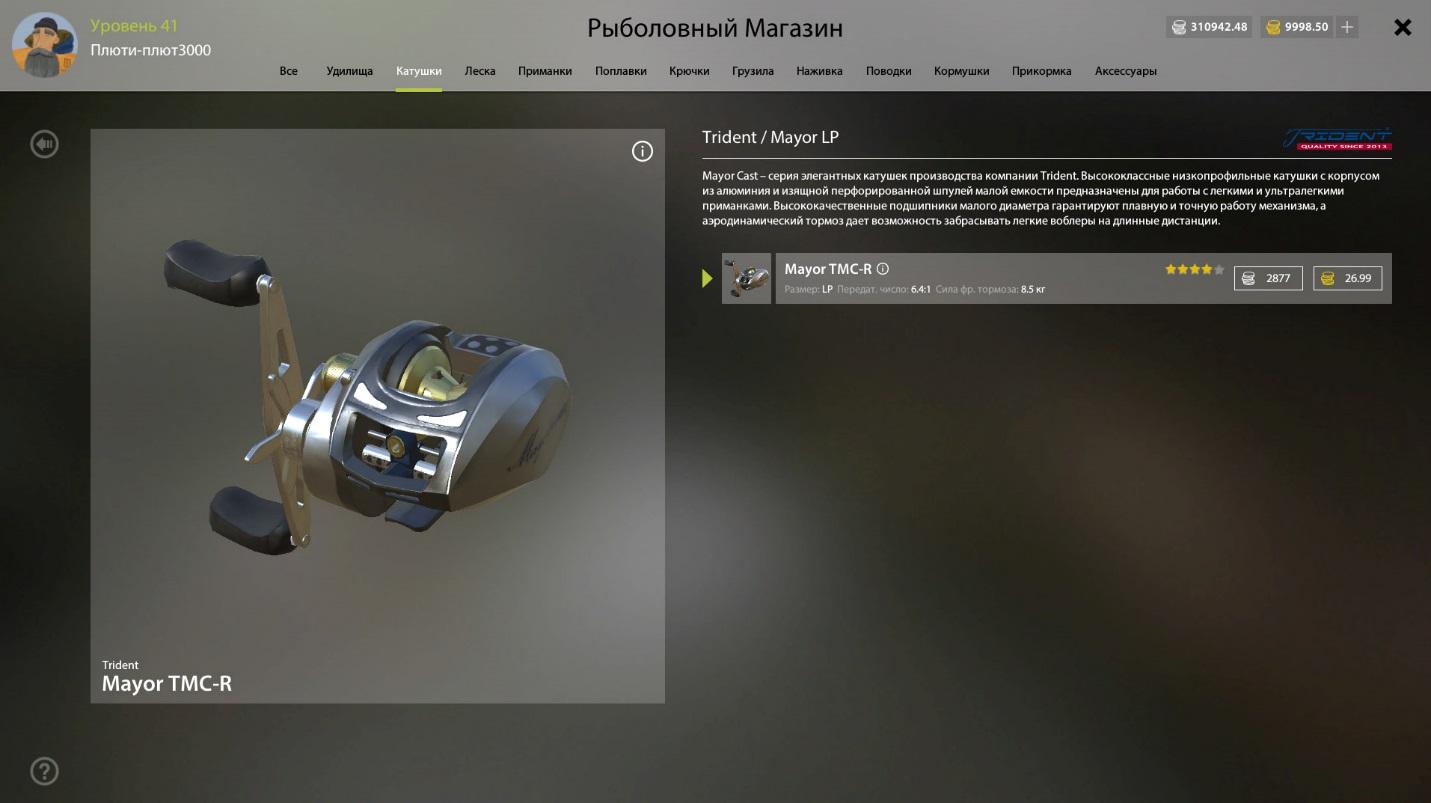
Fig. 18: Low-profile coil for long and precise casting of light perimans.
Selecting a hook
When choosing a hook, pay attention to its cost and the manufacturer. Cheap hooks will probably not be of the best quality.
The size of the selected hook depends primarily on the size of the fish you will catch on this hook.
The size of the hook is indicated in the international format. 24 - the smallest, 4/0 - the largest.
- Large fish such as carp: №2 and above.
- Bream: №10 -№6
- Crucian, roach, fish: №16 - №10
- Small fish, such as a sticker, a fir-tree, a gudgeon: No. 24 - No. 18.
If you do not want to catch a particular fish, then stop the choice on the sizes from №16 to №12. A hook of this size will be enough to catch a variety of medium-sized fish.
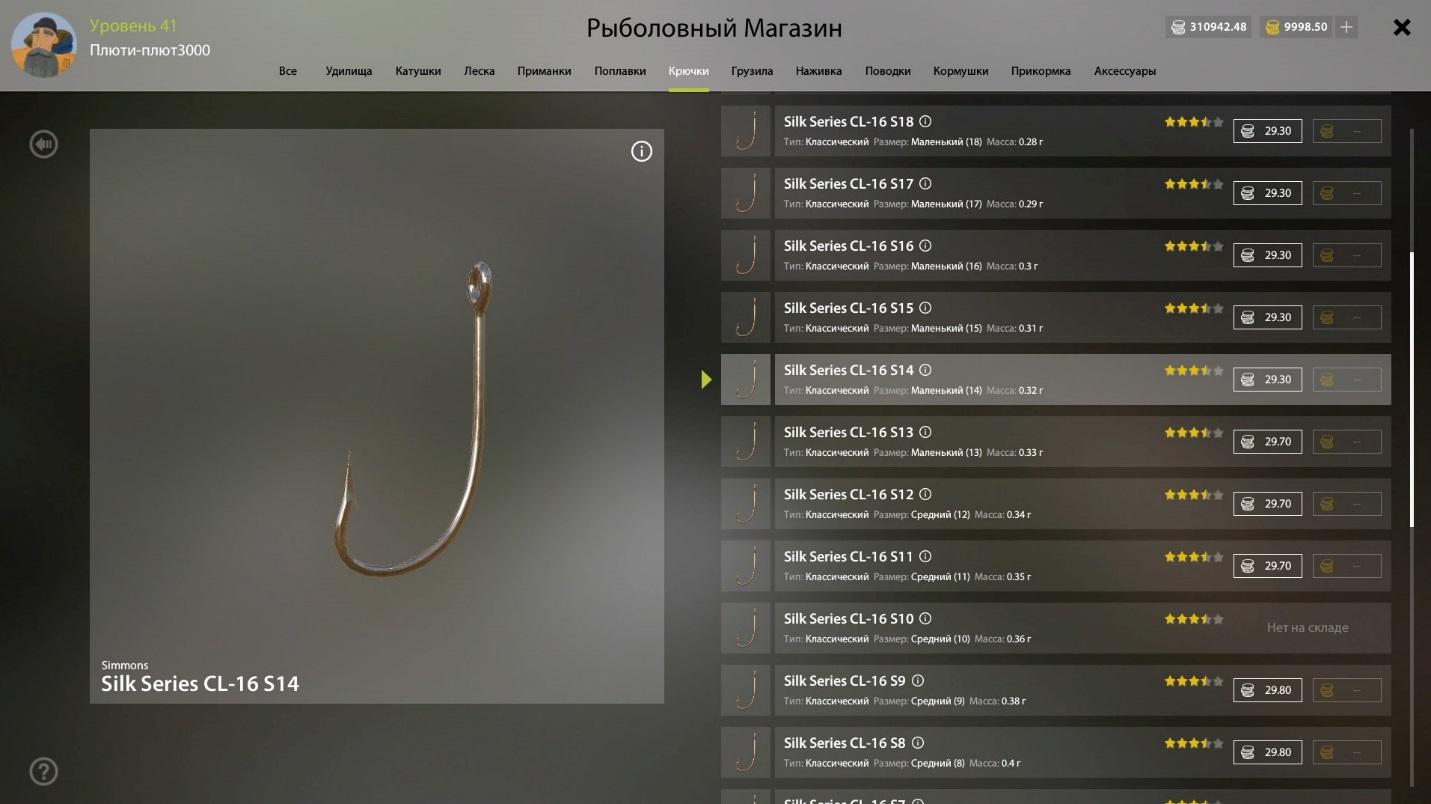
Fig. 19: An example of a hook for catching small and medium fish.
Also consider the size of the bait. To achieve the best cutting with small baits, such as bloodworms or sponges, use small hooks up to 16-14.
Choice of line
Each type of line has its advantages and disadvantages.
Nylon fishing line: invisible in water, inexpensive, has a high coefficient of extensibility. Due to the extensibility, the nylon fishing line extinguishes the fish jerky well, but at the same time, this quality makes such fishing line unsuitable for catching a predator, when a confident and rigid cutting is required. Scope: primarily float and bottom fishing, in some cases spinning (when delicate rigging is required).
Braided cord: very durable and rigid. Ideal solution for spinning. Because of its glossiness is not suitable for float and bottom fishing of cautious fish species. Scope: spinning fishing.
Fluorocarbon: it has zero visibility in the water, which makes fluorocarboxylic fishing line irreplaceable when catching a cautious predator, such as asp, salmon or chub. Has a low coefficient of extensibility, which provides the necessary rigidity for effective cutting of pike or pike perch. Also has a high resistance to damage, and this makes it possible to use thick fluorocarbons when catching a toothless predator without a lead. Scope: any kind of catching. Of the disadvantages of fluorocarbon, it should be noted the high cost and low breaking load when compared with other types of wood.
The choice of fishing line depends also on the rigidity of the tackle. If high stiffness is required, for example, for sure cutting of pike perch or pike, then it is necessary to choose a cord or fluorocarbon, which have low extensibility.
When catching a neat trophy fish (bream, asp, chub, etc.), you should use the most inconspicuous and thin fishing line. Reducing the thickness of the line almost always has a positive effect on the number of bites. An exception is unless catching a rough and unscrupulous predator, such as catfish or pike.
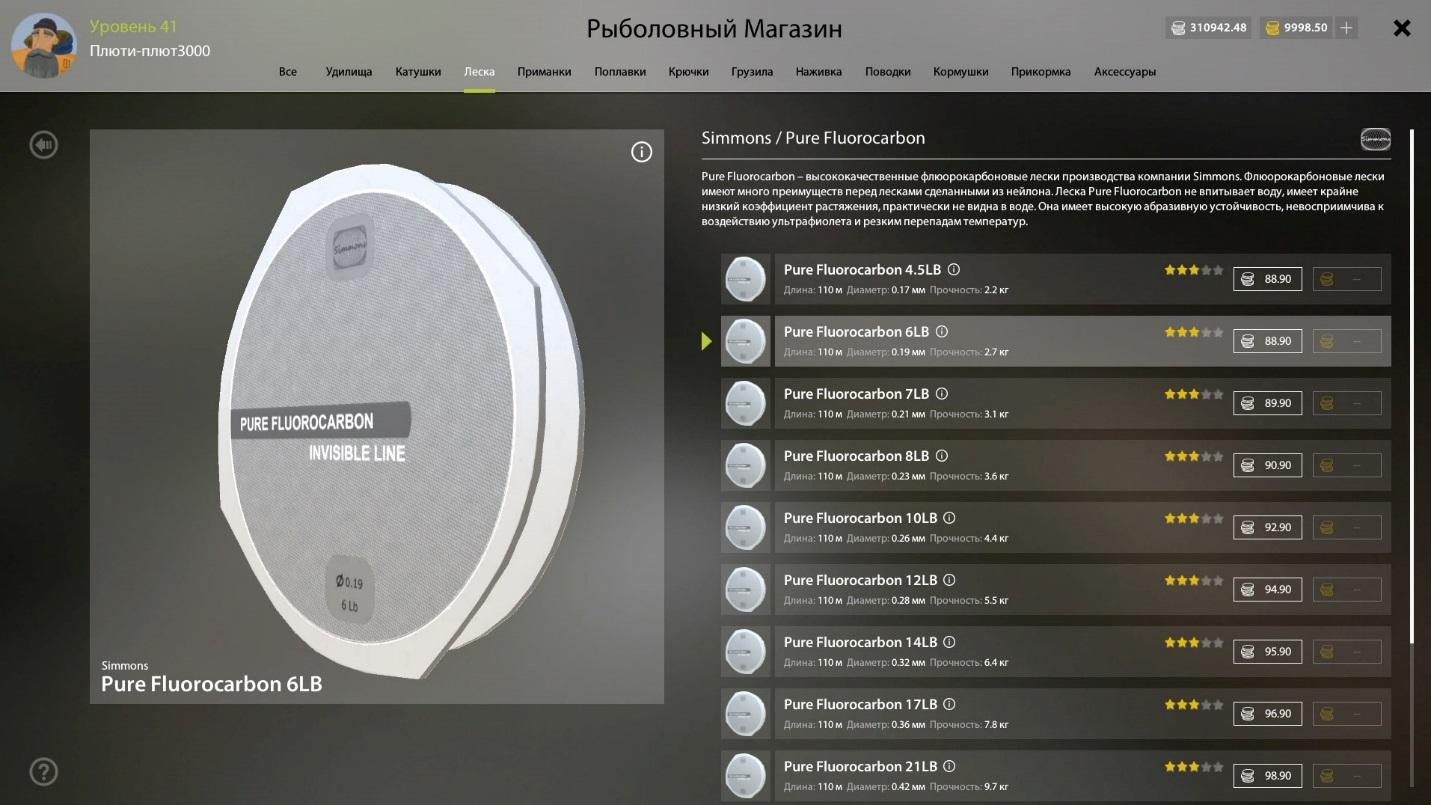
Fig. 20: Thin fluorocarbon is the ideal solution for catching cautious, medium-sized fish.
If possible, give up the leash. Any extra link in the rig has a negative effect on the cautious fish's biting.
When trolling, use fluorocarbon if you want to damp the bait below its working horizon. Fluorocarbon has a high mass and is able to slightly heat the bait during wiring.
Repair and maintenance of gears
Keep track of your gear. Almost any item of gear can be damaged. It is especially important to pay attention to the condition of the rod and coil, the wear of which significantly reduces the performance and increases the risk of breakage. The breakage of the coil mechanism or rod form is irreversible and can not be repaired.
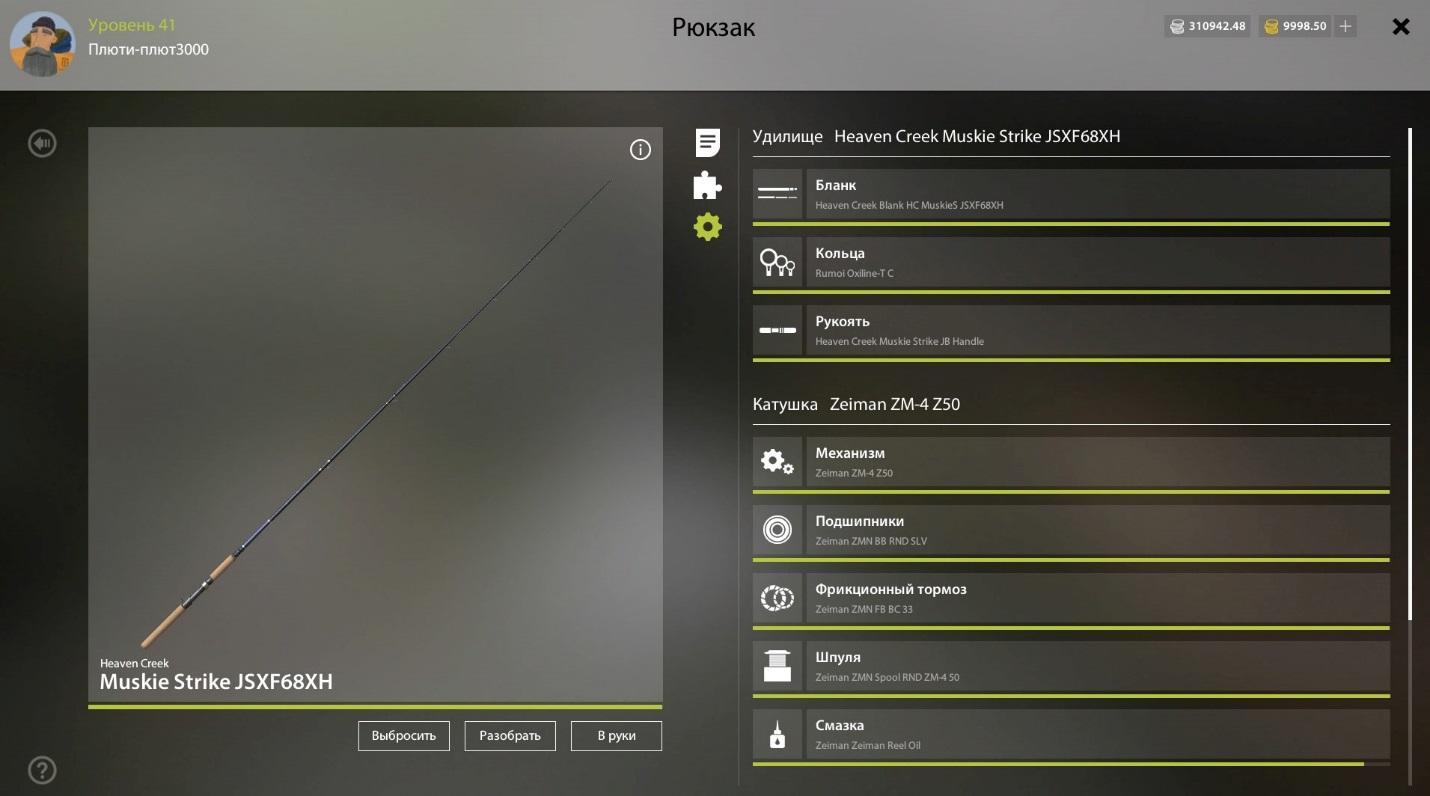
Fig. 21: Tack Status Window.
Pay attention to the condition of lubrication of the coil. Its wear can pull the wear mechanism and bearings, repair of which can cost a lot of money.
The most vulnerable components of the coil are the friction brake washers, which can be quickly erased during critical loads. In time, change the worn washers of the clutch, so that at the most crucial moment you will not lose the trophy.
Do not get involved in frequent repairs of components such as transmission rings, bearings or spool coils. These components are not repaired, but are changed to new ones. At the same time the cost of their replacement does not depend on the degree of their wear and tear. It is advisable to replace these components only if their wear has reached a critical level.
Repair gear can be made in the workshop. The quality and cost of repairs depends on the specific workshop. On all reservoirs workshops are different.
Repair may take some time. Instant repairs can be made only for gold coins, with the probability of successful repair will be equal to 100%.
Fish market
In the fish market you can sell your catch. Sale of fish in the fish market is the main source of earnings for the player.
Find fish market can be at the fishing base. The cost of selling fish depends on the water body. Somewhere the fish is estimated more expensive, and somewhere cheaper.
To sell fish, go to the fish market, and then click interaction [E]. In the window that opens, select the fish you want to sell. Hold down [CTRL] to select multiple fish at the same time or [SHIFT] to select a group of fish in the designated range.
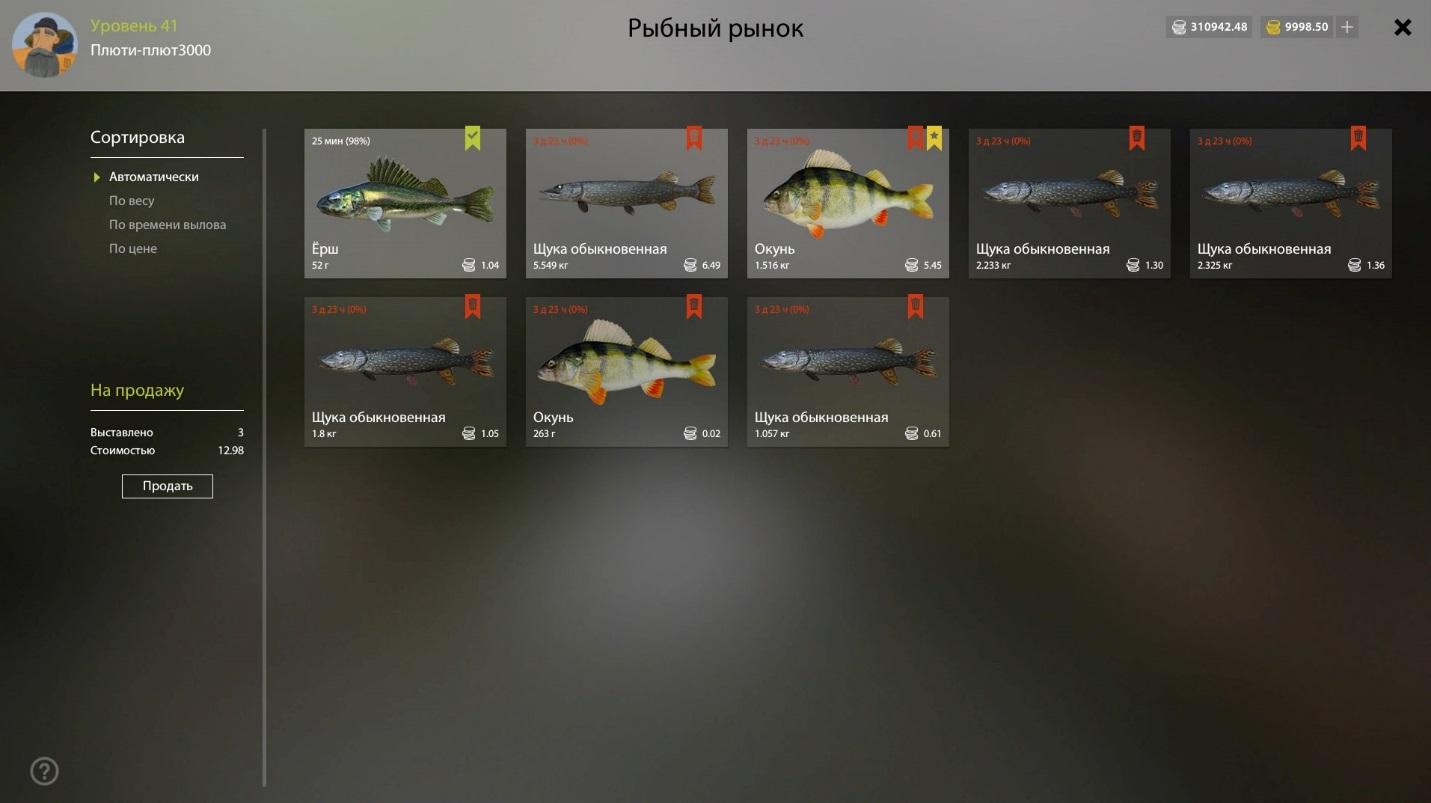
Fig. 22: Fish market and fish assessment. In the screenshot you see a spoiled fish, which is marked with red marakr.
Selecting fish, you will have it rough estimated value, which may differ from the total cost. Click the "Sell" button to execute the sale of the selected fish.
Each fish has its own minimum estimated weight, from which you can get at least some money for fish. Instances that do not reach the estimated weight are sold for symbolic payment.
Trophy fish is sold at an increased rate. Try to catch and sell a large fish, it will bring more money.
The spoiled fish, from the moment of catching which passed more than one real day, is estimated at a reduced rate.
Score
The player is available fishing and grocery stores, where you can buy all the necessary things for fishing.
The shops are located on a fishing base. On some reservoirs you can find several shops with different assortment and prices.
Each store has its own extra charge and a set of offered goods. If there is no product on one pond, then it is worthwhile to look it up elsewhere. Also, on some reservoirs you can buy something cheaper than in other places.
Delivery of goods to the store occurs at random intervals. If there was not any product in the stock, you should wait for the delivery for a while.
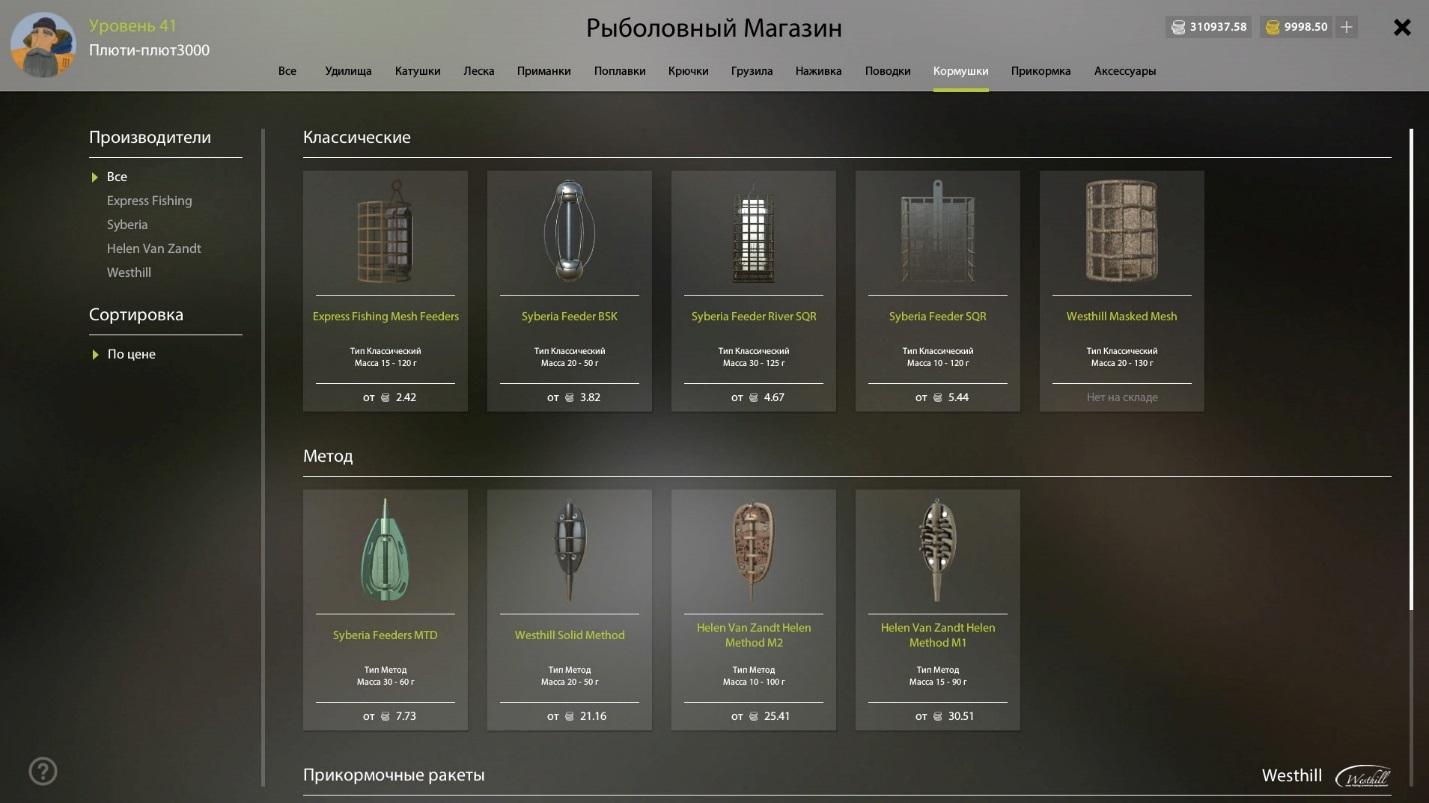
Fig. 23: View the feeders in the store window.
To buy goods, you need to find a store on the fishing base, go to the door and press the interaction button [E]. In the window that opens, select the desired section and find the product of interest in the list. Clicking it with the left mouse button [LMB] to open the detailed information window, where you can see all possible product modifications and detailed information.
To expand the detailed description block, press the button (i), which is located in the upper right corner of the product image.
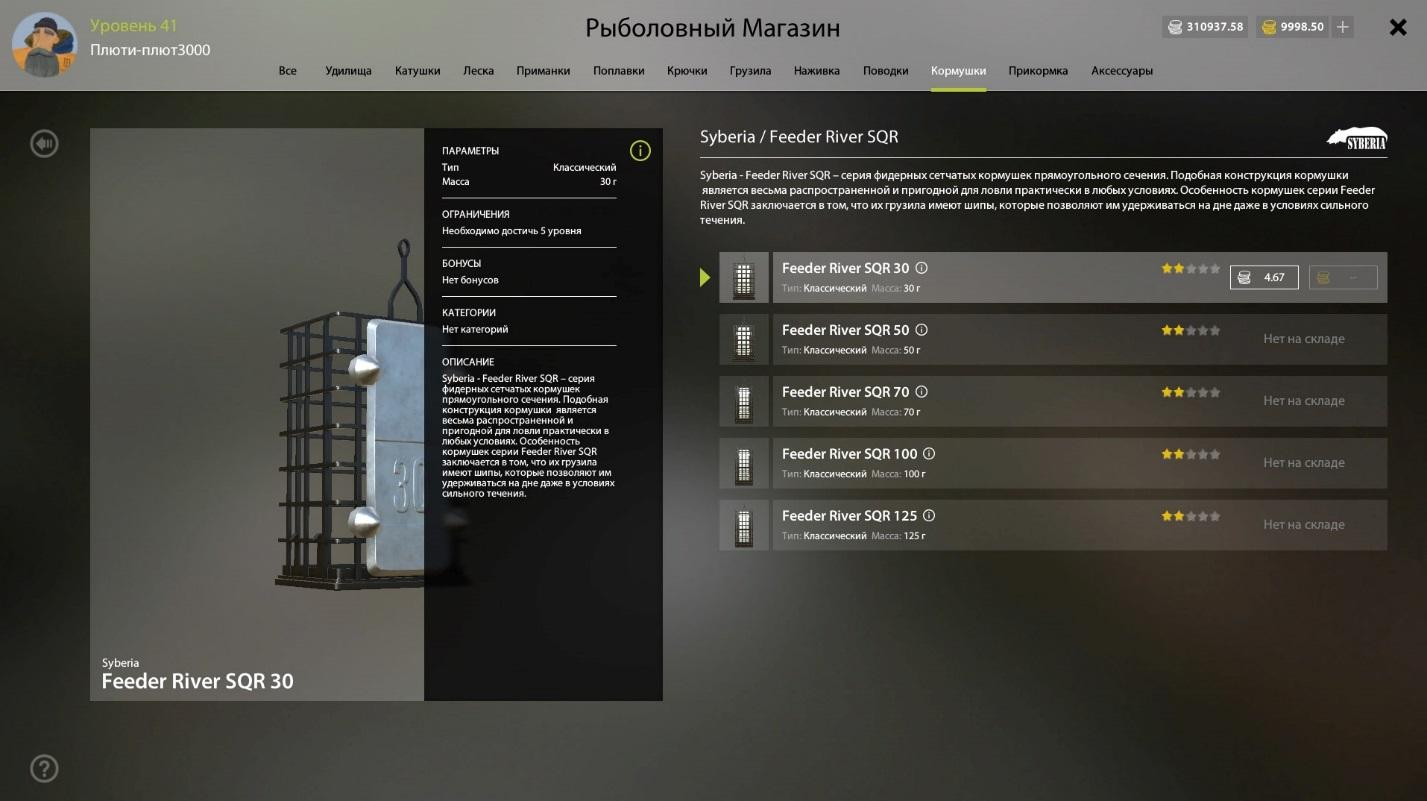
Fig. 24: The detailed information window for the feeder with the expanded description block.
To purchase goods for game currency, click on the button with the image of silver coins.
To buy goods for gold, click on the button with the image of gold coins.
Some goods are available for sale solely for silver or gold coins.
Workshop
In the workshop, you can repair gear, as well as buy tools or materials for crafting.
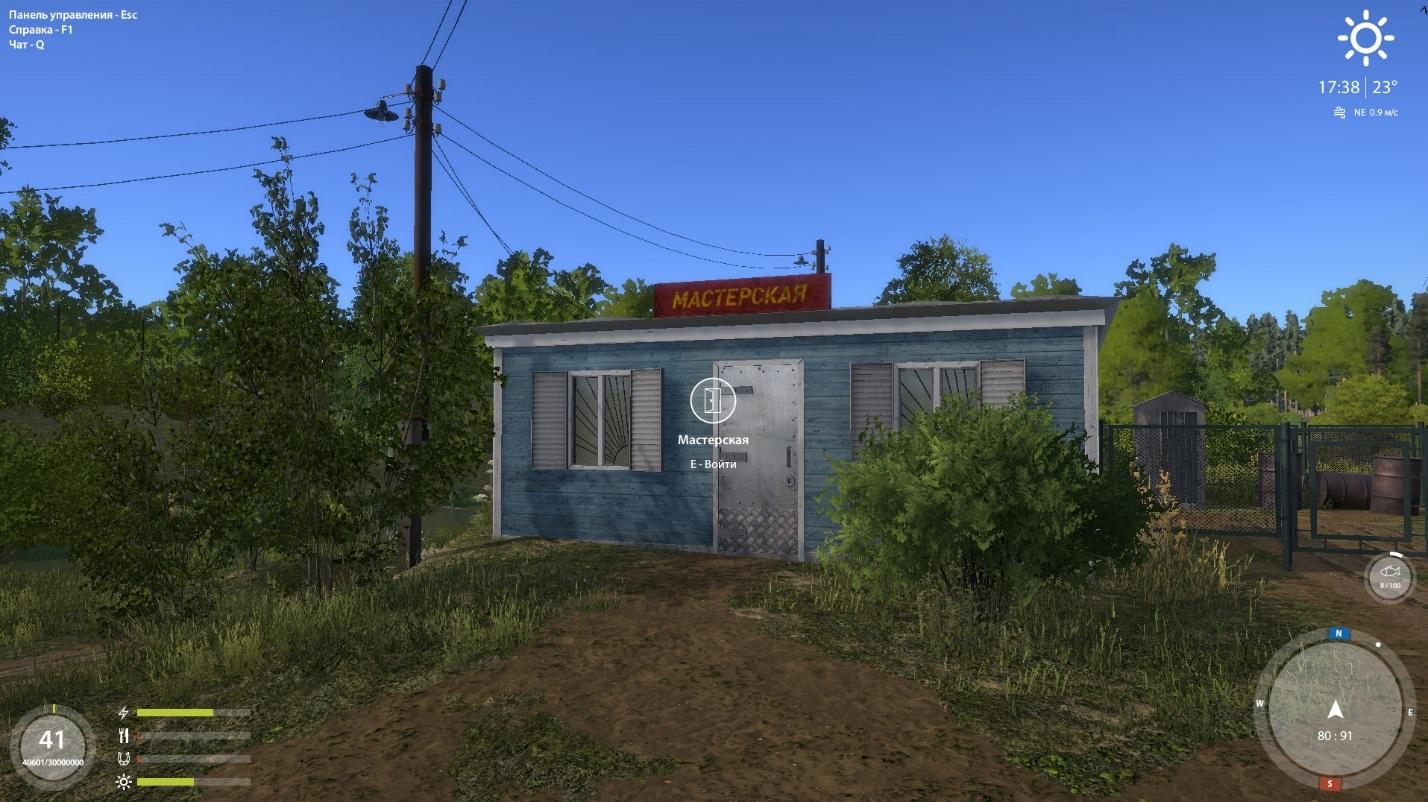
Fig. 25: The workshop building in the village on the Bindweed.
Find the workshop at the fishing base, go to the door and press the interaction button [E] to enter inside. Select "Repair" in the top panel if you want to repair the tackle or "Shop" to buy tools or materials.
You can see the interface of the store window in the previous section.
In the repair window you can see the status of your gear. For detailed information on the state of the object, click on it with the left mouse button [LMB], then the status window of all components of this subject will open.
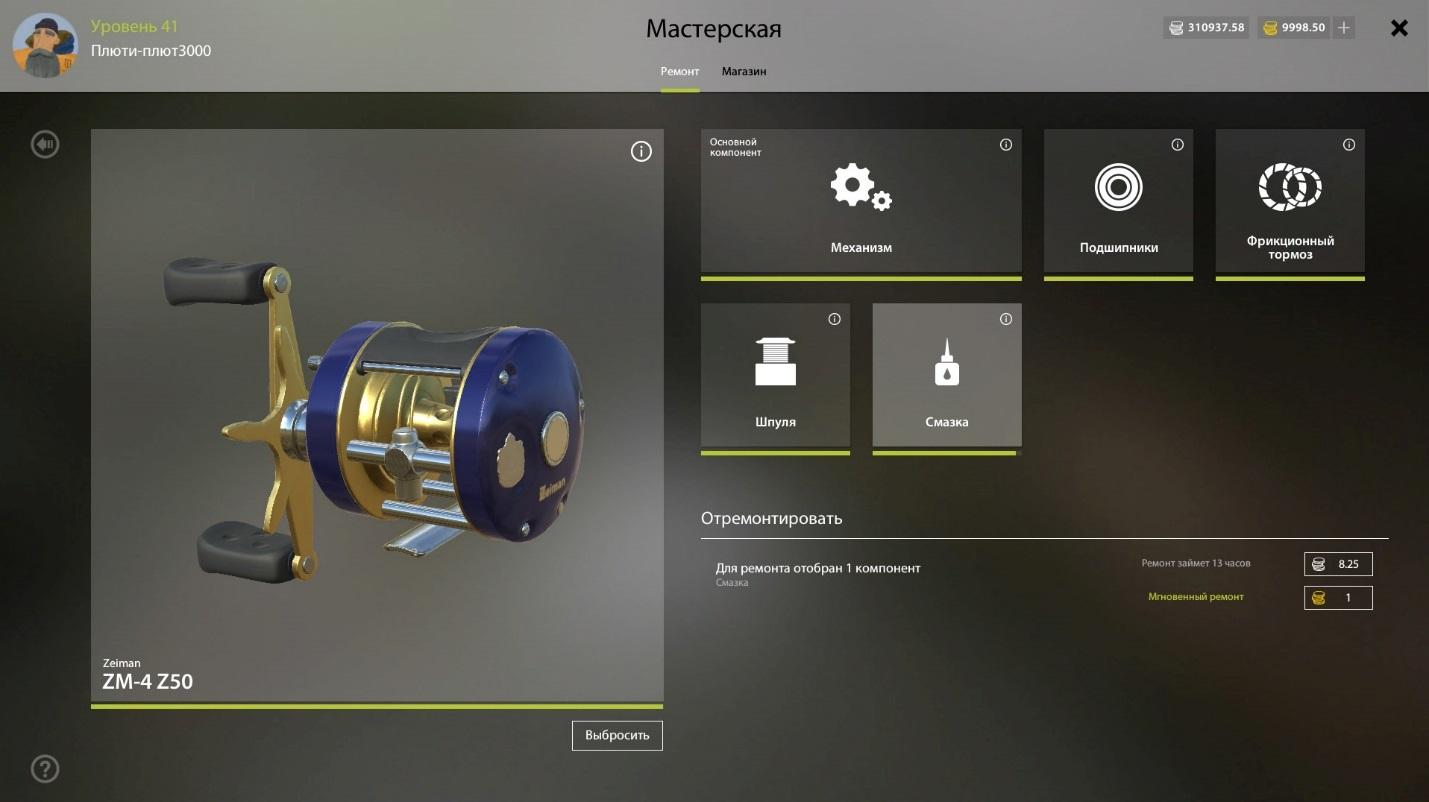
Fig. 26: Coil evaluation window in the workshop. The state of the components of this coil is normal and does not require repair; on the screenshot the interface is demonstrated.
Selecting a component (or several components holding down the [CTRL] button) that requires repair, you will receive a repair cost in silver and gold. Also information on the duration of repair for silver coins will be given. Repair for gold occurs instantly.
Click on the button with silver coins to put the item in repair for the game currency. The item will remain in the workshop for the duration of the repair.
Click on the button with gold coins to make an instant repair for gold.
If you chose to repair for silver and left the item in the workshop, then after the repair is completed, you need to pick it up yourself.
In some cases, repairs for silver may not be available. This can happen if the item being repaired was originally sold exclusively for gold or in the case when necessary spare parts are not in stock.
The probability of successful repair for silver depends on the specific workshop. Repair for gold is always successful.
You can get additional repair tips in the section "Repair and maintenance of gears".
Administration
In the administration building you can buy paper maps of the reservoir.
To purchase a card, look for the administration on the fishing base, go to the door and press the interaction button [E].
In the administration window that opens, select the map of interest and click on it with the left mouse button [LMB] to open the detailed information window.
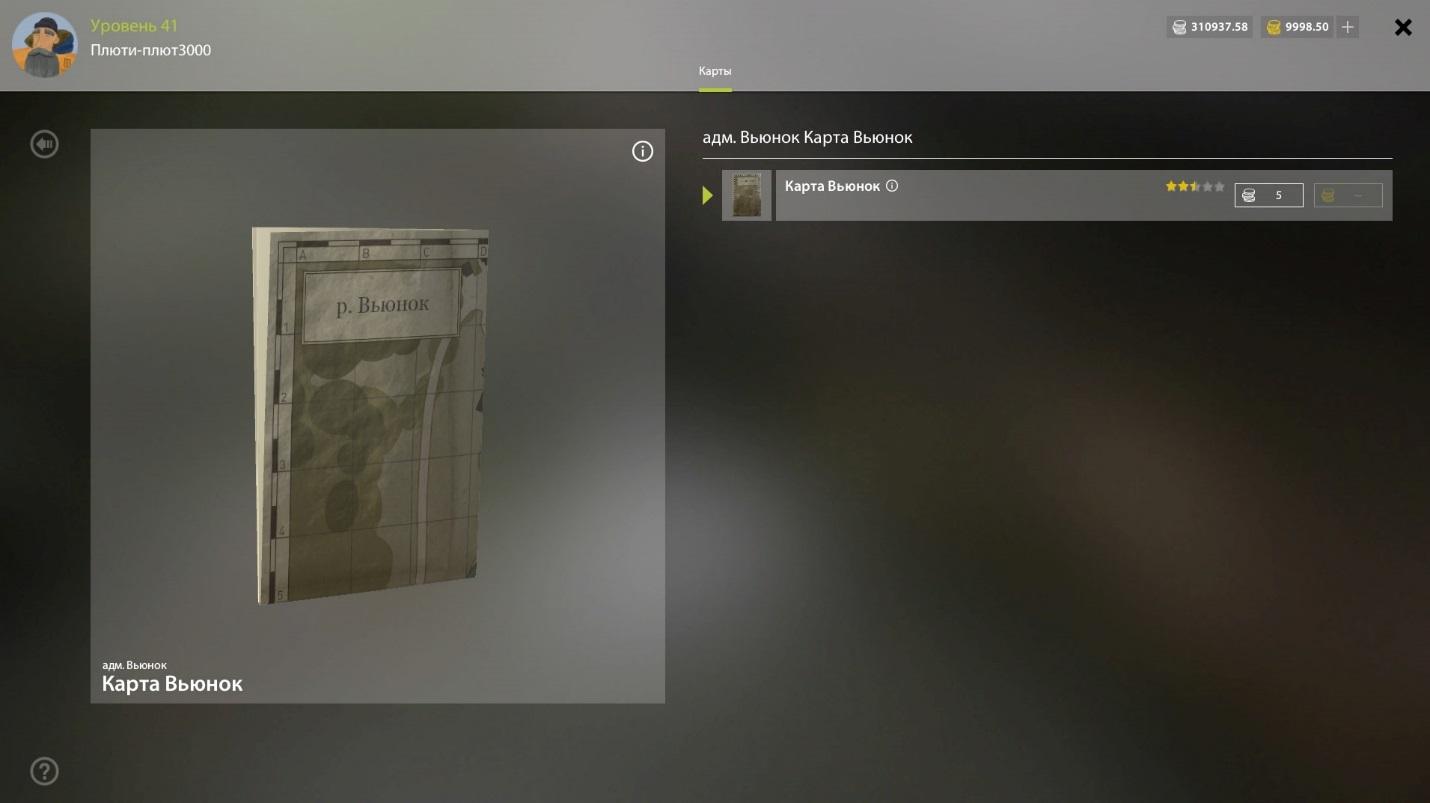
Fig. 27: Purchase a card.
To purchase a card, click on the button with silver coins in the detailed information window.
After purchase, the card will be in your backpack.
To open the map, press [M].
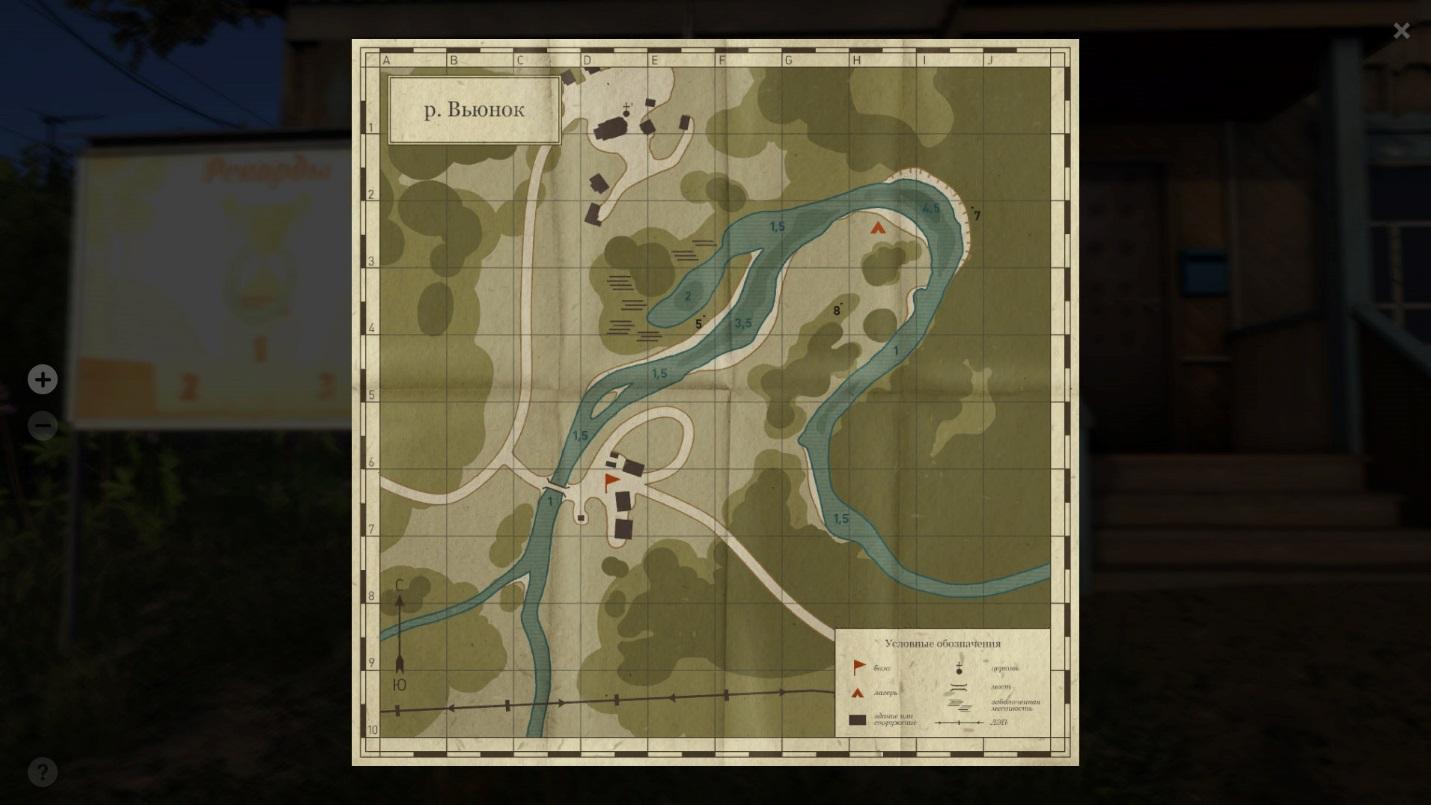
Fig. 28: Viewing a map of the reservoir.
Boat station
In the building of the boat station you can buy tickets for boat rental.
To buy a ticket, look for a boat station on the fishing base (if it is available), go to the door and press the interaction button [E].
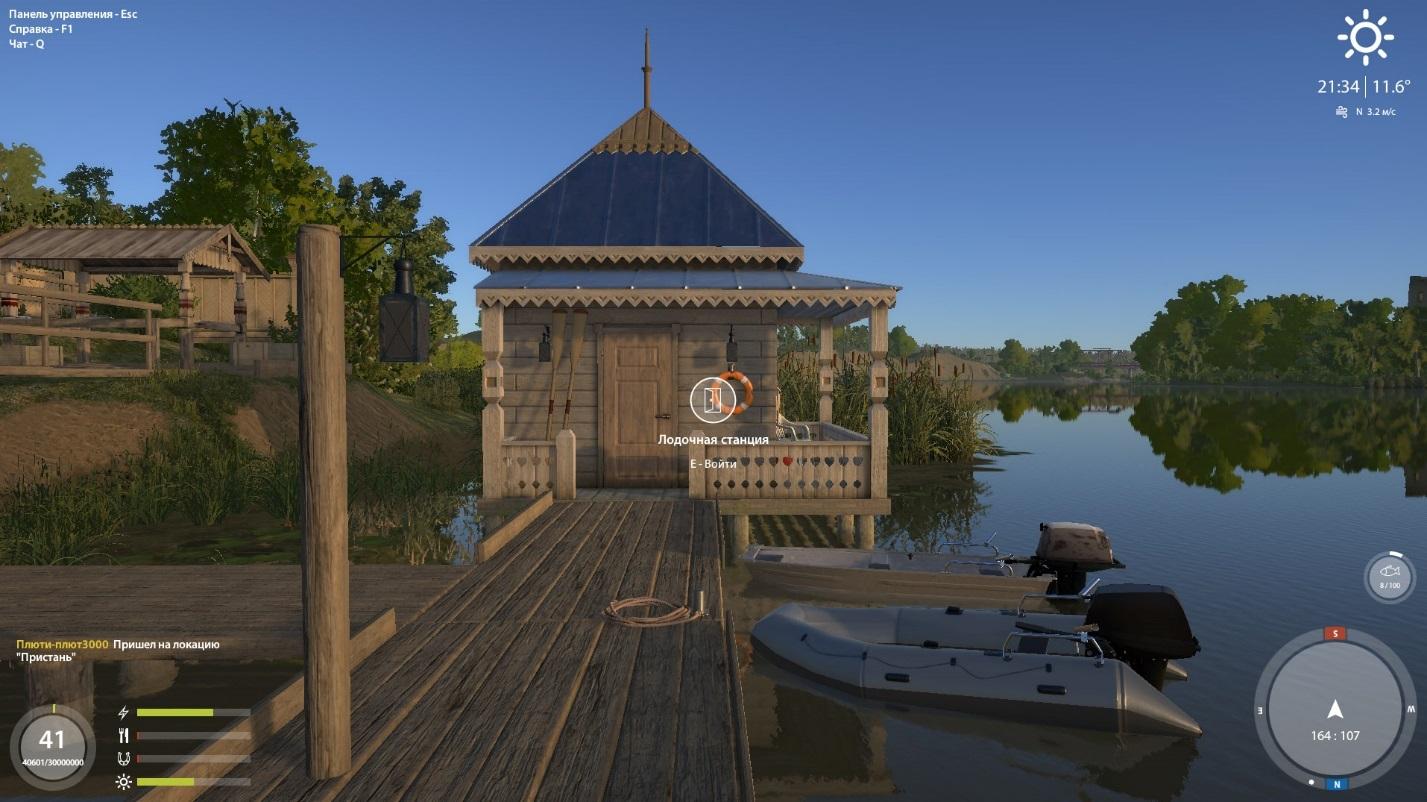
Fig. 29: Boat station on the Volkhov.
In the opened window of the boat station select the ticket you are interested in and click on it with the left mouse button [LMC] to open the detailed information window.
To purchase a ticket, click on the button with silver coins in the detailed information window.
Control Panel
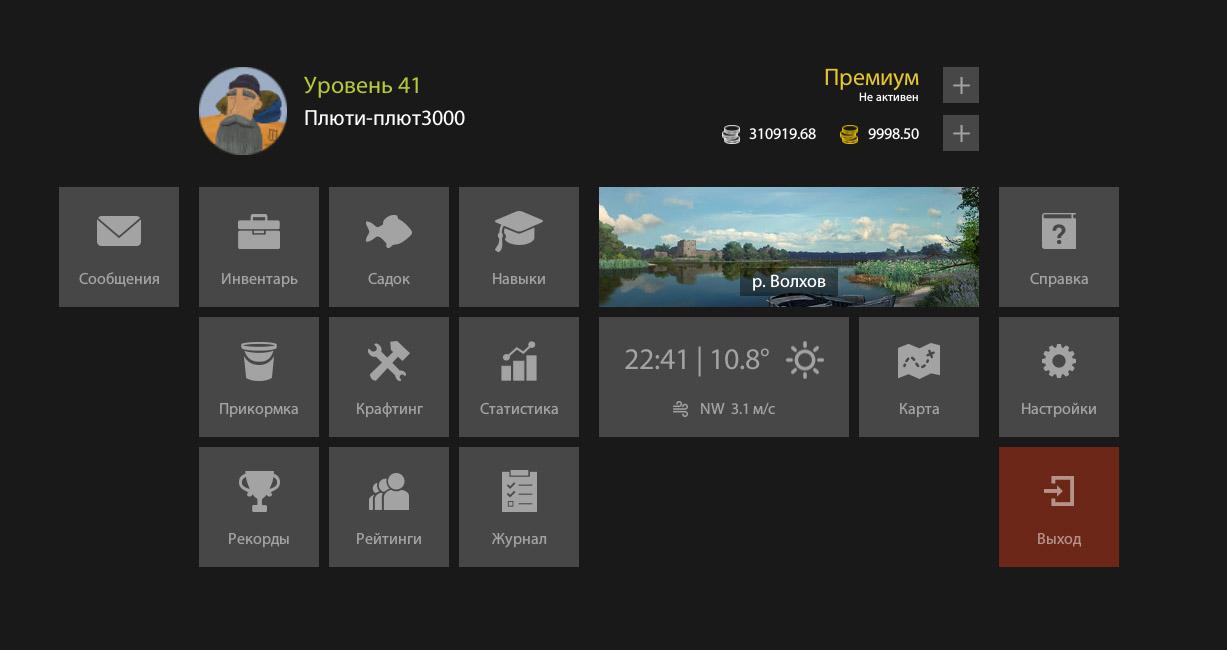
Fig. 30: The control panel.
The control panel can be used to quickly access the full list of game features, settings, and also to exit the game.
To open the control panel, press [ESC].
The pond selection window
To open the reservoir selection window, open the control panel [ESC] and click on the button with the current reservoir image.
Fig. 31: Water reservoir selection window.
In the reservoir selection window, you can get information on the reservoir you are interested in by clicking on it with the left mouse button [LMB]. In the detailed information window, a description of the reservoir, the required level and cost of relocation will be provided. To move to the selected pond, click the "Go" button.
The period of stay on the pond is not limited. The player pays only for the transition.
Skills
The character possesses a set of skills, developing which you will be able to open access to new skills and opportunities.
The tree of character development includes three basic fishing skills:
- Floating Fishing
- Spinning Fishing
- Donkey fishing
And three secondary skills:
- Brewing skills
- Bait mining skill
- Bait making skill
Each skill consists of skills, access to which opens as the skill is pumped.
Some skills can be further improved. For this purpose, special skill points are provided, which are awarded to the player for each level received. The number of these points is limited and they need to be spent wisely.
To pump a skill, you need to perform actions that are directly related to this skill. For the pumping of fishing skills, you must fish on the appropriate tackle. For the pumping of secondary skills, you need to engage in baiting, making baits or preparing bait.
In order to open the character skills window, open the control panel [ESC] and click on the "Skills" button.
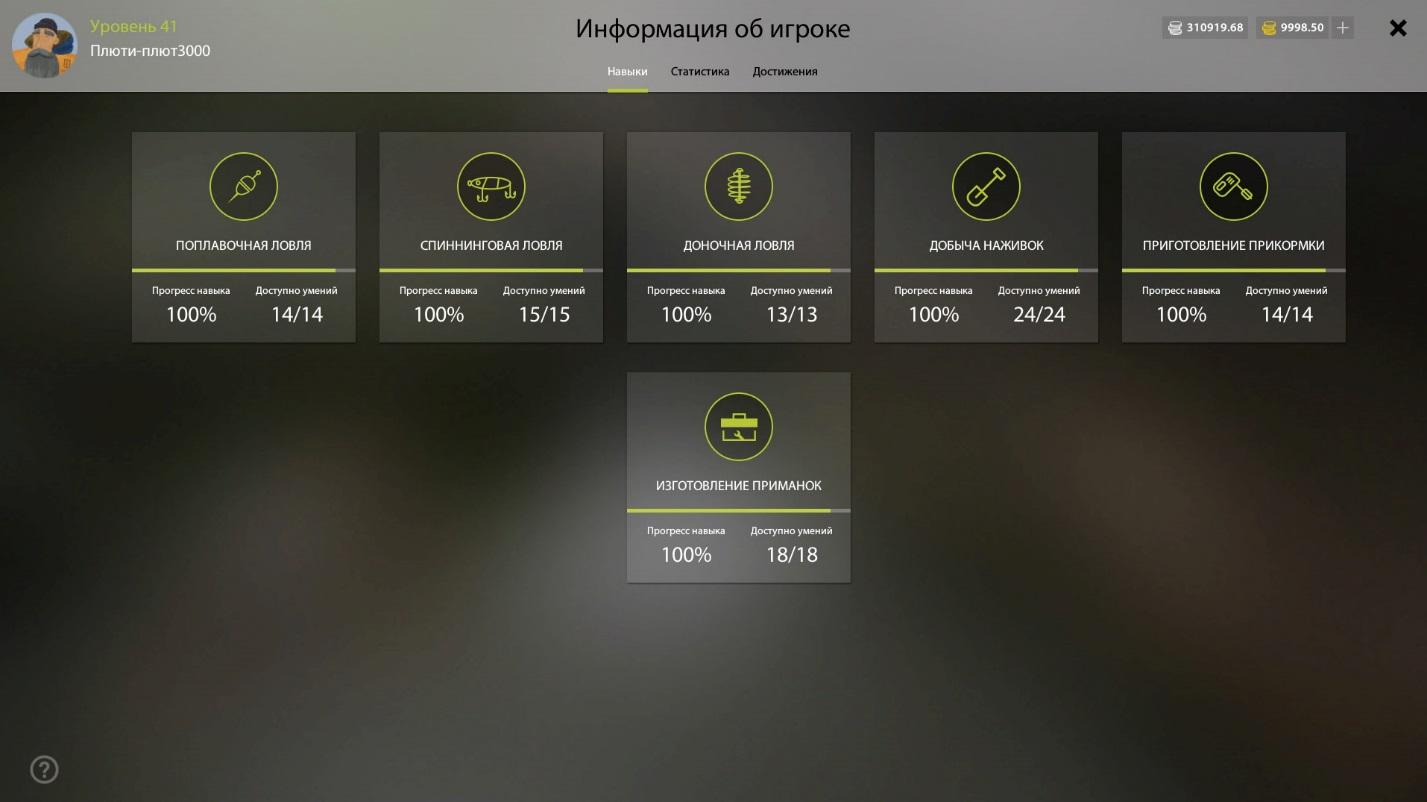
Fig. 32: Window of skills.
About the skill window you can see a list of all the skills of the character, the level of their skills and the number of open skills. Click on the skill to get detailed information on it.
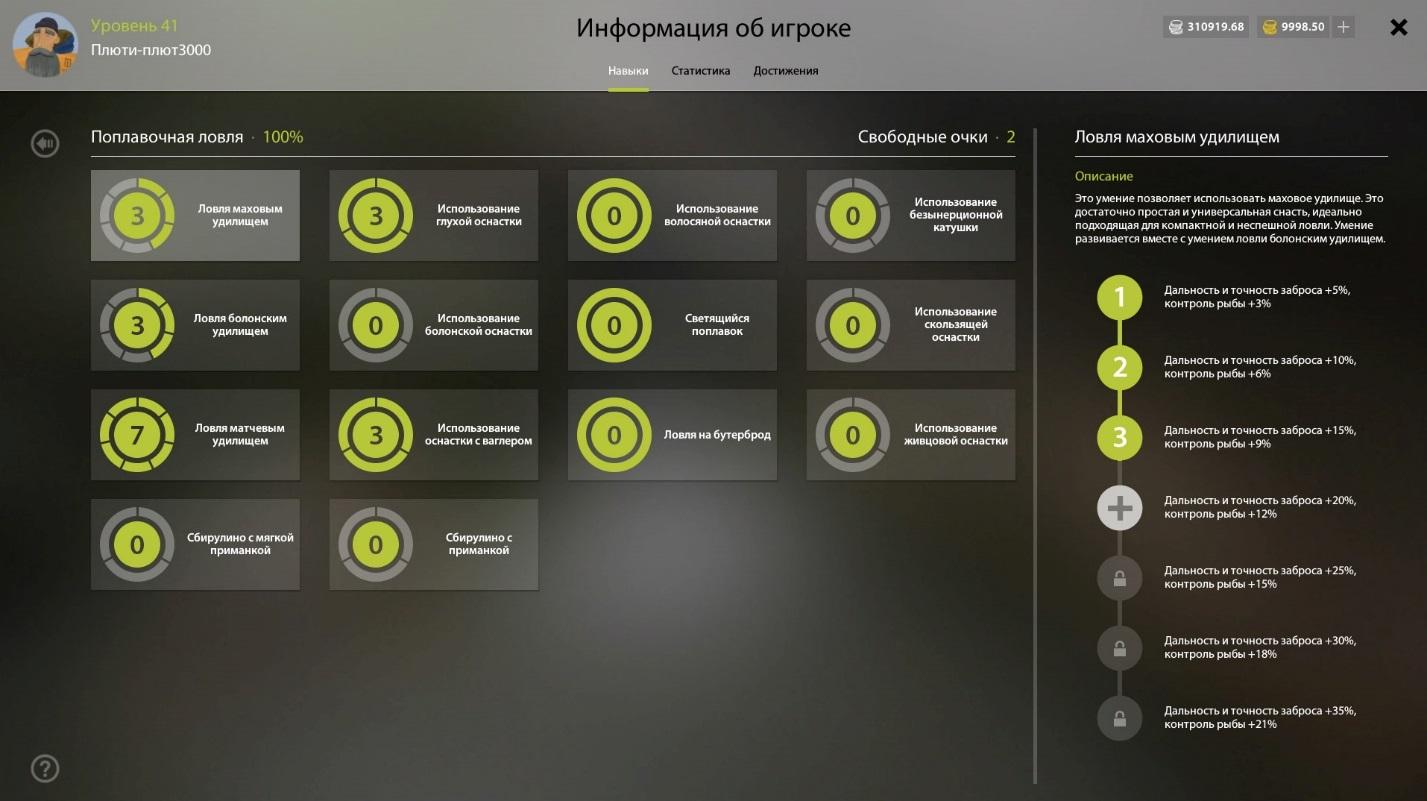
Fig. 33: Window for detailed information on the float fishing skill.
A detailed skill information window displays a list of all the skills that can be made available to the player as the skill is pumped. Click on the skill to get detailed information on it.
In the detailed information on the skill, which is displayed on the right side of the screen, the description and stages of the pumping of this skill is displayed (if pumping is available). To pump the skill, click on the plus button.
Boot skill is not a requirement. Skill and so will be available when you accumulate the necessary skill level. Bleeding develops the skill a few steps higher, if necessary.
Statistics
To view the statistics, open the control panel [ESC] and click on the "Statistics"
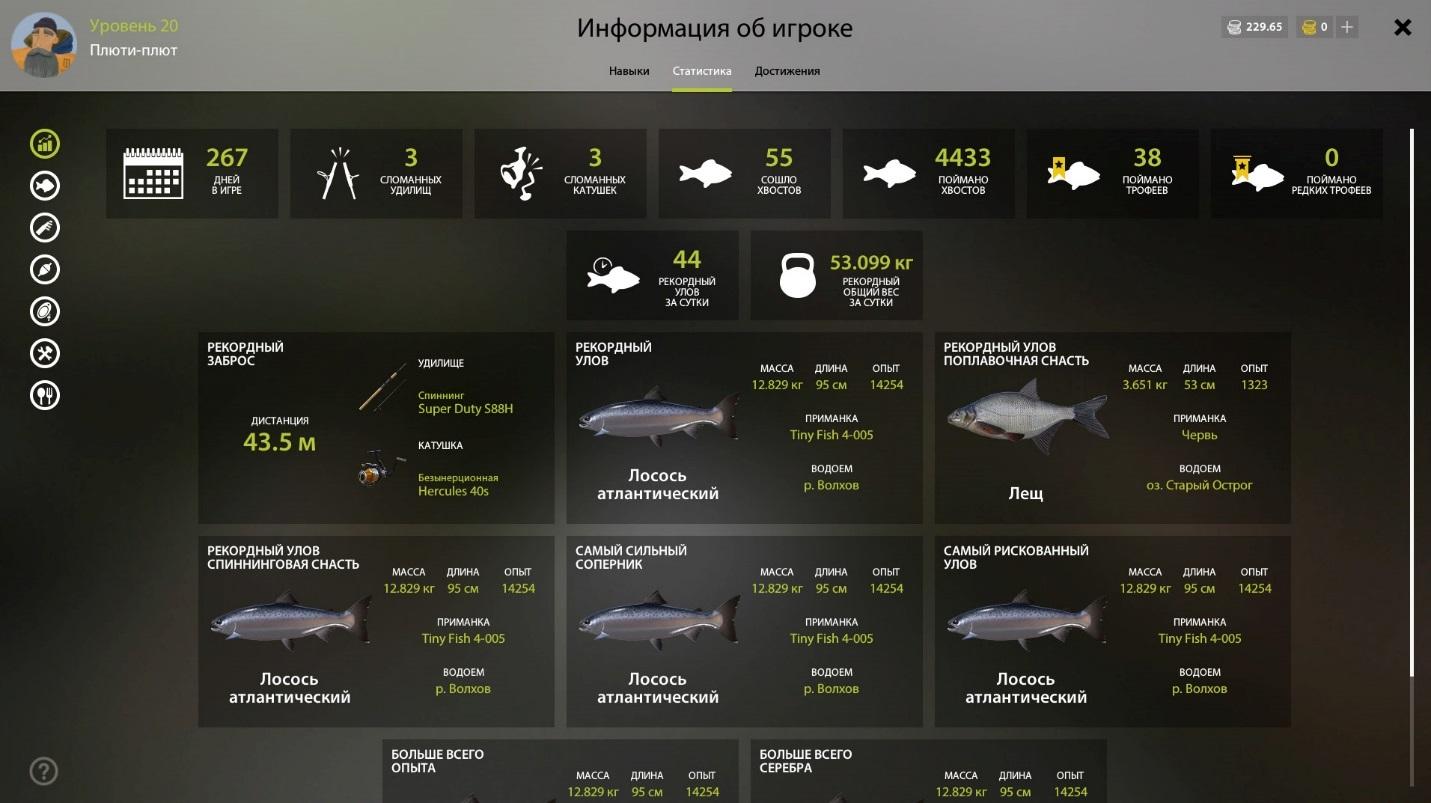
Fig. 34: Character statistics window.
The statistics window contains some interesting information that has accumulated during the game.
Achievements
To view personal achievements, open the control panel [ESC], click on the "Statistics" button and go to the "Achievements" tab.
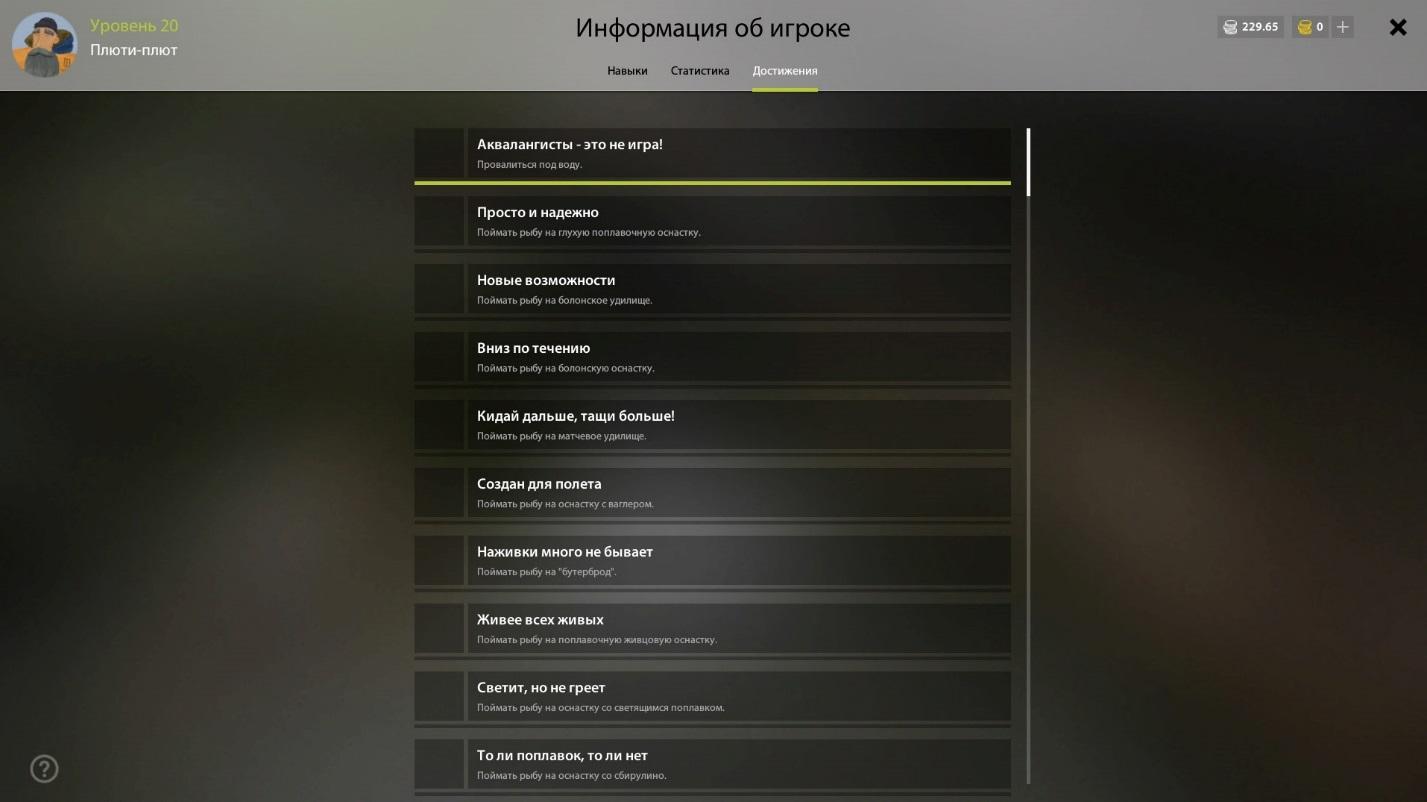
Fig. 35: Window of the player's achievements.
This window lists your personal achievements, the importance of which is difficult to overestimate.
Crafting
The crafting window lists all possible recipes, using which you can make something with your own hands.
In order to get into the crafting window, open the control panel [ESC] and click on the "Crafting" button.
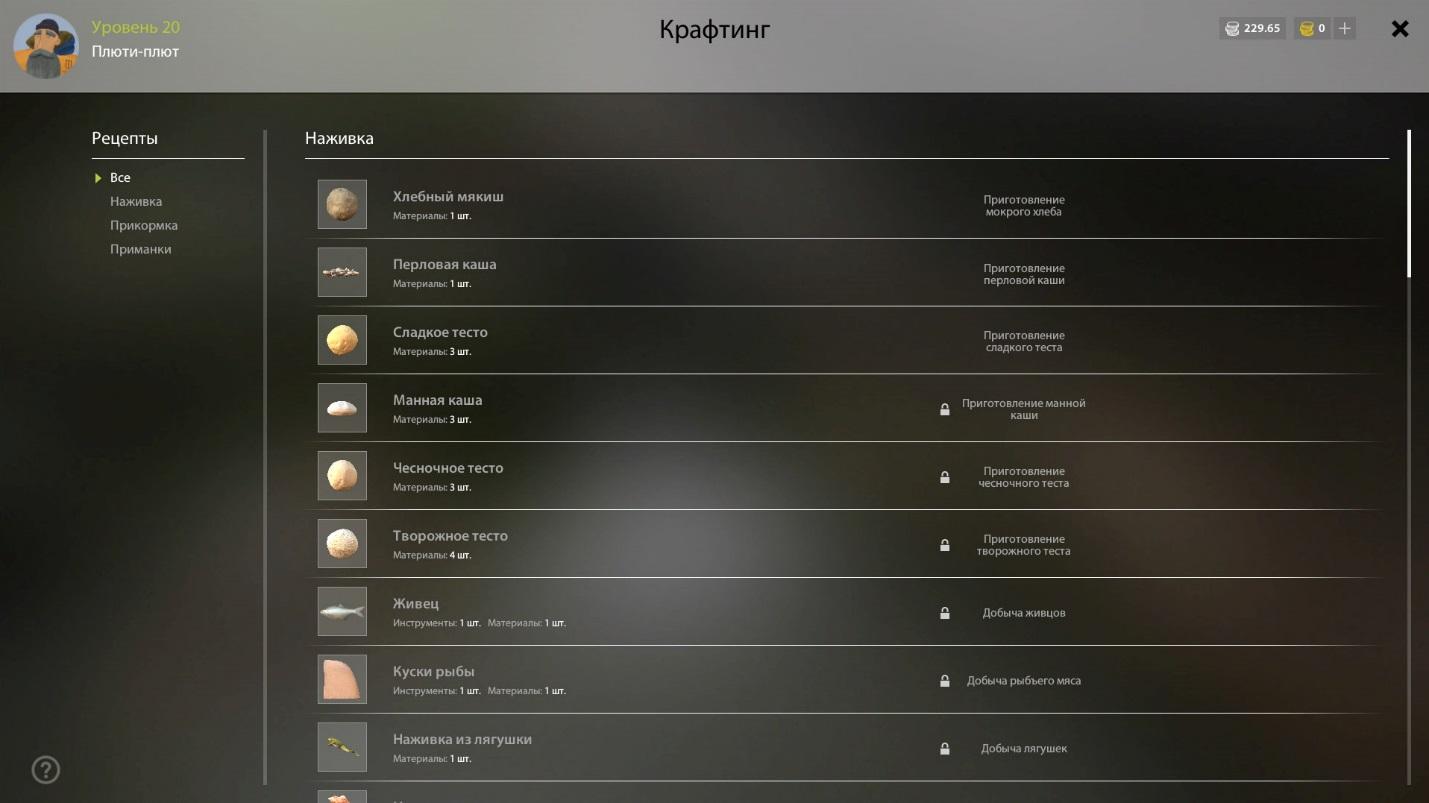
Fig. 36: The window of crafting and the list of recipes.
Select a recipe of interest from the list and click on it with the left mouse button [LMC] to get detailed information.
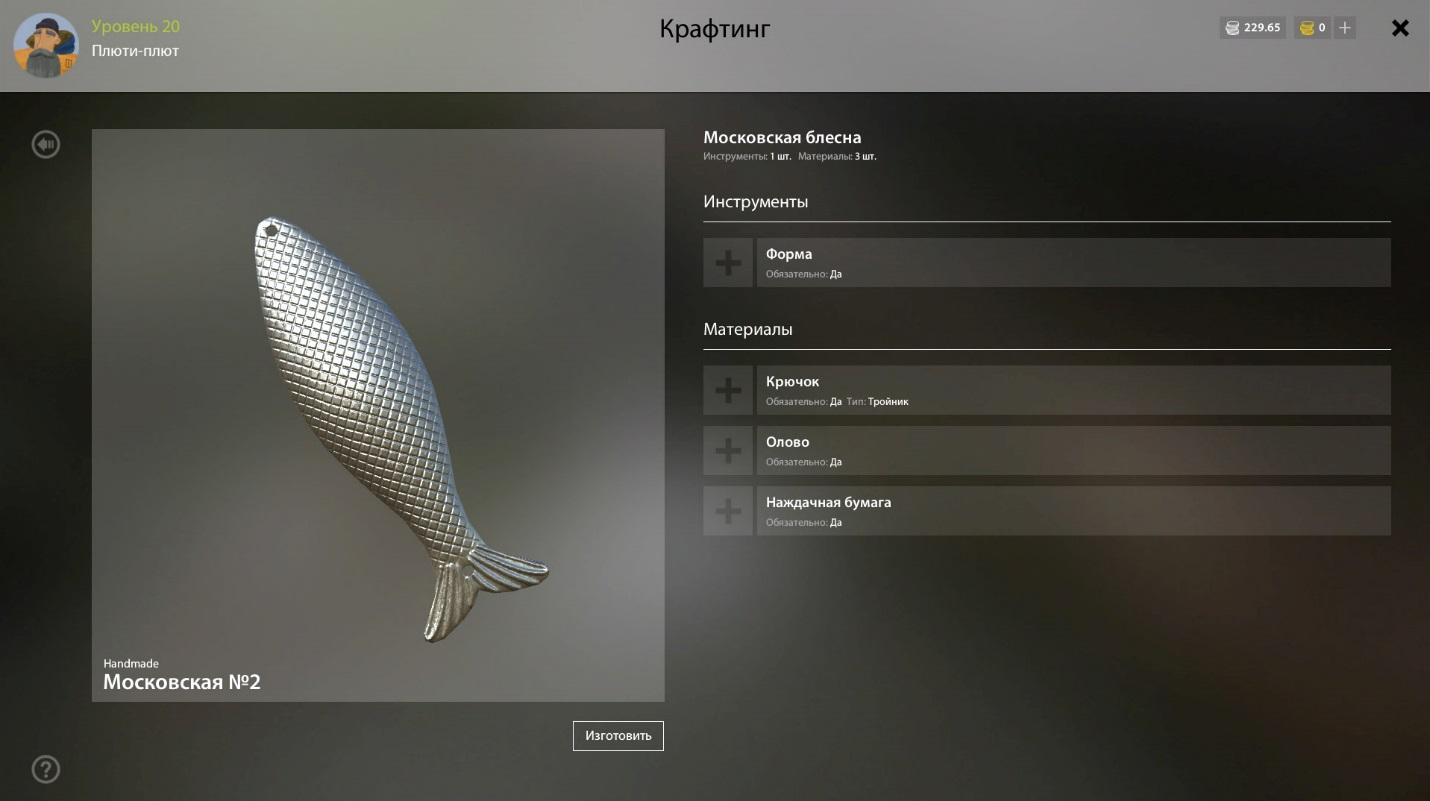
Fig. 37: A window of detailed information on the recipe for making a Moscow spinner.
In the detailed information on the recipe you can see the possible modifications of the manufactured item, as well as see a list of tools and components that need to be used to make this item.
To use the recipe, select the required components. When you select them, the window of your backpack will open, in which you must find and specify these components. Then click on the "Prepare" button.
Preparation of the object will take some time. The probability of a successful preparation of an object depends on the level of your skill.
The quality of the manufactured item also depends on the skill level of the player and the skill level used for this recipe.
After the successful execution of crafting, the player can gain an increase in skill.
Bait extraction
The bait is extracted in two ways: Through the crafting window (see the previous section) and through special tools such as a shovel or scoop.
To use a shovel or scoop, you need to take them in hand. This can be done in the backpack window or using the object's quick selection window [hold U].
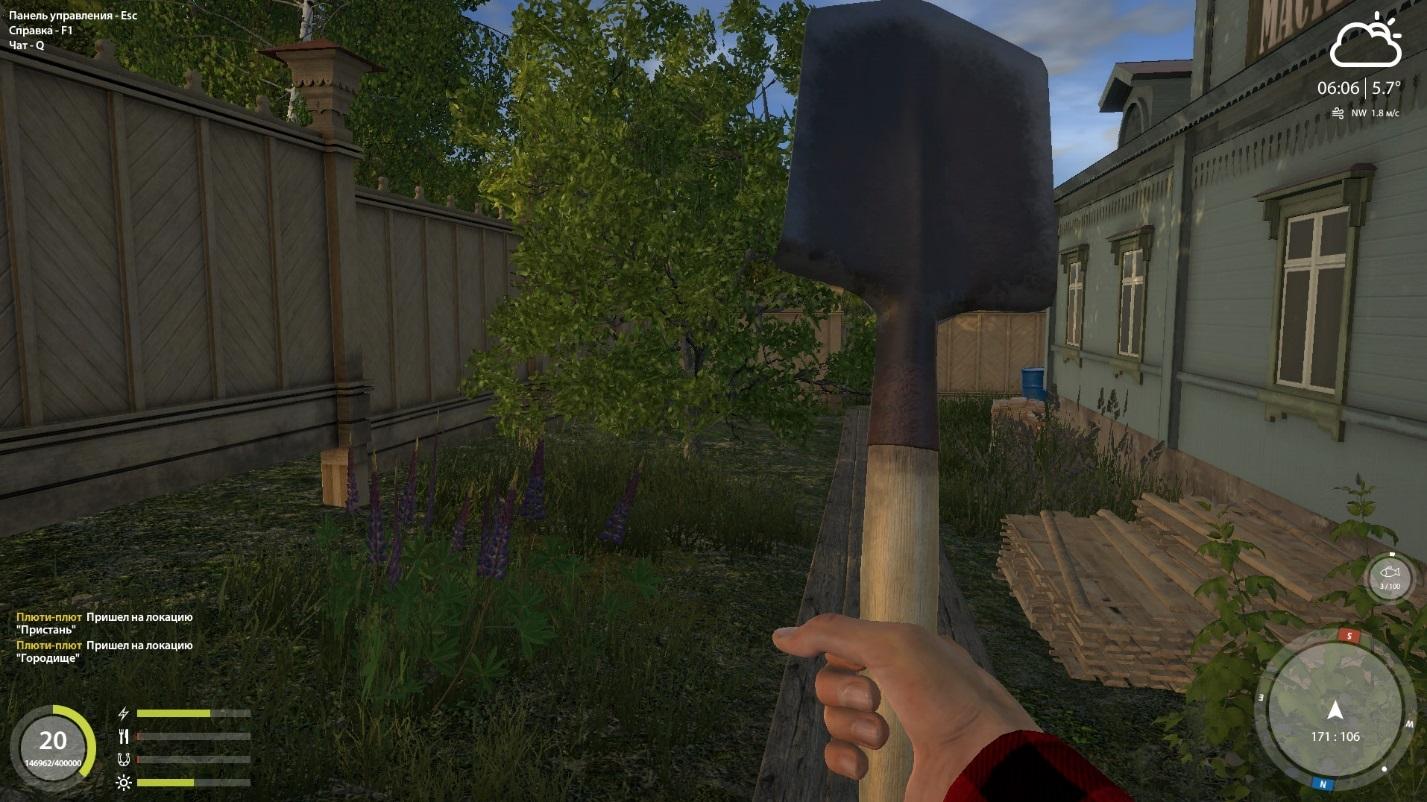
Fig. 38: A truck farmer with a shovel in his hands.
With the tool in hand, click the left mouse button [LMB] to perform the action - to dig the ground or scoop water.
Digging or scooping does not always end successfully. In some cases, to achieve the result, you need to repeat the action several times. If the bait is successfully mined, it will be demonstrated and put in a backpack.
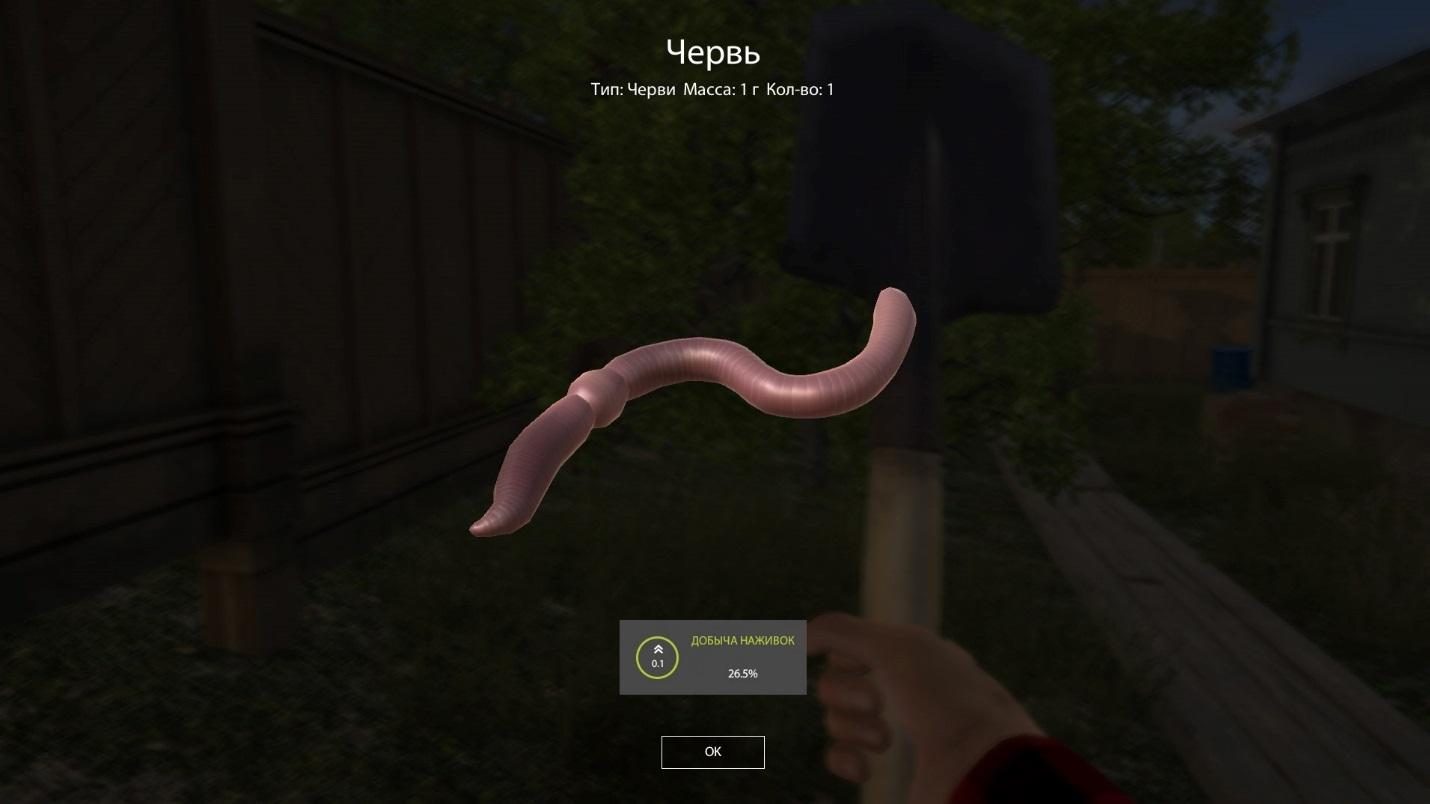
Fig. 39: Brought up by blood and then a worm. There is an additional reward in the form of points to the skill.
The quantity and type of baits produced depend on the level of pumping skill. At the first stage, the player can only get worms or bloodworms, but with the development of skill, the list of extracted baits will be significantly expanded.
In the process of working with the instrument, a large amount of energy is expended. Do not forget to feed the character, so that the production process takes place with maximum efficiency. The hungry person works reluctantly.
Lure
To prepare the bait, open the control panel [ESC] and press the "bait" button. After clicking, a window will open with the choice of bait type.
Ordinary bait is a classic mixture, kneaded in a bucket, which in the future can be pushed through feeding troughs, rockets, or molding balls from it.
PVA-stick is a soluble bag with a bait, which clings to the bottom rigging and is thrown together with it into the water. Dissolving in water, PVA-stick begins to exude unearthly aromas, luring fish from all ends of the reservoir.
The process of preparing bait is based on crafting recipes. To learn more about this process, please review the crafting section.

Fig. 40: The process of preparing bait.
As the first bait, you need to prepare the most simple and inexpensive mixture, which is quite suitable for feeding crucian carp or roach. A simple sweep should include a base and an additive.
Mixture for crucian carp: Ground biscuits + boiled millet.
Blend for roach: Ground breadcrumbs + bloodworms
To throw a ready bait into the water, you first need to take it in your hands. This can be done in a backpack or with the help of the quick access menu to items [hold U]. Throw the ball of bait into the water, holding the left mouse button [LMB] until the indicator of the strength of the throw reaches the desired value.
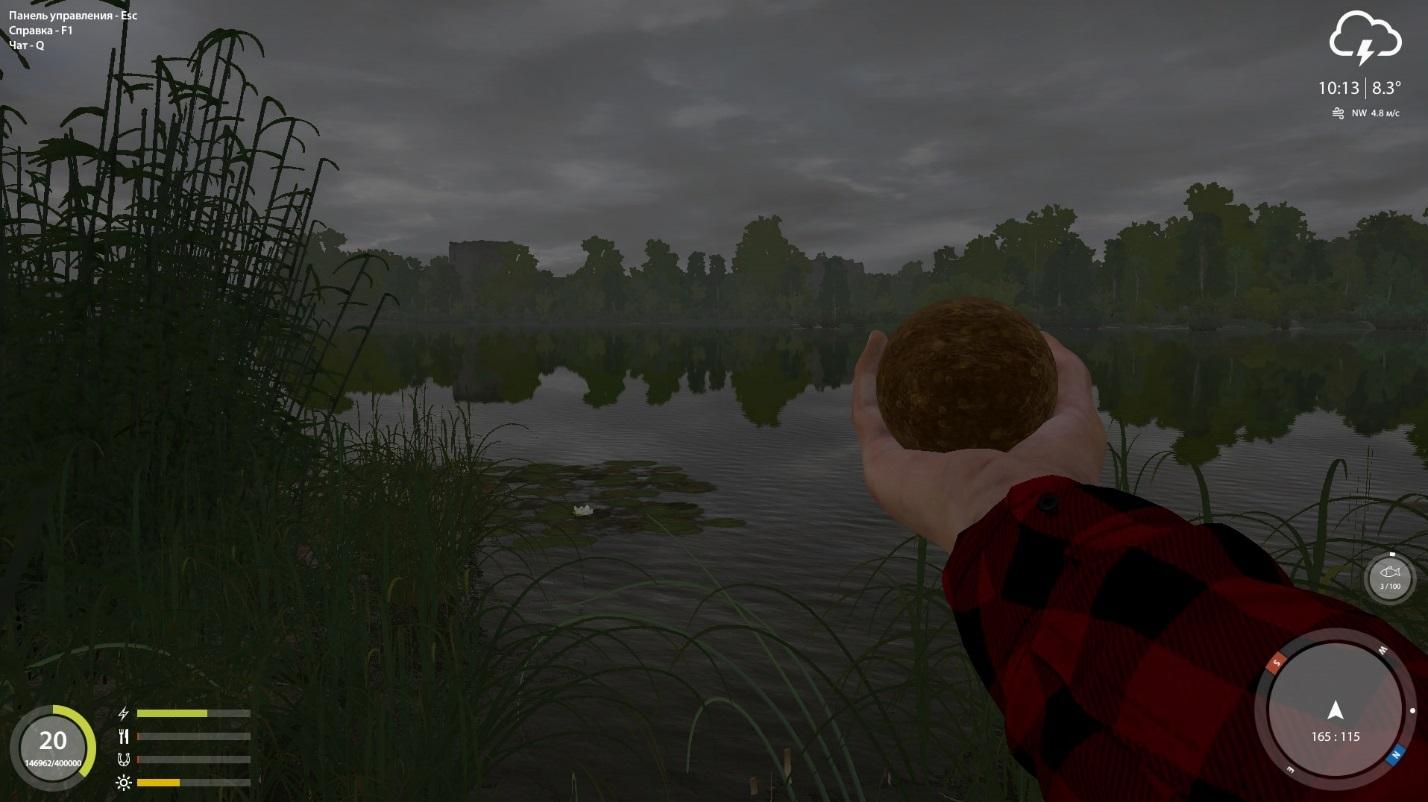
Fig. 41: Preparing for a bait cast.
When fishing for bottom rigging, the bait can be loaded into the feeding bowl. You can do this by configuring the snap-in components. Also, the bait can be thrown into the water with a special rocket, which allows you to feed large portions of bait over a long distance.
To achieve the maximum effect from the bait, it is necessary not only to prepare the right mixture, but also to properly feed the place.
Start with a good starting bar. To do this, throw in the place of catching 10-15 balls of bait. For the first time this will be enough. After 8 - 10 hours add food, throwing into the water a few more balls or one rocket. As the maintenance of the grounded place it is possible to use a little bait with the big maintenance of additives. Fish will be happy to dig into the mixture choosing a variety of supplements without the risk of overeating.
Add a little clay to the mixture. Clay is very fond of fish, in addition, it increases the viscosity of bait, prolonging the time of its action.
Flavors are a very powerful means of attracting fish. Experiment with the addition of a variety of flavors, this can give an impressive result.
Combine in a mixture of various bases and additives. This can significantly improve the efficiency of bait.
Weather
To view the weather forecast, open the control panel [ESC] and press the "weather" button. You will see a forecast for the next 7 days. The actual weather may differ from the forecast, which is quite natural.
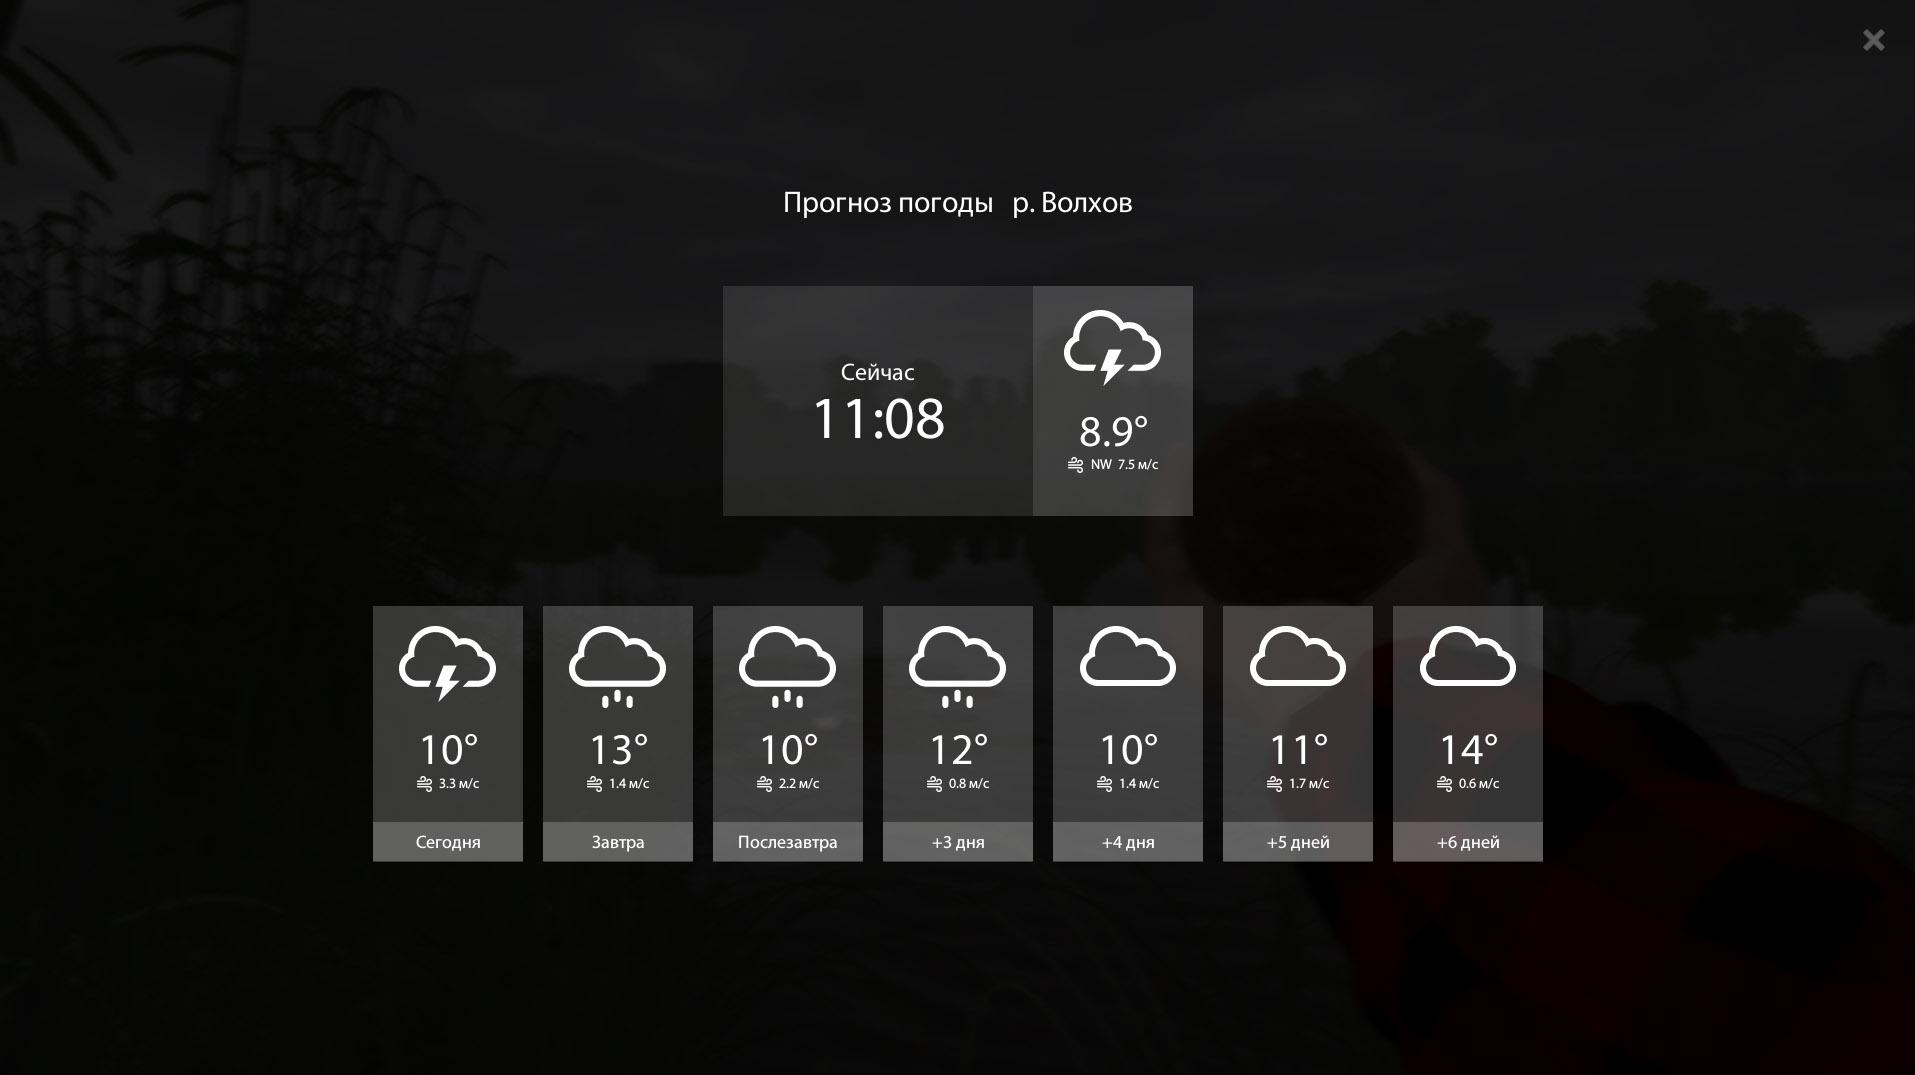
Fig. 42: Unpleasant weather forecast.
The effect of weather on fish depends on the temperature of the reservoir. If the water usually has warm weather, then a decrease in temperature will have a positive effect on fish activity. Clouds or rain will cool the surface of the water and revitalize the fish, this in turn will have a good effect on the biting. Increasing the temperature above normal can significantly reduce the activity of fish and spoil the biting.
In the case of northern water bodies, the weather may have the opposite effect, where a rise in the temperature of cold water on the contrary leads to an increase in fish activity.
Watch for reports of thunderstorms, which are often accompanied by a stormy wind. Being in such a weather in a boat can be extremely unpleasant, because strong wind gusts will not let you enjoy fishing on the open water.
Chat and private messages
Use chat and private messages to communicate with other users.
To open the chat window, press the [Q] button. The chat displays players who are with you within the same location. To send a message, enter the text in a special input window located at the bottom of the chat window.
The chat also displays some events and actions of players. For example, you can see there reports of caught trophies, set records or about a suddenly broken rod.
To access private messages, open the chat window [Q] and switch to the "Private Messages" tab. This can also be done using the control panel [ESC] by clicking on the "Private messages" button.
To send a private message to another player, you need to open the chat window [Q] and go to the "Players" tab. On the tab with the players are displayed neighbors by location. If the player you do not want is not in the list of neighbors, then try to find it using the search bar. Search will help you find a player regardless of his position and being online. To send a message, select the player and press the button with the envelope.
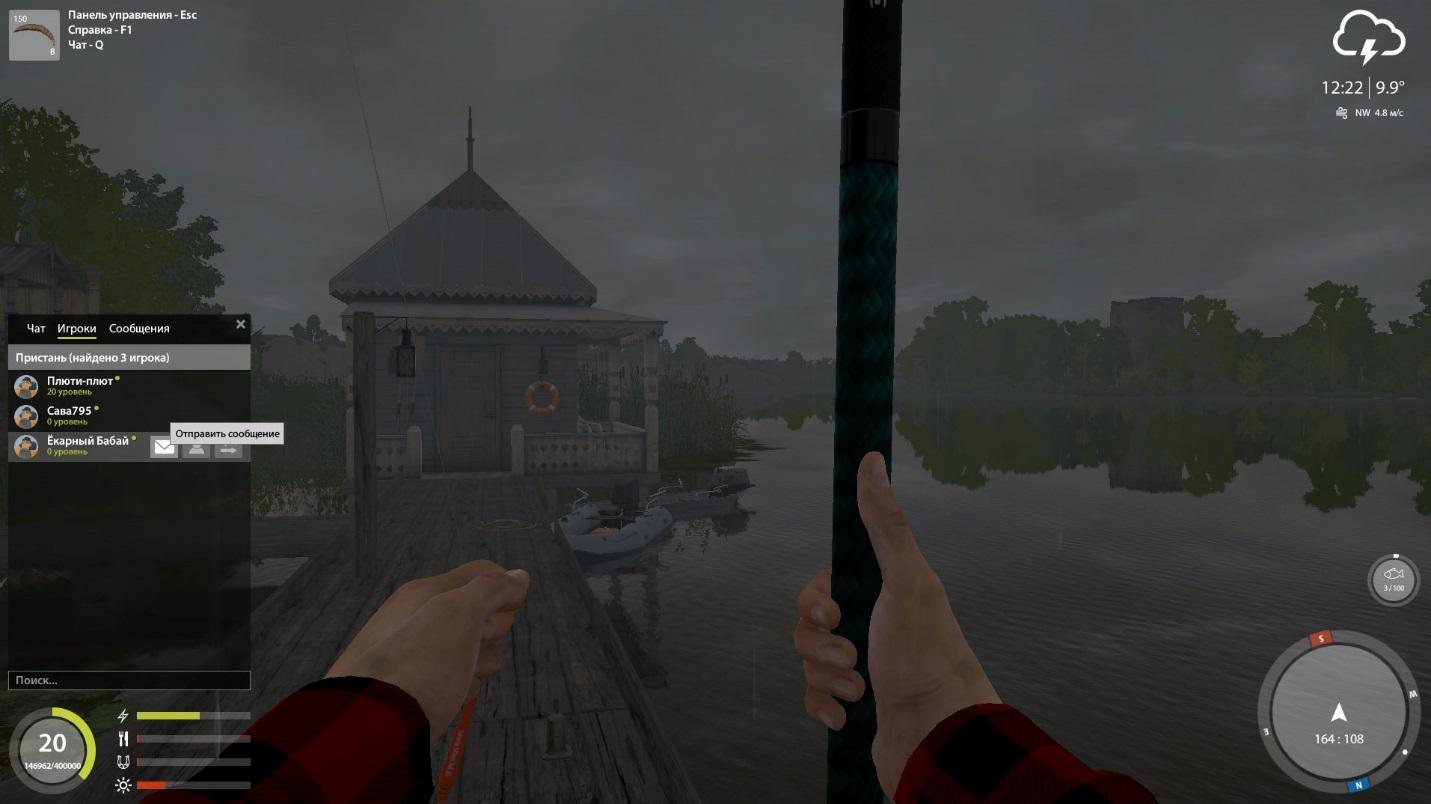
Fig. 43: Chat window and send a private message.
Using the system of private messages, you can send items. The submit item button is located next to the text entry window when sending a message (+). The item sending function is available only for premium subscribers. Any player can receive items.
Premium subscription
Premium subscription allows you to receive some bonuses and additional opportunities. Having registered a premium subscription, the player will be able to:
- Get additional experience when catching fish.
- Increase the chance of pumping fishing and crafting skills.
- Forward items via private messages.
The list of opportunities can be replenished in the process of game development.
Get a detailed description and purchase a premium subscription you can in your account on the site of the game.
How to earn money
The main source of income in the game is the sale of fish in the fish market.
Each type of fish has its own cost and the minimum estimated weight, from which the assessment of the fish is made at a full rate. Fish, not reaching its estimated weight, is usually sold for a pittance.
The cost of fish depends on its age and weight. The maximum revenue can be obtained from the sale of trophy specimens, which are estimated very highly.
Try to sell fish as quickly as possible, because spoiled fish is sold at a reduced rate. Its freshness preserves the fish during one real day.
How to get experience
The player gets experience when catching fish. The number of experience points depends on the fish, such as tackle and snap.
Tack type and number of experience gained in order of decreasing:
- Floating tackle - maximum number of experience points
- Spinning - the average amount of experience points
- Bottom tackle - low amount of experience points
To get an additional bonus to the experience points, try:
- Use ultralight and light rods, which are most often available for the arsenal of the spinner. Identify these rods by the presence of postfix "UL", "L" and "ML" in the name of the model or by the availability of bonuses in the detailed description of the rod.
- Take advantage of premium subscription
- To resort to the use of alcoholic beverages. Alcohol increases the amount of experience points, but to avoid serious consequences to consume it should be within reasonable limits.
Try to catch a rare and large fish that brings the most experience points.